background image

www.honeywell.com/security

70 | Performance 

Series 

Network Video Recorder User Guide

Click 

Save

 to save the new configuration. The NVR will return to the previous menu. 

Configuring the Network

Click the 

Network

 icon 

 in the 

Setting

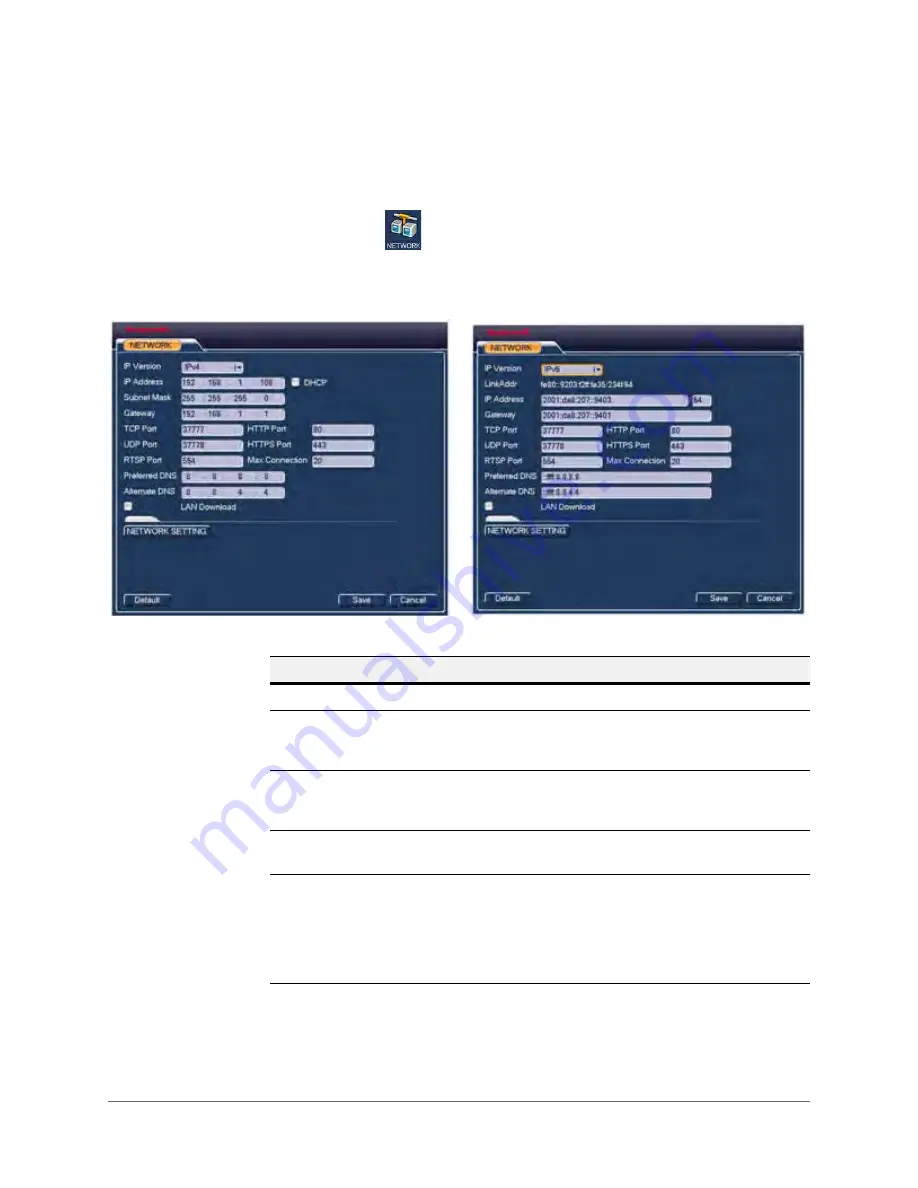
 interface to open the Network configuration 

interface.

Figure 3-27

Network Interface

Table 3-12

Network Configurations

Parameter

Function

IP Version

Select either 

IPv4

 or 

IPv6

. Both formats are supported.

MAC Address

Each NVR gets a unique MAC address. You can use the MAC 
address to connect to the NVR in the LAN. The MAC address 
is not configurable; it is read-only. 

IP Address

Use the Up/Down arrows (

/

) to select an IP address, or 

use the keyboard to enter an IP address. Then configure the 
corresponding subnet mask for the default gateway. 

Subnet Prefix

Select from 

0

 to 

128

. Used to mark a specified network MAC 

address. 

Default Gateway

Enter the default gateway. 

Note

The system needs to check the validity of all IPv6 
addresses. The IP address and the default gateway 
must be in the same IP section. The specified length of 
the subnet prefix must have the same string. 

IPv4

IPv6

Summary of Contents for HEN04101(X)

Page 1: ...Document 800 18160 Rev B 07 2014 User Guide Performance Series Network Video Recorder HEN04101 X HEN04111 X HEN04121 X ...

Page 2: ......

Page 3: ...User Guide ...

Page 4: ...s A 06 2014 New document B 07 2014 Added model number HEN0401 X Removed references to PTZ kept references that are clearly seen in GUI Changed the name of the document Corrected some erroneous references to cameras instead of NVRs ...

Page 5: ... be performed only by qualified and experienced technicians to conform to all local codes and to maintain your warranty Regulatory Statements FCC Compliance Statement Information to the User This equipment has been tested and found to comply with the limits for a Class B digital device pursuant to part 15 of the FCC Rules These limits are designed to provide reasonable protection against harmful i...

Page 6: ...ate the equipment This Class B digital apparatus complies with Canadian ICES 003 Cet appareil numérique de la Classe B est conforme à la norme NMB 003 du Canada Manufacturer s Declaration of Conformance North America The equipment supplied with this guide conforms to UL 60950 1 and CSA C22 2 No 60950 1 Europe The manufacturer declares that the equipment supplied is compliant with the essential pro...

Page 7: ...ding amplifiers 5 WATER AND MOISTURE Do not use this unit near water or in an unprotected outdoor installation or any area classified as a wet location 6 MOUNTING SYSTEM Use only with a mounting system recommended by the manufacturer or sold with the product 7 ATTACHMENTS Do not use attachments not recommended by the product manufacturer as they may result in the risk of fire electric shock or inj...

Page 8: ...the model number serial number and the nature of the problem available for the technical service representative Prior authorization must be obtained for all returns exchanges or credits Items shipped to Honeywell without a clearly identified Return Merchandise Authorization RMA number may be refused ...

Page 9: ...se Functions 32 2 Installation 33 Alarm Connection 33 Alarm Configuration 33 Bi Directional Communication Connection 34 Audio Output Device to a PC 34 Connect 34 Configuring to Hear Audio From the NVR 34 PC to an Audio Input Device 34 Connect 34 Configuring to Hear Audio from the PC 35 Hard Disk Drive Installation 35 Hard Disk Drive Recommendations 35 Installing a HDD 35 Network Connection 38 3 NV...

Page 10: ...ting Down the NVR 125 4 Honeywell Configuration Tool 127 Starting the Honeywell Configuration Tool 127 Installing the Honeywell Configuration Tool 127 Opening the Honeywell Configuration Tool Searching for Devices and Opening a Web Client 129 Upgrading a Single Device IP Camera or NVR 130 Upgrading the IP Devices Batch Upgrade 133 Modifying the IP Address 136 5 Web Operation 139 Preparing to Use t...

Page 11: ...arms 182 Configuring External Alarms 182 Configuring for No Signal 183 Configuring for Abnormalities 184 Configuring Storage 185 Configuring Schedules for Storage 185 Configuring Local Storage for Schedules 187 Configuring the HDD Group Settings 187 Configuring Recording Settings 188 Configuring the Channel for Schedules 189 Configuring Settings 190 Configuring General Settings 190 General Setting...

Page 12: ...The remote control does not work 207 Problem You have forgotten the local menu operation password or network password 208 Problem There is no video the screen is black 208 Problem When viewing multiple channels in the client end the video is not smooth 208 Appendix B Daily Maintenance 209 Appendix C Compatible SATA HDD 211 Appendix D Compatible USB 2 0 Devices 215 Appendix E Compatible Monitors 21...

Page 13: ...Connections 38 Figure 3 1 Multiple channel Display Mode 40 Figure 3 2 System Login Window 40 Figure 3 3 Electronic Keyboard 41 Figure 3 4 Main Menu 42 Figure 3 5 Preview Control Interface 43 Figure 3 6 Right cut Menu 44 Figure 3 7 Main Menu 45 Figure 3 8 Search Interface 45 Figure 3 9 Card Number Search Interface 49 Figure 3 10 Information Tab 50 Figure 3 11 HDD Information Tab 51 Figure 3 12 HDD ...

Page 14: ...onnection Failure 88 Figure 3 45 SNMP Configuration Interface 89 Figure 3 46 Auto Register Configuration Interface 90 Figure 3 47 Alarms Configuration Interface 91 Figure 3 48 Detect Configuration Interface 96 Figure 3 49 Video Loss Configuration Interface 100 Figure 3 50 Camera Masking Configuration Interface 103 Figure 3 51 Display Configuration Interface 107 Figure 3 52 NVR Real Panel PoE Ports...

Page 15: ...ecting Net in the ConfigTool 137 Figure 5 1 IE Window 141 Figure 5 2 Configuring the ActiveX Controls 142 Figure 5 3 Login Interface 142 Figure 5 4 LAN Mode Main Window 143 Figure 5 5 LAN Main Window Function Buttons 143 Figure 5 6 Monitor Channels Section 144 Figure 5 7 Open All Button 144 Figure 5 8 Start Talk Button 144 Figure 5 9 Instant Record Button 145 Figure 5 10 Local Play Select a File I...

Page 16: ...gure 5 45 IPC External Alarm Configuration Interface 183 Figure 5 46 No Signal Configuration Interface 183 Figure 5 47 Configuring for Abnormalities 184 Figure 5 48 Schedule Configuration Interface 186 Figure 5 49 Set Configuration Interface 186 Figure 5 50 Local Storage Configuration Interface for Schedules 187 Figure 5 51 HDD Setting Configuration Interface 187 Figure 5 52 Record Configuration I...

Page 17: ... Figure 5 70 Preview Control Configuration Interface 202 Figure 5 71 Version Configuration Interface 202 Figure 5 72 Log Configuration Interface 203 Figure 5 73 Online User Configuration Interface 204 Figure 5 74 Login Interface 204 ...

Page 18: ...www honeywell com security 18 Performance Series Network Video Recorder User Guide ...

Page 19: ...n 52 Table 3 8 General Settings 61 Table 3 9 Encode Configurations 64 Table 3 10 Schedule Configurations 67 Table 3 11 RS232 Configurations 69 Table 3 12 Network Configurations 70 Table 3 13 IP Filter Configurations 74 Table 3 14 NTP Configurations 75 Table 3 15 Time Zones 75 Table 3 16 Multicast Configurations Special IP Addresses 76 Table 3 17 DDNS Configurations 78 Table 3 18 UPnP Configuration...

Page 20: ... 161 Table 5 12 Network Connection Configurations 162 Table 5 13 CDMA GPRS Configurations 164 Table 5 14 DDNS Configuration Options 166 Table 5 15 DDNS Configurations 167 Table 5 16 Email Configurations 169 Table 5 17 SNMP Configurations 172 Table 5 18 Motion Detection Configurations 175 Table 5 19 Local Alarm Configurations 180 Table 5 20 Configuring for Abnormalities 184 Table 5 21 Schedule Conf...

Page 21: ...ncluding how to log into your NVR and how to configure your NVR s settings Chapter 4 Honeywell Configuration Tool describes how to install and use the Quick Configuration tool for configuring your NVR Chapter 5 Web Operation describes how to connect to your NVR over the internet the user interface and how to remotely configure and operate your NVR Appendix A Troubleshooting describes possible prob...

Page 22: ...BD2PR1 1080p True Day Night IR Bullet IP Camera Quick Installation Guide 800 17077 Describes the physical setup of a HBD2PR1 ball camera Performance Series IP Cameras User Guide 800 18161 Describes the Performance Series IP Cameras how to install them how to configure them and how to operate them Font What it represents Example Helvetica Keys on the keyboard Press Ctrl C Lucida Values of editable ...

Page 23: ...s words that vary depending on the situation Enter your user name Cross reference to external source Refer to the Embedded NVR Quick Installation Guide Cross reference within document See Chapter 2 Configuration Font What it represents Example ...

Page 24: ...www honeywell com security 24 Performance Series Network Video Recorder User Guide ...

Page 25: ...er It supports Local preview Multiple window display Local recorded file storage Remote control and mouse shortcut menu operation Remote management Control The Performance Series Network Video Recorder also features multiple storage options Central storage Front end storage Client end storage Because of the flexibility of its design the Performance Series Network Video Recorder can be used in a va...

Page 26: ... The alarm input can be derived from various connected peripheral devices Network Monitor The NVR supports the transmission of audio video data that is compressed by an IP camera which is then decoded for display The delay time is less than 500 ms sufficient network bandwidth support is required Supports a maximum of 10 connections Compatible to broadcast audio video with the following transmissio...

Page 27: ...s viewing real time system resources information and running statistics display Supports log file Supports local GUI output and shortcut menu operation with a computer mouse Supports IR control using shortcut menu operation with a computer mouse Supports IP camera remote video preview and control Table 1 1 Performance Series Network Video Recorder Features Category Features Table 1 2NVR Front Pane...

Page 28: ...lick to adjust the playback speed Various slow playback speeds are available Fast Play Click to adjust the playback speed Various fast playback speeds are available Reverse Pause II Normal playback Click to reverse playback Reverse playback Click to pause playback Play Pause II Reverse playback or pause mode Click to return to normal playback mode Normal playback Click to pause playback Pause mode...

Page 29: ...tion Table 1 3NVR Back Panel Components Icon Marker Port Component Name Connection Function USB 2 0 Port Connect a USB 2 0 mouse Network Port 10 M 100 M 1000 Mbps self adaptive Ethernet port Connect to a network cable RS232 RS 422 232 Debug COM For general COM debugging to configure the IP address or to transfer transparent COM data HDMI High Definition Media Interface High definition audio and vi...

Page 30: ...er to the external alarm device NO Normally open alarm output port C Alarm output public end Power Input Port Input 12 V DC Power Button Power On Off button PoE Ports The built in switch supports PoE function It also supports up to 48 V 50 W Power Input Port Switch power port Input 48 V DC VIDEO OUT Video Output Port CVBS output MIC IN Audio Input Port Bi directional communication input port It re...

Page 31: ...er a number or letter uppercase lowercase In this mode is the backspace button and _ is the space button English input mode is the delete previous character button and _ is the backspace space button Number input mode is the delete previous number button and _ is the clear button Table 1 5 Double click Left Mouse Button Functions Start a special control operation such as double clicking an item in...

Page 32: ...control Define a motion detection zone Define a privacy mask zone Table 1 6 Single click Right Mouse Button Functions When in real time monitoring mode single clicking the right mouse button opens the popup shortcut menu Click to exit the currently open menu without saving any changes Table 1 7 Mouse Wheel Functions Number input mode Increase or decrease the number s value Enable disable a check b...

Page 33: ...s For the NC alarm device please connect to the NC C ports Note The NO C ports are for NO alarm devices only Alarm Configuration 1 Open the web client login and go to the Alarm setup interface to set the alarm input and output Configuring Alarms on page 90 The alarm setting 01 corresponds to the device s first channel I O port and so on 2 Set the NO NC type according to the high low level the alar...

Page 34: ... monitor Figure 2 3 Enabling Bi Directional Communication Configuring to Hear Audio From the NVR At the NVR end speak through the microphone or the pickup Then you can get the audio from the speaker or earphone from the PC end Figure 2 4 Configuring to Hear from the NVR PC to an Audio Input Device Connect 1 Connect the microphone or the pickup to the audio output port in the PC 2 Connect the earph...

Page 35: ...tallation CAUTION Disconnect power if your NVR is connected to a power source Note The images in this section are for reference only Your hard disk drive might be different from the one shown Hard Disk Drive Recommendations See Compatible SATA HDD on page 219 for a list of recommended Hard Disk Drive HDD brands and models Please use a HDD of 7200 rpm or higher Do not use a PC HDD Installing a HDD ...

Page 36: ...oving the NVR Cover 2 Loosen four screws in the HDD Figure 2 7 Loosening the Four Screws in the HDD Housing 3 Align the HDD with the four holes in the bottom of the NVR housing Figure 2 8 Placing the HDD 4 Turn the NVR upside down and then turn the screws to firmly attach the HDD to the NVR housing ...

Page 37: ... Housing 5 Connect the HDD cable and power cable Figure 2 10 Connecting the HDD and the Power Cable 6 Replace the NVR cover Figure 2 11 Replacing the NVR Cover 7 Secure the NVR cover in place by turning the screws in the rear and side panels Figure 2 12 Securing the NVR Cover ...

Page 38: ...www honeywell com security 38 Performance Series Network Video Recorder User Guide Network Connection Follow this diagram to connect your NVR to the network Figure 2 13 Network Connections ...

Page 39: ...ions on configuring the NVR Logging In to Your NVR Before you can open the GUI for your NVR you must do the following 1 Connect your NVR to a monitor 2 Connect the mouse and power cable to the NVR 3 Click the power button on the NVR s rear panel to turn on the NVR The NVR will boot up and you will see the GUI which is in multiple channel display mode and the default mode ...

Page 40: ...nel displays its channel recording and alarm status information Logging In 1 Left click anywhere on the GUI The System Login window appears Figure 3 2 System Login Window 2 Click to select the Password field An electronic keyboard appears Table 3 1 Channel Recording and Alarm Status Icons Icon Status Icon Status Recording status Video loss Motion detection Camera lock ...

Page 41: ...ase and punctuation symbols The NVR has four default accounts 4 Click Enter on the electronic keyboard and then OK on the login window The Main Menu appears Table 3 2 Default Accounts Username Password Profile admin 1234 Administrator local network 88i8888 888888 Administrator local only 666666 666666 Lower authority user who can only monitor live and video play back backup video default default H...

Page 42: ...nd that you modify your password after first login CAUTION If you fail three times at logging within 30 minutes you will receive a system alarm If you fail five times at logging within 30 minutes you will be locked out of your account Restart the NVR to unlock it Live View Preview Control With the preview control you can do the following ...

Page 43: ...ction the control bar automatically disappears Table 3 3 Preview Controls Icon Name Function Real time playback Click to play back the previous 5 to 60 minutes of recorded video from the current channel Go to the Main Menu Setting General to configure the real time playback settings See Configuring the General Settings on page 60 You might see a popup window if there is no video recorded for the c...

Page 44: ...ur is started You can not control Preview Playback until the Tour has ended Right Click Menu After you have logged in to the NVR right click the mouse and the right cut menu appears Figure 3 6 Right cut Menu Main Menu After you have logged in to the NVR the NVR s main menu appears Manual snapshot Click to manually take a snapshot of the current live video Remote device add shortcut Click to open t...

Page 45: ...NVR Configurations 45 800 18160 B 07 2014 Figure 3 7 Main Menu Search and Playback Click to open the Search interface Figure 3 8 Search Interface 1 7 8 12 2 3 4 5 10 9 6 11 ...

Page 46: ...the file you want to play Note The redundancy HDD does not support snapshot backup It supports picture playback You can select to play from the redundancy HDD if there are snapshots saved to the redundancy HDD 3 Calendar If the date is highlighted in orange that means that there is a picture or file recorded for that date While in any playback mode click on the date you want to see You will see th...

Page 47: ...ust be less than 25 of the HDD total space The first 16 G of each partition cannot be locked The system can lock only one file at a time and cannot lock the extra streaming file You cannot lock a file that is currently writing or overwriting 6 Card Number Search 7 Playback Control Panel See Table 3 5 on page 49 for more about the Playback Control interface 8 Time Bar Displays the recording type an...

Page 48: ...at file A slide bar appears that corresponds to the channel for the recorded video 2 Adjust the time slide bar or enter a specific time for the recorded file end time 3 Click Clip again and then save the current file as a new file 12 Record Type While in any playback mode the time bar changes if you modify the Search type OTHER FUNCTIONS 14 Other Channel Synchronization Switch to Play When Playing...

Page 49: ...use the currently playing file click or to begin Frame by frame Playback In frame by frame playback click to return to Normal Playback Slow Play In Playback Mode click to start Slow Playback Click again to adjust the slow playback speed Fast Forward In Playback mode click to start Fast Forward Playback Click again to adjust the fast forward playback speed Note The actual playback speed is affected...

Page 50: ...ries Network Video Recorder User Guide Information You can view the following information on the Information tab HDD INFO hard disk information BPS data stream statistics Log Version Online Users Remote Device Network Figure 3 10 Information Tab ...

Page 51: ... up to two HDDs Note If the disk is damaged you will see in the Status column Remove the broken disk before adding a new one Viewing the HDD Recording Time Information Click View recording time in the HDD INFO interface The HDD recording time interface for the selected HDD appears Table 3 6 HDD Drive Status Symbols Symbol Meaning o The currently selected HDD is normal There is no HDD The disk is d...

Page 52: ...is connected to your NVR When the second HDD is the currently working HDD you see Type The type of the connected HDD Total Space The total capacity of the connected HDD Free Space The total free capacity of the connected HDD Status Indicates if the HDD is working correctly or not Bad Track Indicates that there is a bad track Page Up Click to view the previous page Page Down Click to view the next ...

Page 53: ... 07 2014 Figure 3 13 BPS Interface View the current video data stream in KB s and the stored hard disk storage MB h Log Click LOG in the INFO tab to open the LOG interface The LOG tab displays system log information Figure 3 14 Log Tab ...

Page 54: ... has been saved the folder is named Log_time on the save path Double click the folder to see the file Details Click the Details button or double click the log item to view detailed information about that file Figure 3 15 Detailed Information About a Log File Use the rolling bar at the bottom to scroll through information about the file Use Previous Next to view other log information For alarm even...

Page 55: ...owing information about your NVR The channel Alarm in Alarm out System version Build date Web client software build number Serial number Online Users Click ONLINE USERS in the INFO tab to open the ONLINE USERS interface On the Online Users interface you can see the users who are connected to the local NVR ...

Page 56: ...nistrator rights Remote Device Information Tab Click REMOTE DEVICE in the INFO tab to open the REMOTE DEVICE interface On this tab you can view the channel status of the remote device the connection log etc Channel Status View the IP camera IPC status for the corresponding channel such as motion detection video loss camera masking and alarms Figure 3 18 Channel Device Status ...

Page 57: ... offline Figure 3 19 Connection Log Network Information Click NETWORK in the INFO tab to open the NETWORK interface In the Network Test tab you can test your network connection and see the average delay and packet loss rate In the Network Load tab you can see the network information for all connected network adapters including connection status send rate and receive rate ...

Page 58: ...0 You might need to use the drop down menu to find your device 3 Click Browse to select the save path 4 Click the Begin Sniffer button in the column on the right to start the Sniffer All connected adapter names appear in the found network adapters table Adapter names can include Ethernet PPPoE WIFI and 3G To stop the Sniffer click the gray Stop button Note You can not Sniff several network adapter...

Page 59: ...nformation configuration interface View and follow the statistics for the device s network adapter Click to select a network adapter in the found network adapters table Figure 3 21 Network Load Interface The flow statistics such as send rate and receive rate appear in the top panel Settings In the Main Menu highlight the Setting icon and double click your mouse The Setting interface appears Click ...

Page 60: ...mance Series Network Video Recorder User Guide Figure 3 22 Setting Interface Note You need to have the proper rights to configure the Settings Configuring the General Settings Click the GENERAL icon to open the General Settings interface ...

Page 61: ...ormats YYYY MM DD MM DD YYYY or DD MM YYYY Date separation format Select from three formats dot hyphen or slash Daylight Saving Time DST Configure the DST time and date 1 Enable DST then click Set The DST interface appears 2 Configure the Start time and End time by either configuring the Week setup as shown above Or by configuring the date setup as shown below 3 Click OK to save the new settings ...

Page 62: ...NVRs Assign a device number for each NVR Video standard Select from NTSC or PAL Realtime play Configure the playback time for Preview Select from 5 to 60 minutes Device ID Enter a device name Holiday setting Click Setup on the General setting interface to open the Holiday Setting interface Go to the Holidays Period interface to set the holiday recording setup See Holiday Settings on page 197 Note ...

Page 63: ...ou check to enable the Startup wizard then the next time the NVR restarts it will open to the Startup wizard If you do not check to enable the Startup wizard the NVR opens to the login interface Auto logout Configure how long the user can be inactive before the NVR automatically logs out the inactive user Select from 0 to 60 minutes Navigation bar Check to enable the navigation bar and it appears ...

Page 64: ...ifferent recording types Compression The NVR supports H 264 MPEG4 and MJPEG Resolution The mainstream resolution type is IP camera s encoding configuration Select from 1080p 720p D1 SXGA 1280x960 Frame Rate Select from 1 f s to 25 f s in NTSC mode 1 f s to 30 f s in PAL mode Bit Rate Type Select from CBR and VBR If you select VBR then you can configure the video quality Bit Rate Select from 4096 6...

Page 65: ...mask zone then when the NVR is in Preview status the privacy mask zone can not be viewed by users If you select Monitor for a privacy mask zone then when the NVR is in Monitor status the privacy mask zone can not be viewed by users Time display Select whether the NVR displays the time during playback Click Set and then drag the time display to the desired position on the video Channel display Sele...

Page 66: ...e to an internal and or external alarm trigger Image Size Choose an image size Image Quality Choose from 1 to 6 The higher the number the higher the quality of the snapshot Snapshot Frequency Choose from 1 to 7 SPP seconds per picture Copy After you have finished configuring the current channel you can click Copy to copy the current setup to other channels The currently selected channel is in gray...

Page 67: ...s Select from 1 to 30 seconds depending on the bit stream Redundancy You can configure the NVR to backup recorded files onto two different HDDs Click to enable Note Before you can enable this function you must configure at least one HDD as redundant Go to Main Menu Advanced HDD Management Note This function is not available if there is only one HDD Snapshot Click to enable the Snapshot function wh...

Page 68: ... a channel The Copy interface appears Figure 3 26 Copy Interface The currently selected channel is highlighted in gray 2 Click to select the channel or channels to which you want to copy the settings Click All to select all channels 3 Click OK in the Copy interface then click OK again in the Encode Schedule interface to complete the copy function Note If you select All then the recording setup for...

Page 69: ...ter Connect to the PC to directly transfer data Protocol COM Used for card overlay Network Keyboard Use the special keyboard to control the NVR PTZ Matrix Use to connect to the peripheral matrix control The default setting is Console Baudrate Select an appropriate baud rate The default setting is 115200 Data Bits Select an appropriate data bit Select from 5 to 8 The default setting is 8 Stop Bits ...

Page 70: ...NVR gets a unique MAC address You can use the MAC address to connect to the NVR in the LAN The MAC address is not configurable it is read only IP Address Use the Up Down arrows to select an IP address or use the keyboard to enter an IP address Then configure the corresponding subnet mask for the default gateway Subnet Prefix Select from 0 to 128 Used to mark a specified network MAC address Default...

Page 71: ...The default is 1500 bytes Note MTU modification can affect the current network service Click OK to confirm a reboot or click Cancel to cancel the modifications Note Before configuring the MTU for the NVR check the gateway s MTU The NVR s MTU should be the same or lower than the MTU s gateway This helps to reduce the number of packets and increases network transmission efficiency MTU Values referen...

Page 72: ...ds blank You must click Save after configuring the Network The system returns to the previous menu Configuring Network Settings Click NETWORK SETTING on the Network configuration interface The Network Setting configuration interface opens Figure 3 28 Network Setting Configuration Interface Click to enable a network setting configuration Double click to a configuration window for each network setti...

Page 73: ...7 2014 Configuring the IP Filter Figure 3 29 IP Filter Configuration Interface You can add safe ID addresses which the NVR can safely access You can add up to 64 IP addresses Note The NVR needs to check the validity of all IPv6 addresses ...

Page 74: ...ress 1 Select a list Type 2 Enter start and end IP addresses 3 Click in the field and enter the IP address Newly added IP addresses are enabled by default Click to disable and remove the IP address from the list The NVR supports up to 64 IP addresses The NVR supports both IPv4 and IVp6 address formats If you are using an IPv6 address the NVR can optimize that address For example aa 0000 00 00aa 00...

Page 75: ...nimum value is 1 The maximum value is 65535 Units minute Time Zone Select the time zone here Manual Update This allows you to manually synchronize the time with the server Table 3 15 Time Zones City Region Name Time Zone London GMT 0 Berlin GMT 1 Cairo GMT 2 Moscow GMT 3 New Delhi GMT 5 Bangkok GMT 7 Beijing Hong Kong GMT 8 Tokyo GMT 9 Sydney GMT 10 Hawaii GMT 10 Alaska GMT 9 Pacific Time PT GMT 8...

Page 76: ... Zones City Region Name Time Zone Table 3 16 Multicast Configurations Special IP Addresses Parameter Description IP multiple cast group address Enter a value between 224 0 0 0 to 239 255 255 255 Reserved local multiple cast group address Enter a value between 224 0 0 0 to 224 0 0 255 TTL 1 when sending out a telegraph For example 224 0 0 1 All systems in the sub net 224 0 0 2 All routers in the su...

Page 77: ...ing the PPPoE Settings Figure 3 32 PPPoE Configuration Interface 1 Enter the PPPoE name and password that you received from your Internet Service Provider ISP 2 Click OK 3 Reboot your NVR to activate the new settings After you reboot the NVR will automatically connect to the internet The IP address that appears is the dynamic IP address for the NVR Note You can access the NVR through this dynamic ...

Page 78: ...s Parameter Description DDNS Type You can select the DDNS protocol from the drop down list and then enable the DDNS function Select the Honeywell DDNS server which is free to enable the DDNS function Server IP This is the DDNS server IP address Under Honeywell DDNS the default server address is www hennvr ddns com Mode Select Auto or Manual The default is Auto If you select Manual then you must en...

Page 79: ... you need Note Do not register frequently You need to wait at least 60 seconds between registration requests Too many registration requests might leave your server vulnerable to attacks Configuring the UPnP Settings The UPnP protocol establishes a mapping relationship between the LAN and the WAN Double click UPNP in Figure 3 28 Network Setting Configuration Interface to open the UPNP configuration...

Page 80: ...e router IP in the LAN WAN IP The router IP in the WAN Port Mapping list PAT Table This is the one to one relationship with the router s port mapping setting Enable Switch A check mark in the box indicates that port mapping is enabled for this port List Service Name Defined by the user Protocol The protocol type Internal port The port that has been mapped in the router External port The port that ...

Page 81: ...ce Configuring the WIFI Settings The Network Settings interface shows the WIFI connection status The interface shows the current connection status and the IP address if there is a connection Figure 3 36 WIFI Connection Status Double click WIFI Setting to open the WIFI Setting interface ...

Page 82: ...WIFI Setting Functions Control Button Control Description Auto Connect WIFI Check to enable Auto Connect WIFI The NVR automatically connects to the previous hotspot Refresh Click to refresh the list of found hotspots When the list is refreshed the system automatically adds any previously configured information such as a password ...

Page 83: ...tion interface appears Connection Status Shows the connection status After successfully connecting the WIFI icon appears in the top right corner of the preview interface When the hotspot Verification Type is WEP the NVR displays AUTO because the device can not detect its encryption type The NVR does not support verification of types WPA and WPA2 The display might become abnormal for the verificati...

Page 84: ...figurations Interface Table 3 20 Email Configurations Parameter Description SMTP server Enter the email SMTP server IP Port Enter the corresponding port User Name Enter the user name for logging in to the sender s email box Password Enter the login password here Sender Enter the sender s email address Title Enter an email subject You can use up to 32 letters or numbers ...

Page 85: ... 3 email addresses SSL enable The NVR supports an SSL encryption box Event Interval The interval for sending ranges from 0 to 3600 seconds 0 means that there is no interval Health email enable Click to enable the email health check The NVR sends a test email to check the network connection Interval After enabling Health Enable you can configure how frequently the NVR sends out emails to test the n...

Page 86: ... example you can log in user ZHY to FTP 10 10 7 7 and then test to see if you can modify or delete folders Figure 3 41 Testing the FTP Setup Uploading Multiple NVRs onto an FTP Server The system FTP server also supports uploading to multiple NVRs on one FTP server You can create multiple folders under this FTP 1 Double click FTP in the Network Setting configuration window Figure 3 42 Network Setti...

Page 87: ...up message appears to indicate the state of the network connection Table 3 21 FTP Configurations Parameter Description User Name The same user name that you used for logging in to the FTP Password The same password that you used for logging in to the FTP File Length This is the upload file length When the setup is larger than the actual file length then the system will upload the whole file When t...

Page 88: ...rame for the network management system SNMP is widely used in many environments in many network devices software and systems Note Use the corresponding software tool MIB Builder and MG SOFT MIB Browser plus two MIB files BASE SNMP MIB and NVR SNMP MIB to connect to the NVR The corresponding device configuration information appears after you have successfully connected 1 Double click SNMP in the Ne...

Page 89: ...Browser where you can get the device configuration You can see the following information for the device the number of video channels the number of audio channels the version number for example Configuring Auto Register Settings The Auto Register function allows the device to automatically register to the proxy that you have specified This means that you can use the client end to access the NVR thr...

Page 90: ...p 2 4 Add the device Do not enter the default port number such as the TCP port in the mapping port number The device ID should be the same as the ID you entered in Figure 3 46 5 Click Save to complete the setup 6 Boot up the proxy server If you see that the network status is Y then you correctly registered your device You will be able to see the proxy server when the device is online Note The serv...

Page 91: ...off alarm signal from the camera which activates the local NVR to receive the IP camera s alarm if there is an alarm occurring at the camera IPC offline alarm When enabled the system generates an alarm when the front end IP camera disconnects from the local NVR The alarm can activate recording or taking a snapshot for example The alarm can last until the camera and the NVR connection resumes Alarm...

Page 92: ...ays and which days are Free Days Click Set select the Work Days and the Free Days then click Save 3 Enter a time range for the alarm then click the check box to select that time range Note Newer configurations override previous configurations For example if you configure Work Days with an alarm period from 8 30 to 17 30 and then Configure a Monday alarm period for 7 10 to 18 00 the Monday alarm pe...

Page 93: ...ces when an alarm occurs Latch When the anti dither time has ended the channel alarm you have selected will last this period Select from 1s to 300s Latch does not work with other alarm activation operations Latch is still valid even if you directly disable the alarm event function The system can delay the alarm output for a specified time after an alarm ends The value ranges from 1s to 300s Show M...

Page 94: ... Menu Setting Encode 4 Set the alarm input as the local alarm and then select the recording channel The NVR will record this channel when an alarm is detected Note The system begins the alarm triggered recording instead of motion detection triggered recording if the local alarm and the motion detection event occur at the same time Tour Click to enable a tour to be triggered by an alarm The system ...

Page 95: ...amera Masking Note The Motion Detection icon appears only if the currently viewed channel has an enabled motion detection alarm Note When selecting the event detection region you can drag the mouse to configure the motion detection region without clicking the FN button on the NVR s front panel Click OK to save the currently selected region Right click the mouse to exit the current interface Click ...

Page 96: ...ide Figure 3 48 Detect Configuration Interface Table 3 23 Motion Detection Configurations Configuration Description Event Type Select the event detection type Select from Motion Detection Video Loss or Camera Masking Channel Select a channel Enable Click to enable event detection ...

Page 97: ...event detection area by either clicking and dragging the mouse or using the direction arrows on the NVR s front panel Note Use the FN button on the NVR s front panel to switch the cursor between selecting and deselecting 3 Click ENTER on the NVR s front panel to save the configuration or click ESC to exit the area selection interface without saving the configuration Sensitivity Select from 6 level...

Page 98: ...k box to select that time range Note You can configure up to 6 time periods within one day Note Newer configurations override previous configurations For example if you configure Work Days with an event detection area active period from 8 30 to 17 30 and then Configure a Monday alarm period for 7 10 to 18 00 the Monday event detection area active period overrides the Work Day event detection area ...

Page 99: ...ms on page 157 and Configuring Alarms on page 184 Send email The system can send an email when an alarm is detected When you have enabled the Snapshot function the system can also send an image attached to the email Go to Main Menu Setting Network Email to configure the email settings See Configuring the Email Settings on page 84 Record channel Select a recording channel See How to Record on page ...

Page 100: ...nable an alarm output channel and then enable the Show Message function Select Video Loss from the Event Type drop down list Figure 3 49 Video Loss Configuration Interface Table 3 24 Video Loss Detection Configurations Configuration Description Event Type Select the event detection type Select from Motion Detection Video Loss or Camera Masking Channel Select a channel Enable Click to enable event ...

Page 101: ...ride previous configurations For example if you configure Work Days with an event detection area active period from 8 30 to 17 30 and then Configure a Monday alarm period for 7 10 to 18 00 the Monday event detection area active period overrides the Work Day event detection area active period So on Mondays the event detection area active period will be 7 10 to 18 00 Alarm Out Select the device outp...

Page 102: ...nd Configuring Alarms on page 184 Send email The system can send an email when an alarm is detected When you have enabled the Snapshot function the system can also send an image attached to the email Go to Main Menu Setting Network Email to configure the email settings See Configuring the Email Settings on page 84 Record channel Select a recording channel See How to Record on page 94 for more abou...

Page 103: ...lighting the system can alert you to guarantee video continuity Select Camera Masking from the Event Type drop down list Figure 3 50 Camera Masking Configuration Interface Table 3 25 Camera Masking Detection Configurations Configuration Description Event Type Select the event detection type Select from Motion Detection Video Loss or Camera Masking Channel Select a channel Enable Click to enable ev...

Page 104: ...igurations override previous configurations For example if you configure Work Days with an event detection area active period from 8 30 to 17 30 and then Configure a Monday alarm period for 7 10 to 18 00 the Monday event detection area active period overrides the Work Day event detection area active period So on Mondays the event detection area active period will be 7 10 to 18 00 Alarm Out Select ...

Page 105: ...d an email when an alarm is detected When you have enabled the Snapshot function the system can also send an image attached to the email Go to Main Menu Setting Network Email to configure the email settings See Configuring the Email Settings on page 84 Record channel Select a recording channel See How to Record on page 94 for more about recording PTZ activation Not supported Record delay The syste...

Page 106: ...ww honeywell com security 106 Performance Series Network Video Recorder User Guide Configuring Display Settings Click the DISPLAY icon in the Setting interface to open the Display configuration interface ...

Page 107: ...ze the channel name You can enter up to 31 characters Changes here apply only to the NVR local end 1 Click Modify The Channel Name configuration interface opens 2 Enter camera names in the editable fields 3 Click Save Note Modifications here apply only to the local end only You need to open the web client to refresh the channel name Time Display Turn time display On or Off for playback Channel Dis...

Page 108: ...tions 1920x1080 default 1280x1024 1280x720 and 1024x768 Image Enhance Click to enable Enable Tour Click to enable Interval The system supports a 1 4 window tour Enter a time interval for switching from one channel to the next in a tour Select from 5 to 120 seconds If enabled here your NVR will automatically start Interval view when the display is switched to single channel mode While in a tour you...

Page 109: ...el is below 500 ms Your NVR supports IP cameras from many popular manufacturers such as Honeywell Sony Hitachi Dynacolor Axis Samsung Arecont Dahua and Onvif Just enter the camera s URL address user name and password to log in to the camera Connect the cameras to the PoE ports on the NVR s rear panel Figure 3 52 NVR Real Panel PoE Ports The NVR automatically searches for and connects to the networ...

Page 110: ...uide Figure 3 53 Switch Settings Configuration Interface 2 Enter values for the IP Address Subnet Mask and Gateway 3 Click OK to save these settings Configuring the Remote Device Camera Click the REMOTE DEVICE icon in the Main Menu to open the Remote Device configuration interface ...

Page 111: ...uration Description IP Search Click to search for an IP address Add Click to connect to the selected found IP device camera and add it to the Added device list Note You can batch add more than one device Show Filter Displays the specified devices from the added device Delete Select a device in the Added device list and then click Delete to remove it Manual Add Click to manually add a camera The po...

Page 112: ...ect a connection mode Auto TCP default or UDP Shortcut Menu If there is no IP camera connected the GUI shows Figure 3 56 Figure 3 56 Short cut to Remote Device Configuration Interface Click the in the center of the Preview interface for the channel which is not connected to an IP camera The Remote Device configuration interface appears ...

Page 113: ...gure 3 57 Remote Device Configuration Interface Advanced Configurations Click the ADVANCED icon in the Main Menu to open the ADVANCED configuration interface The ADVANCED configuration interface appears Figure 3 58 Advanced Configuration Interface ...

Page 114: ...eries Network Video Recorder User Guide Configuring HDD Management In the HDD MANAGE configuration window you manage the Hard Disk Drive and view its current HDD type status capacity and record time Figure 3 59 HDD MANAGE Configuration Interface ...

Page 115: ...er types of hard disks can not be set as a HDD Group Note The current software version can set only the HDD Group operation of the read write HDDs It is not for the redundancy HDD Configuring HDD Group Settings 1 Click HDD Setting on the HDD MANAGE configuration interface Table 3 28 HDD MANAGE Configurations Configuration Description Alarm Set Click Alarm Set The Alarm Set configuration interface ...

Page 116: ...OK to save these new settings Note A HDD can belong to only one group But one group can contain many HDDs The HDD No corresponds to the HDD port The HDD Group No can change if you change the HDD Note When you change the HDD Group settings the system will save the recorded video and snapshots then reboot Configuring HDD Channels 1 Click HDD Channel on the HDD MANAGE configuration interface The Chan...

Page 117: ...ange the HDD Group settings the system will save the recorded video and snapshots then reboot TIPS There is an easy way to test whether or not the recordings from the corresponding channel are saved in the specified HDD Remove the HDD and then check to see if the channel can record The channel should not record and you should not be able to search the previous recordings Configuring Abnormality Se...

Page 118: ...ge to alert you when an alarm occurs Alarm Upload Click to enable the system to upload the alarm signal to the network including an alarm center and the web client The system uploads only the alarm channel status Go to the Web operation and then go to the Alarm interface to set the alarm event and alarm operation See Enabling and Disabling Alarms on page 157 and Configuring Alarms on page 184 Send...

Page 119: ...OK to save the changes Configuring Manual Recording Settings Note You must have proper rights to configure the Recording settings Also ensure that the HDD has been properly installed 1 Click RECORD in the ADVANCED configuration interface OR Right click the mouse to open the shortcut menu then click Record The RECORD configuration interface appears Figure 3 64 RECORD Configuration Interface 2 Selec...

Page 120: ...y recording If you select All for Manual recording the schedules for the individual channels will not work and the system records manually The front panel light indicates that the system is manually recording Schedule Recording follows the schedule you have configured See Configuring the Schedule on page 66 If you select All for Schedule recording all channels will record following the schedules y...

Page 121: ...is 8 bytes There are four default users admin 888888 and 666666 plus a hidden user default All default users except 666666 have administrator rights Hidden Default User The hidden user default is for internal system use only and can not be deleted When logging in without a user name the system automatically uses the hidden user You can configure some rights for the hidden user such as the right to...

Page 122: ...face 2 Enter a group Name Entering Memo information is optional 3 Click to enable privileges in the list There are 60 from which to choose 4 Click Save to save the new settings Adding or Modifying a User The procedures for adding a user and modifying a user are similar The Add User configuration interface is shown in this example 1 Click Add User or Modify User in the ACCOUNT configuration interfa...

Page 123: ...o enable the Reuseable function See Reusable Function on page 121 4 Click to enable privileges for this user TIP We recommend that general user account rights are less than administrator account user rights 5 Click Save to save the new settings Modifying a Password 1 Click Modify Password in the ACCOUNT configuration interface The Modify Password configuration interface opens ...

Page 124: ...TAIN function allows you to automatically reboot the time and automatically delete old file setups You can set the system to delete the files for the specified days 1 Click AUTO MAINTAIN in the ADVANCED configuration interface The AUTO MAINTAIN configuration interface appears Figure 3 69 AUTO MAINTAIN Configuration Interface 2 Select from the drop down lists a day and time for automatically reboot...

Page 125: ...ettings Configuring Backup With the CONFIG BACKUP function you can copy the current system configuration to other devices It also supports importing creating new folders and deleting folders 1 Click BACKUP in the ADVANCED configuration interface The CONFIG BACKUP configuration interface appears Figure 3 70 BACKUP Configuration Interface 2 Click to select a device and then click Export or Import Sh...

Page 126: ...its for 3 seconds and then shuts down You can not cancel the shut down sequence after it has begun Note You might need to enter your password to shut down the NVR Table 3 31 SHUTDOWN Selections Selection Description Logout Log out of the NVR The next time you log in you will need to enter a password Shutdown The NVR shuts down and turns off the power Restart system Reboots the system Switch user U...

Page 127: ...l applies only to IP addresses that are in the same segment Starting the Honeywell Configuration Tool You must install the Honeywell Configuration Tool before you can use it to discover IP devices Installing the Honeywell Configuration Tool 1 Insert the Software CD that came with your NVR into your PC Navigate to and double click Honeywell Config Tool to install the configuration tool software The...

Page 128: ...ure 4 1 Honeywell Config Tool Wizard 2 Click Next to begin the installation The User License Agreement page appears Figure 4 2 User License Agreement Page 3 Click to select I agree and then click Install to install the software The Installation is Complete page appears has been successful ...

Page 129: ...n is Complete Page 4 Click Enjoy Now to open and use the Config Tool Opening the Honeywell Configuration Tool Searching for Devices and Opening a Web Client In the Config Tool you will find the IP addresses for the IP devices NVRs and IP cameras 1 Click to open the Config Tool ...

Page 130: ...device to open a Web Client for that device Upgrading a Single Device IP Camera or NVR Note For the following examples of upgrading an IP camera are shown The procedures for upgrading an NVR are similar 1 Open the ConfigTool software Figure 4 5 ConfigTool Login 2 Select from the list the device you want to upgrade 3 Click Login to log in to the device ...

Page 131: ...Error message Figure 4 6 Device Upgrade Login Interface 4 Click OK The Config Upgrade interface appears Figure 4 7 Config Upgrade Interface 5 Click OpenFile to select the upgrade file and then click Upgrade to begin the upgrade When the upgrade is complete and the device is rebooting a Device is offline device IP address message appears ...

Page 132: ...rformance Series Network Video Recorder User Guide Figure 4 8 Device Offline Message 6 Click OK to close the Device Offline warning message and to return to the Upgrade interface Figure 4 9 Upgrade Interface 7 Log into the device again ...

Page 133: ...ion Error Upgrading the IP Devices Batch Upgrade Note For the following examples of upgrading an IP camera are shown The procedures for upgrading an NVR are similar 1 Open the ConfigTool software if it is not already open Figure 4 10 ConfigTool Login 2 Click Upgrade to begin the batch upgrading process The Upgrade interface appears ...

Page 134: ... Figure 4 11 Upgrade Interface 3 Click Open to find and select the upgrade file The Open interface appears Figure 4 12 Open Interface 4 Select the upgrade firmware and then click Open or double click the file to open it The Open interface closes and you return to the Upgrade interface ...

Page 135: ...ce 5 Click to select the devices you want to upgrade Their row turns blue when selected 6 Click Upgrade to begin the batch upgrade A message appears in the Upgrade State fields for each selected IP camera to show the batch upgrade progress Figure 4 14 Batch Upgrade Progress Message ...

Page 136: ...rk Video Recorder User Guide A message appears to show that the batch upgrade procedure is successful Figure 4 15 Batch Upgrade Successful Message Modifying the IP Address 1 Open the ConfigTool software if it is not already open Figure 4 16 ConfigTool Login ...

Page 137: ...m the list the device you want to modify 3 Click Login to log in to the device Figure 4 17 Selecting Net in the ConfigTool 4 Click Net to open the Net tab 5 Enter the new IP Address and the corresponding Subnet Mask and Gateway 6 Click Save to save these new settings ...

Page 138: ...www honeywell com security 138 Performance Series Network Video Recorder User Guide ...

Page 139: ... NVR web client Descriptions about setting up and operating the NVR web client Preparing to Use the Device Web Client PC Requirements Table 5 1 PC Requirements Component Minimum Requirement Processor Quad core System memory RAM 2G pr higher Non integrated video card 256M or higher ...

Page 140: ... can automatically download the latest ActiveX web control The new version can overwrite the previous one If you want to un install the web control then run uninstall webrec2 0 bat Or you can go to C Program Files webrec to remove the single folder Note Before you uninstall the web control close all web pages If you do not then the uninstallation procedure might result in an error The current NVR ...

Page 141: ...example if your NVR s IP address is 192 168 1 108 then enter http 192 168 1 108 in the address field A message pops up asking if you want to install webrec cab control 3 Click Yes to install webrec cab control 4 Configure the ActiveX control settings if you can not download the ActiveX files Enter the IP address ...

Page 142: ...mance Series Network Video Recorder User Guide Figure 5 2 Configuring the ActiveX Controls When installation is successful the login interface appears Figure 5 3 Login Interface 5 Enter your username default admin and password default 1234 ...

Page 143: ...ty we recommend that you modify your password on your first log in LAN Mode The LAN main window which is divided into 9 main sections Figure 5 4 LAN Mode Main Window Section 1 Function Buttons Figure 5 5 LAN Main Window Function Buttons 2 1 3 4 5 6 7 8 9 ...

Page 144: ...ction 2 Monitor Channels Figure 5 6 Monitor Channels Section The Monitor Channels section displays monitor channels that are successfully connected to the NVR Left click to select a channel for viewing Section 3 Open All Button Figure 5 7 Open All Button The Open All button enables disables all channels in the real time monitor You can also select the Main Stream or Extra Stream Section 4 Start Ta...

Page 145: ...ual recording Click Instant Record again to restore the NVR to the previous recording mode Section 6 Local Play Button The NVR can play back saved files in the dav format in the PC 1 Click Local Play and an interface appears for selecting the playback file Figure 5 10 Local Play Select a File Interface 2 Select a file then click Open A media player opens and plays the selected video Section 7 PTZ ...

Page 146: ... Name Description Video Quality Click to select the video quality Select either High quality or Low quality Fluency Click to configure the fluency Select from Fluency Level 1 Fluency Level 2 Fluency Level 3 Middle level Latency Level 1 Latency Level 2 and Latency Level 3 Full Screen Click to switch the viewer to show video full screen Click Esc on your PC to quit full screen Vertical Synchronizati...

Page 147: ...ess Channel number Bit rate Decoding mode Select either M for Main stream or S for sub stream Digital Zoom Click this button and then left drag the mouse in the zone to zoom in Right click the mouse to return to the original viewing status Local Record When you click the Local Record button the system NVR begins recording The recorded file is saved to the default system folder RecordDownload Snaps...

Page 148: ...Figure 5 13 Alarm Out Configuration Interface 2 Disable enable the alarm signal for the corresponding port Playing Back Recorded Video 1 Click the Playback tab at the top of the Main window The Playback interface appears Table 5 5 Image Settings Setting Description Adjusts the monitor s video brightness Adjusts the monitor s video contrast Adjusts the monitor s video hue Adjusts the monitor s vide...

Page 149: ...nnel name to select video for playback 3 Click File List and the system displays a list of recorded video clips that match the search criteria from step 2 Figure 5 15 List of Recorded Video Clips 4 Select a file for playback then click Play You can play back in full screen mode Use the playback control bar to control playback Video clips ...

Page 150: ...ck Video Note For one channel playback the system can not play back and download at the same time Downloading Video After generating a list of recorded video clips by clicking File List see Playing Back Recorded Video on page 148 select the files you want to download then click Download Playback control bar ...

Page 151: ...utton becomes the Stop button and it indicates the downloading progress in a percentage Go to your default Saved Path file to view the downloaded files See Configuring the Save Path on page 159 Loading More Click More in Figure 5 17 and the Download by File Download by Time interfaces appear ...

Page 152: ...e Interfaces In this window you can search for recordings or snapshots Select the channel recording type and the recording time Enabling and Disabling Alarms Click the Alarm tab at the top of the Main window The Alarm configuration interface appears Note For information about configuring alarms see Configuring Alarms on page 179 ...

Page 153: ...al Alarm the On Off signal from the network camera It activates the NVR to locally activate Disk Error Click to enable the Disk Error alarm The system triggers an alarm when a disk error occurs Disk Full Click to enable the Disk Full alarm The system triggers an alarm when the disk is full No Signal Click to enable the No Signal alarm The system triggers an alarm when the network camera and the NV...

Page 154: ...you can configure the following Remote settings Audio and video encoding settings The save path Snapshot settings Video overlay settings Network settings including wifi and 3G Email settings UPnP settings Automatic registration settings Configuring Remote Settings Remotely Adding a Device Camera 1 Click the arrow beside REMOTE to expand the REMOTE selection tree 2 Click Add Device to open the Add ...

Page 155: ... and type Add Select a device in the list and then click Add to automatically connect to the camera and add it to the Added device list Or you can double click a camera in the list to add it to the Added device list Modify Click or any camera in the Added device list to open a configuration window to change the corresponding channel setup Delete Click to delete the remote connection for the corres...

Page 156: ...anual Add 1 Click Manual Add and the Manual Add configuration interface appears See Figure 5 21 2 Select a channel from the drop down list Only disconnected channels are shown Note The NVR supports cameras from Honeywell Panasonic Sony Dynacolor Samsung AXIS Arecont Dahua and cameras with ONVIF standard protocol Note If you do not enter an IP address the system uses the default IP address 192 168 ...

Page 157: ...he system allows you to set different frame rates for recording motion detection and recording alarms Video Enable Check to enable the extra video stream This is enabled by default Compression The main bit stream supports H 264 The secondary stream supports H 264 or MJPG Resolution This value refers to the capability of the network camera Frame Rate PAL 1 25 fps NTSC 1 30 fps Bit Rate Type Select ...

Page 158: ...ion Description Channel Select a channel from the drop down list Mode There are two modes Timing schedule and Trigger Timing The snapshot function is valid during the specified time period Trigger The snapshot function is only available as a result of an alarm such as motion detection tampering or local activation Image Size This matches the resolution of the main stream Quality Select from six le...

Page 159: ...or Click Set to configure a privacy mask for the Preview or Monitor The system supports up to four privacy mask zones Channel Display Enable this function to overlay channel information on the video window Use the mouse to drag the channel title to the desired position View the channel title on the live web client video or the playback video Time Display Enable this function to overlay time inform...

Page 160: ...e Channel Name Click Channel Name in the Video Audio configuration interface to open the Channel Name configuration interface Figure 5 26 Channel Name Configuration Interface Click Browse to select the upgrade file Or use the filter to select several network cameras for upgrading at the same time Configuring Network Settings Click the Network arrow to expand the Network selection tree Configuring ...

Page 161: ...ode then you need to reset the IP parameters The IP address submask gateway and DHCP are read only values when the PPPoE dial is OK MAC Address Displays the MAC address This field is not configurable IP Version Select the IP version either IPv4 or IPv6 You can use either version to access the camera s IP address IP Address 1 Use your PC s keyboard to enter the IP address 2 Set the Subnet mask and ...

Page 162: ...ck Wifi in the Network configuration interface to open the Wifi configuration interface Table 5 12 Network Connection Configurations Configuration Description Max Connection The maximum Web connection for the same NVR The value ranges from 1 to 120 The default is 120 TCP Port The default is 37777 You can enter the actual port number if necessary UDP Port The default is 37778 You can enter the actu...

Page 163: ...e wireless network information 4 Double click the name of a wireless device to connect to it Note Click Refresh to update the list of wireless network information Configuring CDMA GPRS for 3G 1 Click 3G in the Network configuration interface to open the 3G configuration interface 2 Click the CDMA GPRS tab to open the CDMA GPRS configuration interface ...

Page 164: ...No APN and the Dial No are important PPPoE parameters The APN Access Point Name and the Dial No are automatically received by the NVR after connecting to a 3G module AUTH Authorization Choose from PAP CHAP or NO_AUTH Pulse Interval Configure a time for ending the 3G connection after you close the extra stream monitor For example if you select 60 here the NVR ends the 3G connection 60 seconds after...

Page 165: ...ion interface to open the PPPoE configuration interface Figure 5 32 PPPoE Configuration Interface 2 Enter the PPPoE User name and Password which you receive from your Internet Service Provider ISP 3 Enable the PPPoE function 4 Click Save to save the changes 5 Reboot the device to activate these changes After rebooting the device should connect to the Internet through the PPPoE connection The IP ad...

Page 166: ...domain name 2 Access the system through that domain name Note This works even if your IP address has changed 3 Select DDNS from the drop down list Honeywell DDNS The Honeywell DDNS function works with a special DDNS server and special Professional Surveillance Software PSS Click DDNS in the Network configuration interface to open the PPPoE configuration interface Table 5 14 DDNS Configuration Opti...

Page 167: ...figuration you will get a notification email before the domain name is taken back Table 5 15 DDNS Configurations Parameter Description DDNS Type You can select the DDNS protocol from the drop down list and then enable the DDNS function Select the Honeywell DDNS server which is free to enable the DDNS function Server IP This is the DDNS server IP address Under Honeywell DDNS the default server addr...

Page 168: ...P Filter configuration interface Figure 5 34 IP Filter Configuration Interface 2 Click to enable Trusted Sites and only the listed IP addresses can access the current NVR OR Click to enable Blocked Sites and the listed IP addresses can not access the current NVR Configuring Email Settings Click Email in the Network configuration interface to open the Email configuration interface ...

Page 169: ...n allows you to automatically log in anonymously so you do not need to enter your user name password or sender s information User Name Enter the user name for logging in to the sender s email box Password Enter the login password here Sender Enter the sender s email address Encrypt Type Select from NONE TLS or SSL Title Enter an email subject You can use up to 32 letters or numbers Attachment Clic...

Page 170: ...PnP in the Network configuration interface to open the UPnP configuration interface Interval The interval for sending ranges from 0 to 3600 seconds 0 means that there is no interval Note The system will not send an email immediately when the alarm occurs When an alarm motion detection or video abnormality triggers an email the system sends out the email according to the interval that is specified ...

Page 171: ...ion Interface Configuring SNMP SNMP allows the communication between the network management work station software and the proxy of the managed device It is reserved for a third party developer Click SNMP in the Network configuration interface to open the SNMP configuration interface ...

Page 172: ...s control and the management relationship between one proxy and one managers group Ensure that the device and the proxy are the same The Read Community reads all the objects the SNMP supports in the specified name The default is Public Write Community This is a string and it is a command between the managing processes and the proxy process It defines the authentication the access control and the m...

Page 173: ...utomatically register to the proxy you have specified This allows you to use the client end to access the NVR through the proxy The proxy acts as a switch In network service the device supports IPv4 server addresses or domains Click Auto Register in the Network configuration interface to open the Auto Register configuration interface Figure 5 39 Auto Register Configuration Interface Configuring Ev...

Page 174: ...gs Configuring for Motion Detection You can configure the system to generate a motion detection alarm when the minimum amount of motion as defined by you is detected in the video Click Detect in the Event configuration interface to open the Detect configuration interface Figure 5 40 Detect Configuration Interface ...

Page 175: ...down menu Select from a day of the week Work Day or Free Day Note If you select Work Day or Free Day a Set button appears so you can configure which days are Work Days and which days are Free Days Click Set select the Work Days and the Free Days then click OK Note You can configure up to 6 periods within one day 3 Configure a time range for when the event detection area is active then click the ch...

Page 176: ...ave to save the configurations Click Esc to exit the setup without saving the changes Record Channel The system automatically starts recording selected channels when a motion detection alarm occurs Note You need to set the motion detection recording period Go to Storage Schedule to configure the current channel for scheduled recording See Configuring Local Storage for Schedules on page 187 Delay T...

Page 177: ...s enabled by default you can configure the system so an alarm triggers the system to enable the alarm tours you configured here If there is no alarm then the system uses the tour setup that was configured in the Display interface 1 Click Setup to select a tour channel The system begins a 1 window or multiple window tour display showing the channels you ve set to record when an alarm occurs 2 Click...

Page 178: ... for Video Loss Detection is very similar to the configuration for Motion Detection Please see Configuring for Motion Detection on page 174 for more information Show Message Click to enable a pop up message on your local host PC screen to let you know an alarm has occurred Send Email The system can send an email when an alarm is detected When you have enabled the Snapshot function the system can a...

Page 179: ...erface The configuration for Camera Masking Detection is very similar to the configuration for Motion Detection Please see Configuring for Motion Detection on page 174 for more information Configuring Alarms Before configuring alarms ensure that you have properly connected alarm devices such as a buzzer You can configure local and network alarms Click Alarm in the Event configuration interface to ...

Page 180: ...s within one day 3 Select a date If you do not select a date the current setup will apply to today only Note You can select All Week if you want these settings to apply to the whole week 4 Click OK then click Save Type Select from NO or NC Record Channel When an alarm occurs the system automatically records motion detection channels Note You need to set the motion detection recording period Go to ...

Page 181: ...the Display interface 1 Click Setup to select a tour channel The system begins a 1 window or multiple window tour display showing the channels you ve set to record when an alarm occurs 2 Click to select a channel or All then click Save Snapshot Click to enable the Snapshot function A snapshot will be taken when an alarm occurs 1 Click Set to open the Snapshot Configuration interface 2 Click to sel...

Page 182: ...rm configuration interface Figure 5 44 Net Alarm Configuration Interface The configuration for Net Alarms is very similar to the configuration for Local Alarms Please see Configuring Local Alarms on page 179 for more information Configuring External Alarms Configure the External Alarms so that the NVR can detect alarm signals from the IP cameras The system does not support anti dither and sensor t...

Page 183: ...lar to the configuration for Local Alarms Please see Configuring Local Alarms on page 179 for more information Configuring for No Signal The system can generate an alarm if the network camera goes offline Click No Signal in the Alarm configuration interface to open the No Signal configuration interface Figure 5 46 No Signal Configuration Interface ...

Page 184: ...ote The No Disk configuration interface is shown here as an example The other configuration interfaces and the configuration does on the interfaces are similar Table 5 20 Configuring for Abnormalities Configuration Description Event Type Select from No Disk Disk Error Disk No Space Net Disconnection IP Conflict and MAC Conflict Less Than For No Space configuration only Configure the minimum percen...

Page 185: ...pop up message on your local host PC screen to let you know an alarm has occurred Alarm Upload The system can upload the alarm signal to the center including the alarm center Send Email The system can send an email when an alarm is detected When you have enabled the Snapshot function the system can also send an image attached to the email Go to Main Menu Setting Network Email to configure the emai...

Page 186: ...Schedule Configuration Interface The schedules are color coded by type Green General recording snapshot Yellow Motion detection recording snapshot Red Alarm recording snapshot Blue MD Alarm recording snapshot 2 Click Set The Set configuration interface opens Figure 5 49 Set Configuration Interface ...

Page 187: ...ct the read only write only redundancy if there is more than one HDD and formatting Configuring the HDD Group Settings Click HDD Setting in the Schedule configuration interface to open the HDD Setting configuration interface Figure 5 51 HDD Setting Configuration Interface Select the HDD group in which you want to save the recording Table 5 21 Schedule Configurations Configuration Description Chann...

Page 188: ...number of channels for your NVR Status Select a status Auto Manual or Off Auto The system enables the automatic recording function which you have set in the Recording Schedule setup such as general motion detection and alarm settings See Configuring the General Settings on page 60 Configuring Detection Settings on page 174 and Configuring Alarms on page 179 Manual This is the highest priority sett...

Page 189: ...hen click Save See Figure 5 53 Configuring the Extra Stream Channel You can select the corresponding HDD group for the sub stream 1 Click the Extra Stream tab to open the Extra Stream configuration interface Figure 5 54 Extra Stream Configuration Interface 2 Select an HDD Group from the drop down menu then click Save Configuring the Image Storage Channel You can select the corresponding HDD group ...

Page 190: ... 198 Alarm Out settings such as the alarm output mode auto manual stop See Enabling and Disabling Alarm Out Settings on page 199 Default settings for the network events storage the system configuration and cameras See Returning to Default Settings on page 200 Configuration Backup settings for importing and exporting the configuration files See Configuring Backup Settings on page 200 Automatic Main...

Page 191: ...er Language Select a GUI language from the drop down list Note You need to reboot the device NVR to activate this change Video Standard Select the video standard either NTSC or PAL HDD Full Select what happens when the NVR s storage is full Select either Stop Recording or OverWrite Stop Recording If the HDD is full the NVR stops recording OverWrite If the currently working HDD is full and the next...

Page 192: ...ct from either 24 hour or 12 hour Date Separator Select from a period a hyphen or a slash System Time Set the NVR s time You have to Save to activate this setting Sync PC Click to synchronize your NVR s time with your PC s time Time Zone Select a Time Zone for the NVR DST Click to enable Daylight Saving Time DST Click to select a type either Date or Week Then configure a date and time when DST beg...

Page 193: ... _ You can add up to 64 users and 20 groups these are also the default settings The default setting includes two group levels user and admin Configure the Group privileges and then assign users to their groups according to the privileges those users require User management involves assigning privileges to groups and users to groups User names can not be the same as group names user names and group...

Page 194: ...only monitor rights The hidden default user is for internal use only and can not be deleted If users log in without selecting a login user the hidden default user is automatically used You can configure some rights for the default hidden user such as monitor rights so that the user can view channels without logging in Note User rights can not exceed group rights TIP General users should have fewer...

Page 195: ...erface 2 Enter a Username and a Password Re enter the Password to confirm it 3 Select a Group 4 Select System Playback and Real Time Monitor privileges 5 Click Save to save these new settings Modifying a User 1 Click under Modify to open the Modify User configuration interface ...

Page 196: ...Modify Password in the Modify User configuration interface 2 Enter the old Password then enter the new Password twice 3 Click OK to save the new password Note Passwords can have up to 6 characters numbers only Users with admin rights can modify the password of other users Configuring Group Settings Click the Group tab in the Account configuration interface to open the Group configuration interface...

Page 197: ...dd Group in the Group Account configuration interface Figure 5 63 Add Group Configuration Interface 2 Enter a Group name 3 Select System Playback and Real time Monitor privileges 4 Click Save to save these new settings Modifying a Group 1 Click under Modify to open the Modify Group configuration interface ...

Page 198: ...rder User Guide Figure 5 64 Modify Group Configuration Interface 2 Modify the Group privileges then click Save to save the changes Configuring Display Settings Click Display in the General settings configuration interface to open the GUI settings configuration interface ...

Page 199: ...rations Configuration Description Resolution Select from four options 1920x1080 1280x1024 default 1280x720 and 1024x768 Note You need to reboot the NVR to activate changes to the resolution Transparency Configure the transparency of the GUI display Select from 128 to 255 Time Display Channel Display Click to enable these functions which display the time and channel on the video monitor Image Enhan...

Page 200: ... alarm outputs Returning to Default Settings Click Default in the General settings configuration interface to open the Default settings interface Figure 5 67 Default Settings Interface Click to enable the Default settings then click Default Configuring Backup Settings Click Config Backup in the General settings configuration interface to open the Import Export settings interface ...

Page 201: ... when the NVR automatically deletes old files 4 Click Save to save the new settings Note Click Manual Reboot to manually reboot the NVR Configuring Preview Control Settings Click Preview Control in the General settings configuration interface to open the Preview Control settings configuration interface Table 5 26 Configuration Backup Import Export Interface Configuration Description Browse Click t...

Page 202: ...b on the Main Menu to open the Info configuration interface Viewing the Version 1 Click the arrow next to System to expand the System menu tree 2 Click Version to open the Version configuration interface Figure 5 71 Version Configuration Interface Here you can view the recording channel the alarm input output information the software version and the release date None of these values can be changed...

Page 203: ...ype Select from System Operation Configuration Operation Data Operation Event Operation Record Operation User Management Log Clear and All Search Click Search to find a log or logs that fit the search requirements Begin time End time and Type You can click Stop to terminate the current search Detailed Information Select one item to see its detailed information Clear Click to clear the found log fi...

Page 204: ...ies Network Video Recorder User Guide Figure 5 73 Online User Configuration Interface You can view what users are currently online Logging Out Click the Logout tab in the Main Menu The NVR returns to the Login interface Figure 5 74 Login Interface ...

Page 205: ...ned to Honeywell Video Systems for warranty or service repair must have a Return Merchandise Authorization RMA number The RMA number must be clearly marked on all return packages and internal paperwork Problem The NVR does not boot up properly Possible Solutions Ensure that the input power is correct Ensure that the power connection is connected Check the upgraded software It might be incorrect an...

Page 206: ...tup when using the BNC output If this setup is incorrect the real time video appears black and white Check the compatibility of the resistance between the NVR and the monitor Check the video transmission The clip might be too long or there is a lot of file degradation Check the NVR s color and or brightness settings Problem Motion detection does not work Possible solutions Check that the period se...

Page 207: ...play card driver might be inadequate lower than dx8 1 Upgrade the display card driver Check the network connection There might be a network connection error Check the network setup There might be a network setup error Check that you have entered the correct username and password Your client end computer might not be compatible with the NVR s software Problem The remote control does not work Possib...

Page 208: ...mera s port number Check and correct the IP camera s account user name and password Check the physical connections Problem When viewing multiple channels in the client end the video is not smooth Possible solutions Check the network bandwidth as it needs to be at least 100M or higher for monitoring multiple channels Increase the bandwidth or reduce the number of channels for viewing Ensure that yo...

Page 209: ...unplug the power cable when you remove the audio video signal cable RS232 or RS485 cable Always properly shut down the device Please press the power button in the front panel for at least three seconds to shut down the device If you don t you might experience an HDD malfunction Please make sure the device is away from the direct sunlight or other sources of heat Ensure that the NVR is properly ven...

Page 210: ...www honeywell com security 210 Performance Series Network Video Recorder User Guide ...

Page 211: ...SATA Seagate Seagate SV35 3 ST3750330SV 750G SATA Seagate Seagate SV35 3 ST31000340SV 1T SATA Seagate Seagate SV35 4 ST3320410SV 320G SATA Seagate Seagate SV35 4 ST3250311SV 250G SATA Seagate Seagate SV35 5 ST3500410SV 500G SATA Seagate Seagate SV35 5 ST3500411SV 500G SATA Seagate Seagate SV35 5 ST31000525SV 1T SATA Seagate Seagate SV35 5 ST31000526SV 1T SATA Seagate Seagate SV35 5 ST1000VX000 1T ...

Page 212: ...n ES ST32000644NS 2T SATA Seagate Seagate Constellation ES ST2000NM0011 2T SATA Seagate Seagate Constellation ES ST1000NM0011 1T SATA Seagate Seagate Constellation ES ST500NM0011 500G SATA Seagate Seagate Constellation ES ST2000NM0031 2T SATA Seagate Seagate Constellation ES ST1000NM0031 1T SATA Seagate Seagate Constellation ES ST500NM0031 500G SATA Seagate Seagate Constellation ES ST2000NM0051 2T...

Page 213: ... AV AVJS WD3200AVJS 6 3WDA0 320G SATA Western Digital WD AV AVJS WD5000AVJS 6 3YJA0 500G SATA Western Digital WDAV GP AVCS WD5000AVCS 6 3H1B1 500G SATA Western Digital WDAV GP AVCS WD7500AVCS 6 3ZLB0 750G SATA Western Digital WDAV GP AVCS WD3200AVCS 320G SATA Western Digital WDAV GP AVCS WD2500AVCS 250G SATA Western Digital WDAV GP EVCS WD10EVCS 63Z LB0 1T SATA Western Digital WDAV GP EVCS WD20EVC...

Page 214: ...0AURS 750G SATA Western Digital WD AV GP WD7500AVDS 500G SATA Western Digital WD AV GP WD500AVDS 500G SATA Western Digital WD AV GP WD10EUCX 1T SATA Samsung Samsung HA HA500LJ CE 500G SATA Samsung Samsung HA HA751LJ 750G SATA Samsung Samsung HA HA101UJ CE 1T SATA Samsung Samsung HD HD502HI CEC 500G SATA Samsung Samsung HD HD103SI CEC 1T SATA Samsung Samsung HD HD154UI CE 1 5T SATA Hitachi Hitachi ...

Page 215: ...ruzer Freedom 1G Sandisk Cruzer Freedom 2G Kingston Data Traveler II 1G Kingston Data Traveler II 2G Kingston Data Traveler 1G Kingston Data Traveler 2G Maxell USB 2 0 Flash Stick 128M Maxell USB 2 0 Flash Stick 256M Maxell USB 2 0 Flash Stick 512M Maxell USB 2 0 Flash Stick 1G Maxell USB 2 0 Flash Stick 2G Kingax Super Stick 128M Kingax Super Stick 256M Kingax Super Stick 512M Kingax Super Stick ...

Page 216: ...ies Network Video Recorder User Guide Netac U210 512M Netac U210 1G Netac U210 2G Teclast Ti Cool 128M Teclast Ti Cool 256M Teclast Ti Cool 512M Teclast Ti Cool 1G Teclast Ti Cool 2G Table D 1 Compatible USB 2 0 Devices Manufacturer Model Capacity ...

Page 217: ...7 inch Samsung LCD 225bw 22 inch wide screen Lenovo CRT LXB FD17069HB 17 inch Lenovo CRT LXB HF769A 17 inch Lenovo CRT LX GJ556D 17 inch Samsung LCD 2494HS 24 inch Samsung LCD P2350 23 inch Samsung LCD P2250 22 inch Samsung LCD P2370G 23 inch Samsung LCD 2043 20 inch Samsung LCD 2243EW 22 inch LG LCD W1942SP 19 inch LG LCD W2243S 22 inch LG LCD W2343T 23 inch BenQ LCD G900HD 18 5 inch BenQ LCD G22...

Page 218: ...l com security 218 Performance Series Network Video Recorder User Guide Philips LCD 220CW9 23 inch Philips LCD 220BW9 24 inch Philips LCD 220EW9 25 inch Table E 1 Compatible Monitors Manufacturer Model Screen Size ...

Page 219: ...ompression H 264 MJPEG Resolution 1080p 1920 x 1080 720p 1280 x 720 D1 704 x 576 704 x 480 SXGA 800 x 600 1 3 MP 1280 x 1024 Recording Rate 100 120 fps 1080p 100 120 fps 720p 100 120 fps D1 100 120 fps SXGA 100 120 fps 1 3MP Bit Rate 256 to 8192 kbps Recording Mode Manual Schedule Regular Continuous Motion Detection Alarm Motion Detection Alarm Stop Recording Interval 1 to 120 minutes default 60 m...

Page 220: ...k Function HTTP TCP IP IPv4 IPv6 UPNP RTSP UDP SMTP NTP DHCP DNS IP Filter PPPOE DDNS FTP Alarm Server IP Search Maximum number of users 20 users Smart Phone compatibility IOS Android Storage Internal Storage 2 SATA ports up to 8 TB RAID redundancy Auxiliary Interface USB 2 ports 1 on rear panel USB 2 0 RS232 1 port for PC communication and keyboard RS485 1 port for PTZ control not supported Elect...

Page 221: ...Specifications 221 800 18160 B 07 2014 Physical Dimensions 14 8 x 11 2 x 2 0 inches 375 x 285 x 50 mm Weight without HDD 5 07 pounds 2 3 kg Table F 1 Specifications ...

Page 222: ...www honeywell com security 222 Performance Series Network Video Recorder User Guide ...

Page 223: ...on 176 number of 55 alarm output configuration 148 alarms 179 abnormalities 184 abnormality alarm upload 185 alarm in channel 91 alarm out 93 alarm upload 93 alarm upload error settings 118 anti dither settings 93 buzzer settings 94 camera masking 179 camera masking alarm upload 105 camera masking settings 104 configuring 33 90 configuring IPC offline alarms 91 configuring latch 93 configuring mes...

Page 224: ...tion 164 auto logout 63 auto maintenance 124 auto registration 173 automatic maintenance 201 B back panel components 29 back up files 48 backup 203 file name 54 logs 54 settings 125 200 batch upgrading cameras 133 baud rate default RS232 setting 69 begin time log 203 bi directional communication 144 connections 34 bit rate 64 live video 147 remotely configuring 157 bit rate type 64 remotely config...

Page 225: ...lity settings 117 accounts 120 administrative scoped addresses 76 alarm buzzer 94 alarm delay 93 alarm emails 93 alarm event type 91 alarm in channel 91 alarm messages 93 alarm out 93 alarm output 119 148 alarm period 92 alarm PTZ activation 93 alarm schedule 187 alarm sound file 153 alarm tour 94 108 alarm type 91 alarm upload 93 alarms 33 90 179 alarms recording channel 93 anonymous email 169 an...

Page 226: ...ay settings 62 192 HTTP port 71 162 HTTPS port 162 image quality for snapshots 66 image settings 147 image size for snapshots 66 IP end address 74 IP filter 168 IP multicast group address 76 IP start address 74 IPC external alarm 91 IPC offline alarm 91 latch 93 176 local alarm buzzer 181 local alarm delay 180 local alarm emails 181 local alarm latch 181 local alarm message 181 local alarm period ...

Page 227: ...storage channel 189 schedule main stream channel 189 schedule recording type 67 schedule redundancy 67 schedule snapshot 67 schedules 66 schedulre pre record time 67 snapshot 94 177 snapshot frequency 66 snapshot image quality 66 snapshot image size 66 snapshot settings 66 snapshot timing 66 snapshot trigger 66 SNMP 88 171 SNMP port 172 SNMP read community 172 SNMP trap address 89 172 SNMP trap po...

Page 228: ... DDNS mode 78 DDNS server address 78 167 DDNS server IP address 78 display resolution 108 domain name 167 gateway 70 Honeywell DDNS server address 78 167 HTTP port 71 162 HTTPS port 162 maximum network connections 162 MTU network adaptor 71 NTP port 75 password 111 PTZ matrix 69 resolution 199 restore UPnP defaults 80 RS232 baud rate 69 RS232 data bit 69 RS232 parity 69 RS232 stop bits 69 RTSP por...

Page 229: ...ion settings 99 password 169 port settings 169 receiver 169 sender 169 settings 168 SMTP settings 169 snapshots 169 test 170 title 169 user name 169 email address DDNS 166 email settings configuring 84 emails abnormality 185 camera masking 105 error 185 local alarm 181 motion detection 178 video loss 102 enabling alarm disk error 153 alarm disk full 153 alarm out settings 199 alarm sound 153 alarm...

Page 230: ...in switch 110 GPRS for 3G configurations 163 green recorded file 47 group management 121 naming conventions 121 rules 193 settings 196 groups adding 121 197 modifying 121 197 GUI channel display 107 channel names 107 language 191 time display 107 transparency 107 199 H H 264 64 HDD 35 abnormal indicator 29 bad track warning 52 configuring channels 116 drive info 52 drive status symbols 51 free spa...

Page 231: ...normal indicator 29 license agreement 128 live video audio On Off 147 bit rate 147 channel number 147 decoding mode 147 digital zoom 147 IP address 147 local recording 147 recording system folder 147 snapshot 147 snapshot system folder 147 local alarm activation 181 local recording live video 147 log 53 202 backup 54 203 begin time 203 clear 203 configuration operation 203 data operation 203 detai...

Page 232: ...s 177 mouse properties 63 mouseset 63 MPEG4 64 MTU 71 MTU adaptor default 71 multicast 172 group address 76 settings 76 multiple cast 76 N name backup file 54 naming conventions account 121 group 121 user 121 navigation bar 63 net disconnection 184 IP conflict 184 network alternate DNS server 71 default gateway 70 DHCP 71 fluency 71 HTTP port 71 IP address 70 IP version 70 keyboard 69 LAN download...

Page 233: ...work 29 NTP 192 PoE 30 power input 30 power input port 30 RS232 29 SNMP 172 SNMP trap address 172 SNMP trap port 172 USB 2 0 29 VGA 29 video output 30 power button 27 power input port 30 PPPoE configurations 77 165 name 77 password 77 165 username 165 PPS 166 preferred DNS server 71 preparing for UPnP 170 pre record time configuration 67 preview control settings 201 controls 43 playback 62 privacy...

Page 234: ...139 reserved local multicast group address 76 resolution 64 199 default 199 display 108 remotely configuring 157 restarting the NVR 126 restore to default settings 148 reusable function 121 right click menu 44 router LAN IP 80 port mapping 80 RS232 baud rate 69 configuration 68 configuring the function 69 console control 69 data bit default 69 data bits 69 default baud rate 69 default data bit 69 ...

Page 235: ...rap port 172 version 172 write community 172 write community default 172 SNTP server 74 software CD 127 start talking button 144 startup wizard 63 status icons 40 storage 185 blue 186 channel 187 green 186 local storage for schedules 187 red 186 schedules 185 yellow 186 stream resolution 64 subnet mask built in switch 110 subnet prefix 70 supported cameras 156 switch user 126 SXGA 64 symbols HDD d...

Page 236: ... 78 167 hidden default hidden default user 41 PPPoE 165 users adding 122 194 maximum connection 71 modifying 122 195 V version 55 system 202 vertical synchronization 146 VGA port 29 video card 139 color 44 color settings 44 compression 64 data stream rate 52 default save path 160 file format 145 output port 30 playback 145 148 quality 71 146 remote encoding 156 save path 159 standard 62 191 video ...

Page 237: ...ng 130 WEEE 6 WEP 83 WIFI 81 autoconnect 82 configurations 162 connect 83 connection status 83 disconnect 83 verification type 83 wizard startup 63 WLAN type 164 work day 92 WPA 83 WPA2 83 write community 172 X X 115 Y yellow recorded file 47 Z zoom 48 ...

Page 238: ...www honeywell com security 238 Performance Series Network Video Recorder User Guide ...

Page 239: ......

Page 240: ...ity Products Americas Caribbean Latin America 9315 NW 112th Ave Miami FL 33178 USA www honeywell com security clar 1 305 805 8188 Honeywell Security Asia Pacific 35F Tower A City Center 100 Zun Yi Road Shanghai 200051 China www asia security honeywell com 86 21 2219 6888 Honeywell Security Middle East N Africa Emaar Business Park Sheikh Zayed Road Building No 2 Office No 301 Post Office Box 232362...

Reviews: