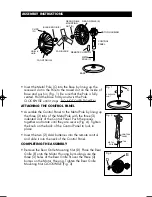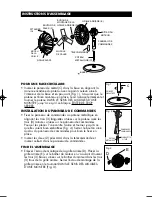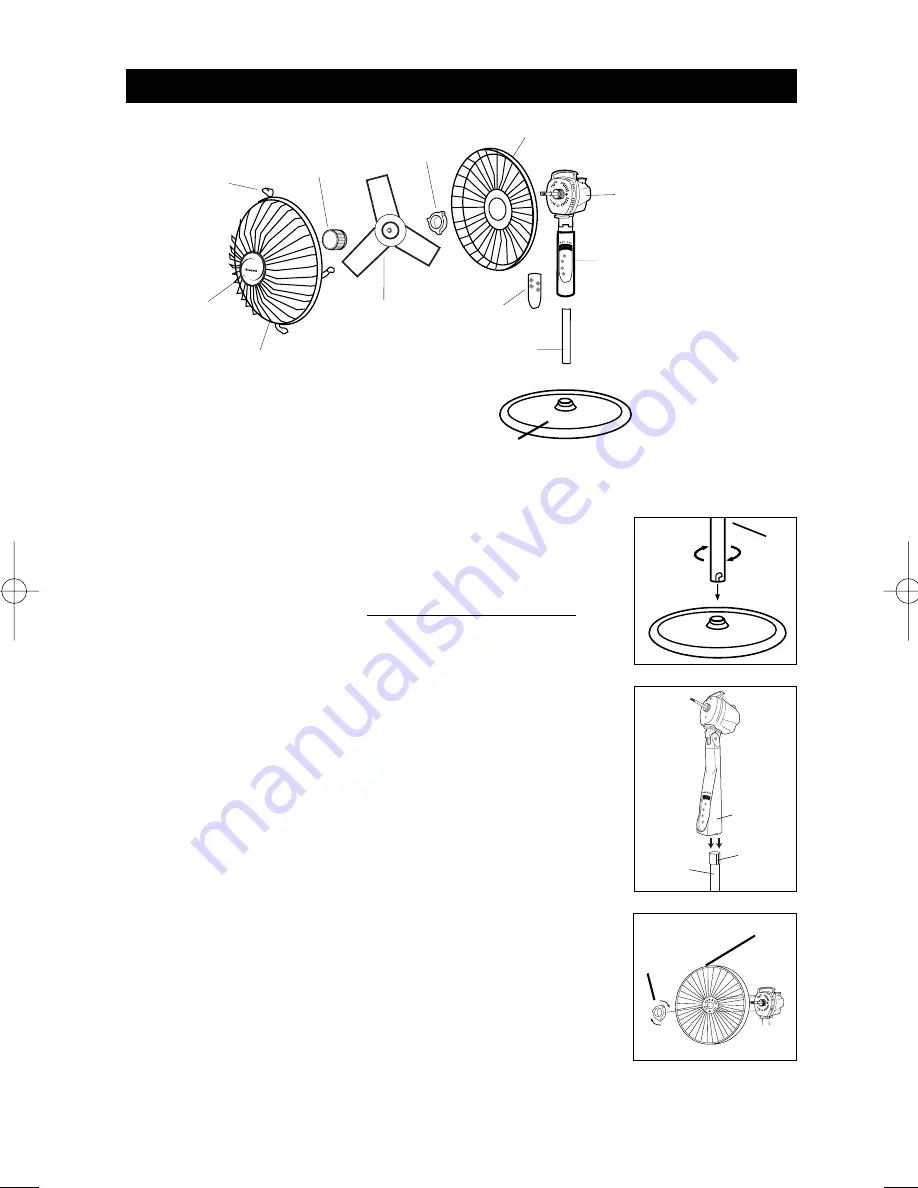
• Insert the Metal Pole (C) into the Base by lining up the
recessed slot in the Pole to the raised dot on the inside of
Base and push in (Fig. 1). Be sure that the Pole is fully
seated. Hold the Base firmly and twist the Pole
CLOCKWISE until it stops. DO NOT OVER-TIGHTEN.
ATTACHING THE CONTROL PANEL
• Assemble the Control Panel to the Metal Pole by lining up
the three (3) tabs of the Metal Pole with the three (3)
indented slots of the Control Panel. Push the pieces
together and rotate until they are secure (Fig. 4). Tighten
the knob on the back of the Control Panel to lock in
place.
• Insert the two (2) AAA batteries into the remote control
and slide it into the neck of the Control Panel.
COMPLETING THE ASSEMBLY
• Remove the Rear Grille Mounting Nut (D). Place the Rear
Grille (E) onto the Motor Housing by making sure the
three (3) holes of the Rear Grille fit over the three (3)
bumps on the Motor Housing. Tighten the Rear Grille
Mounting Nut CLOCKWISE (Fig. 3).
SPEED
BREEZE
TIMER
OFF
TIMER
SPEED
2 4
8
L M
H
BREEZE
TIMER
SPEED
OFF
CLIPS
(G)
BLADE KNOB (F)
REAR GRILLE (E)
GRILLE
HUB
FRONT GRILLE
FAN BLADE
REAR GRILLE
MOUNTING
NUT (D)
METAL
POLE (C)
MOTOR HOUSING
CONTROL
PANEL
REMOTE CONTROL
ASSEMBLY INSTRUCTIONS
BASE
Fig. 1
C
RECESSED
SLOT
Fig. 3
E
D
TIMER
SPEED
2
4
8
L
M
H
TIMER
ON/SP
EED
OFF
BREEZ
E
Fig. 2
TAB
CONTROL
PANEL
METAL
POLE
035-00371-003_R1 HFS-641PC 2/27/04 2:15 PM Page 3


