background image

2

PARTS DESCRIPTION

EN

1)

Control Panel

8)

Drain Tube
(For Continuous Drain)

2)

Handle

9)

Lower Dust Filter

3)

Casters

10) Hose Connector

4)

Air Outlet

11) Lower Rubber Drain Plug 

(Air Conditioning Mode)

5)

Remote Control

12) Drain Plug Cap

6)

Upper Dust Filter

13) Power Supply Cord

7)

Cord Winder

14) Atmosphere Light

*

7

6

1

2

3

8

9

4

10

14

11

12

13

5

*Applicable for models with Atmosphere Light feature only.

Summary of Contents for HG Series

Page 1: ...itung vor dem gebrauch und heben sie sie auf DE Aire Acondicionado Local Manual de Instrucciones Lea y guarde estas instrucciones antes de usar la unidad ES Climatiseur Local Mode d emploi Lire ces instructions avant l utilisation et les conserver FR Model Modèle Modelo Modello Model Modelo Modelo HG Series www honeywellaircomfort com info honeywellaircomfort com Ar Condicionado Local Manual do Ut...

Page 2: ...INCONSISTENCY OR CONFLICT BETWEEN THE ENGLISH VERSION AND ANY OTHER LANGUAGE VERSION OF THE CONTENT OF THIS MATERIAL THE ENGLISH VERSION SHALL PREVAIL WARNING DO NOT use means to accelerate the defrosting process or to clean other than those recommended by the manufacturer The appliance shall be stored in a room without continuously operating ignition sources like open flames an operating gas appli...

Page 3: ...efrigerant circuits Maintenance and repairs requiring the assistance of other qualified personnel must be carried out under the supervision of specialists in the use of inflammable refrigerants All working procedure that affects safety means shall only be carried by competent persons This appliance can not be used by children and persons with reduced physical sensory or mental capabilities or lack o...

Page 4: ...uide strips The appliance should be transported upright or on its side DO NOT use the device in the following cases in a room with continously operating sources of ignition eg open flames an operating gas appliance or an operating electrical heaters In areas where gasoline sulphur oil paint or other flammable goods are stored In an area where the water can be projected DO NOT touch the plug or the d...

Page 5: ...as in unventilated rooms could lead to fire or an explosion hazard should the refrigerant come in contact with electric heaters stoves or other sources of ignition Use care when storing the appliance to prevent mechanical faults Use only implements recommended by the manufacturer for defrosting or cleaning DO NOT use an extension cord with this unit Never insert your fingers or rods into the air out...

Page 6: ...ational regulations The storage of equipment should be in accordance with the manufacturer s instructions Storage package protection should be constructed such that mechanical damage to the equipment inside the package will not cause a leak of the refrigerant charge The maximum number of pieces of equipment permitted to be stored together will be determined by local regulations This marking indica...

Page 7: ...ON WARNING This symbol shows that this appliance uses a flammable refrigerant If the refrigerant is leaked and exposed to an external ignition source there is a risk of fire CAUTION This symbol shows that the operation manual should be read carefully CAUTION This symbol shows that a service personnel should be handling this equipment with reference to the installation manual CAUTION This symbol show...

Page 8: ... evaporates the condensate through the hose There is no need to empty the drainage tank except in humid conditions Read and follow the instructions carefully To ensure optimal efficiency of the product keep doors and windows closed when it is used as an air conditioner or dehumidifier If the product is being used with the fan function only an open window could improve air circulation EN Important Be...

Page 9: ...Filter 3 Casters 10 Hose Connector 4 Air Outlet 11 Lower Rubber Drain Plug Air Conditioning Mode 5 Remote Control 12 Drain Plug Cap 6 Upper Dust Filter 13 Power Supply Cord 7 Cord Winder 14 Atmosphere Light 7 6 1 2 3 8 9 4 10 14 11 12 13 5 Applicable for models with Atmosphere Light feature only ...

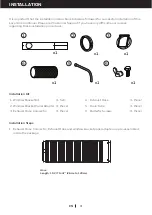
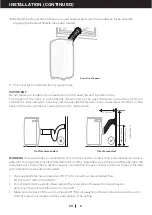
Page 10: ...garding these installation procedures Installation Kit Installation Steps Exhaust Hose Connector Exhaust Hose and window bracket panel adapter are pre assembled inside the package 1 1 Window Bracket Kit 1 Set 4 Exhaust Hose 1 Piece 2 Window Bracket Panel Adapter 1 Piece 5 Drain Tube 1 Piece 3 Exhaust Hose Connector 1 Piece 6 Butterfly Screws 1 Piece 4 5 6 1 3 x1 x1 x1 x1 x1 x1 2 Hose Length 10 23 t...

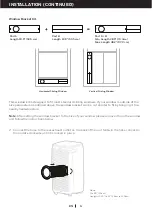
Page 11: ...d follow the instructions below Hose Dia 5 9 15cm Length 10 23 to 47 26cm to 120cm Window Bracket Kit This window kit is designed to fit most standard sliding windows If your window is outside of the size parameters as outlined above the window bracket can be cut shorter to fit by bringing it to a nearby hardware store Horizontal Sliding Window Vertical Sliding Window Part A Length 19 9 50 5 cm Part...

Page 12: ...NUED Horizontal Sliding Window Vertical Sliding Window Connect the window bracket to the window Or 3a Connect the window bracket to the window bracket panel adapter Ensure that all connections are tight and installed properly ...

Page 13: ...or shut off Make sure the back of the unit is at least 20 50 cm away from the wall Do not place the unit in front of curtains or drapes as this could obstruct the airflow WARNING Any warranties included with this product will be voided if an extra extension hose is added to the originally provided installation kit or if the installation is performed differently than the manufacturer s instructions ...

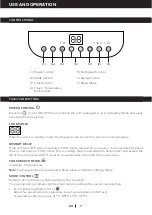
Page 14: ...t and extend the life of the compressor After 3 minutes you will be able to turn ON the unit as usual POWER CONTROL 5 3 2 1 6 7 4 2 settings High and Low Note Fan Speed cannot be adjusted in Sleep Mode and Dehumidifying Mode FAN SPEED CONTROL MODE CONTROL Settings Air Conditioning Dehumidifying Fan Heating The corresponding indicator light will illuminate to indicate the current mode setting Air C...

Page 15: ...ndenses into the internal water tank The unit will pause operation when the tank is full and will restart when the tank has been emptied It is recommended to use the Heating Mode in a room with 50 humidity or lower Avoid operating moisture producing products or appliances such as a humidifier or a kettle when using the unit in Heating Mode See the Draining Water Condensation in Heat Mode section fo...

Page 16: ...e for models with Heating feature only Applicable for models with Atmosphere Light feature only TIMER CONTROL While the unit is turned on press the timer button then press the or to select the number of hours you would like the unit to continue to run The unit will turn on off automatically AUTO TURN OFF While unit is running press the or button to select the number of hours you want the unit to r...

Page 17: ...subject to following two conditions 1 this device may not cause harmful interference and 2 this device must accept any interference received including interference that may cause undesired operation This equipment has been tested and found to comply with the limits for a Class B digital device pursuant to part 15 of the FCC Rules These limits are designed to provide reasonable protection against h...

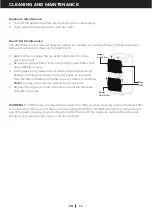
Page 18: ... You may use a vacuum cleaner to remove dust Replace the Upper Grill onto the unit and reinstall the Lower Grill with the screw 1 2 3 4 Dust Filter Maintenance The dust filter is to be cleaned every two weeks to maintain air cooling efficiency Please follow the below instructions for cleaning the dust filters WARNING DO NOT power or operate the Local Air Conditioner when cleaning or when the Dust Fil...

Page 19: ...Connector It is recommended to store the Window Kit parts in a bag together with the Remote Control Drain Tube and placing them together with the Local Air Conditioner unit If needed you can clean the Window Kit with a damp cloth and water before storing Make sure all parts of the Window Kit are dry before storage Cover the Local Air Conditioner with a cloth plastic bag before storage to protect f...

Page 20: ...s only suitable when the unit is set up in Dehumidifier mode The water cannot be drained using the continuous drain option in heating mode In Heating mode the internal water tank collects condensation faster and may require more frequent emptying of the tank in more humid rooms It is recommended to use the heating mode in a room with 50 humidity or lower Avoid operating moisture creating products o...

Page 21: ...ote control need to be replaced Change remote control batteries The power cord is not properly plugged in Remove and reconnect the power cord The safety LCDI plug has tripped USA Canada Mexico only Reset the safety LCDI plug if problem persists contact our customer support USA Canada Mexico only Runs a short while only The thermostat temperature setting is too close to room temperature Lower the s...

Page 22: ...fer to Installation section Temperature setting is too high Reduce temperature setting Air outlet or intake is blocked Remove blockage Room exceeds recommended size Move unit to smaller room Large size or number of windows are decreasing cooling effectiveness Cover windows with curtains or blinds Will not run and WATER FULL indicator illuminates Excess water condensation inside the tank Drain the ...

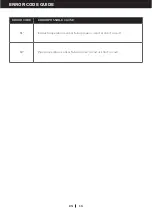
Page 23: ...16 ERROR CODE GUIDE ERROR CODE ERROR POSSIBLE CAUSE E1 Indoor temperature sensor failure open circuit or short circuit E2 Pipe temperature sensor failure open circuit or short circuit EN ...

Page 24: ...NTRE LA VERSION ANGLAISE ET TOUTE AUTRE VERSION LINGUISTIQUE DU CONTENU DE CE DOCUMENT LA VERSION ANGLAISE PRÉVAUDRA MISE EN GARDE NE PAS utiliser de moyens pour accélérer le processus de dégivrage ou pour nettoyer autres que les moyens recommandés par le fabricant L appareil sera stocké dans une pièce sans sources d allumage fonctionnant en continu comme des flammes nues un appareil fonctionnant a...

Page 25: ...eurs compétences pour gérer des réfrigérants en conformité avec la législation du secteur doivent travailler sur des circuits réfrigérants L entretien et les réparations nécessitant l assistance d autre personnel qualifié doivent être effectués sous la supervision de spécialistes de l utilisation de réfrigérants inflammables Toutes les procédures de travail qui touchent aux moyens de sécurité ne ser...

Page 26: ...tuyaux de vidange sont installés assurez vous qu ils sont correctement raccordés et qu ils ne sont pas déformés ou pliés Tout en ajustant les glissières supérieures et inférieures des évents de la sortie d air pincez le doucement avec les mains pour éviter d endommager les glissières des évents L appareil doit être transporté debout ou sur son côté NE PAS utiliser l appareil dans les cas suivants ...

Page 27: ...la porte et NE PAS le tirer le long de bords ou de coins pointus Ne pas percer ni brûler les réfrigérants Avertissement pour garder les ouvertures de ventilation libres de toute obstruction Toujours éteindre et débrancher l appareil lors de son nettoyage ou de son entretien Débranchez l appareil lorsqu il est entreposé ou non utilisé Les gaz réfrigérants peuvent être inodores La stagnation de poss...

Page 28: ...e annulera toute garantie existante Si un entretien est nécessaire contactez un agent d entretien autorisé Les réparations doivent uniquement être effectuées par les centres d entretien autorisés du fabricant Le non respect de cette consigne peut être dangereux Transport d équipement contenant des réfrigérants inflammables Conformité aux règles de transport Marquage des équipements à l aide de pann...

Page 29: ...dique qu un personnel d entretien doit manipuler cet équipement en se référant au manuel d installation ATTENTION Ce symbole indique que des informations sont disponibles comme le mode d emploi ou le manuel d installation Ce marquage indique que ce produit ne doit pas être éliminé avec les autres ordures ménagères dans toute l UE En vue de prévenir d éventuels dommages à l environnement ou à la sa...

Page 30: ...l n est pas nécessaire de vider le réservoir de vidange sauf dans des conditions d humidité Lisez et suivez attentivement les instructions Pour assurer une efficacité optimale du produit gardez les portes et les fenêtre fermées lorsqu il est utilisé en tant que climatiseur ou déshumidificateur Si le produit est utilisé uniquement avec la fonction ventilation une fenêtre ouverte peut améliorer la ci...

Page 31: ...cord de tuyau 4 Sortie d air 11 Bouchon de vidange en caoutchouc inférieur mode climatisation 5 Télécommande 12 Capuchon du bouchon de vidange 6 Filtre à poussière supérieur 13 Câble d alimentation 7 Enrouleur de câble 14 Voyant d atmosphère 7 6 1 2 3 8 9 4 10 14 11 12 13 5 S applique uniquement aux modèles dotés des fonctionnalités Voyant d atmosphère ...

Page 32: ...apes de l installation Le raccord du tuyau d échappement le tuyau d échappement et l adaptateur du panneau de support de fenêtre sont pré assemblés à l intérieur du boîtier 1 1 Kit de support de fenêtre 1 jeu 4 Tuyau d échappement 1 pièce 2 Adaptateur de panneau de support de fenêtre 1 pièce 5 Tube de vidange 1 pièce 3 Raccord de tuyau d échappement 1 pièce 6 Vis à oreilles 1 pièce 4 5 6 1 3 x1 x1...

Page 33: ...s Tuyau Dia 15 cm 5 9 po Longueur 26 cm à 120 cm 10 23 po à 47 po Kit de support de fenêtre Ce kit de fenêtre est conçu pour s adapter à la plupart des fenêtres coulissantes standard Si les mesures de votre fenêtre sont supérieures aux paramètres de taille décrits ci dessus il est possible d adapter le support de fenêtre en le faisant couper dans une quincaillerie Fenêtre coulissante horizontale F...

Page 34: ...te horizontale Fenêtre coulissante verticale Branchez le support de fenêtre à la fenêtre 3a Branchez le support de fenêtre à l adaptateur du panneau de support de fenêtre Assurez vous que tous les raccords sont serrés et correctement installés ...

Page 35: ...ension de l appareil Assurez vous que le dos de l appareil est au moins à 50 cm 20 po du mur Ne placez pas l appareil devant des rideaux ou des tentures car cela pourrait obstruer le débit d air MISE EN GARDE Toutes les garanties incluses avec ce produit seront annulées si une rallonge supplémentaire est ajoutée au kit d installation fourni à l origine ou si l installation est effectuée différemme...

Page 36: ...minutes vous serez en mesure d allumer l appareil comme d habitude COMMANDE ALIMENTATION 5 3 2 1 6 7 4 2 settings réglages Élevé et Faible Remarque La vitesse du ventilateur ne peut pas être réglée en mode Veille et en mode Déshumidification COMMANDE DE VITESSE DU VENTILATEUR COMMANDE DES MODES Réglages Climatisation Déshumidification Ventilateur Chauffage Le témoin lumineux correspondant s allume p...

Page 37: ...appareil suspendra le fonctionnement lorsque le réservoir sera plein et redémarrera lorsque le réservoir aura été vidé Il est recommandé d utiliser le mode Chauffage dans une pièce avec au plus 50 d humidité Évitez de faire fonctionner des produits ou des appareils générant de l humidité comme un humidificateur ou une bouilloire lorsque le mode Chauffage est utilisé Consultez la section Vidange de...

Page 38: ...ec fonctionnalité de Chauffage uniquement S applique uniquement aux modèles dotés des fonctionnalités Voyant d atmosphère COMMANDE DU MINUTEUR Lorsque l appareil est allumé appuyez sur le bouton du minuteur puis sur les boutons ou pour sélectionner le nombre d heures pendant lesquelles vous souhaitez que l appareil continue de fonctionner L appareil s allumera s éteindra automatiquement ARRÊT AUTO...

Page 39: ...conditions suivantes 1 cet appareil ne doit causer aucune interférence nuisible et 2 cet appareil doit accepter toute interférence reçue y compris des interférences pouvant causer un fonctionnement non souhaité Cet équipement a été testé et déclaré conforme aux limites d un appareil numérique de classe B conformément à la section 15 des règles de la FCC Ces limites sont conçues pour apporter une p...

Page 40: ...e supérieure et la grille inférieure sur l appareil et réinstallez la grille inférieure avec la vis 1 2 3 4 Entretien du filtre à poussière Le filtre à poussière doit être nettoyé toutes les deux semaines pour maintenir l efficacité du rafraîchissement par air Veuillez suivre les instructions ci dessous relatives au nettoyage des filtres à poussière MISE EN GARDE NE PAS mettre sous tension ou faire fo...

Page 41: ...anneau du support de fenêtre et le raccord de tuyau Il est recommandé de conserver les pièces du kit de fenêtre dans un sac avec la télécommande et le tuyau de vidange et de les mettre avec le climatiseur local Si nécessaire vous pouvez nettoyer le kit de fenêtre avec un linge humide et de l eau avant de l entreposer Assurez vous que toutes les pièces du kit de fenêtre sont sèches avant l entrepos...

Page 42: ... Déshumidificateur L eau ne peut pas être évacuée en utilisant l option de vidange continue en mode Chauffage En mode Chauffage le réservoir d eau interne collecte la condensation plus vite et peut nécessiter une vidange plus fréquente du réservoir dans des pièces plus humides Il est recommandé d utiliser le mode Chauffage dans une pièce avec au plus 50 d humidité Évitez de faire fonctionner des pr...

Page 43: ... de la télécommande Le câble d alimentation n est pas branché correctement Retirez et rebranchez le câble d alimentation La fiche LCDI de sécurité s est déclenchée USA Canada Mexique uniquement Réinitialisez la fiche LCDI de sécurité si des problèmes persistent contactez notre service client USA Canada Mexique uniquement Ne fonctionne qu un bref moment Le réglage de la température du thermostat est ...

Page 44: ...allation Le réglage de la température est trop élevé Réduisez le réglage de la température La sortie ou la prise d air est bloquée Éliminez le blocage La pièce dépasse la taille recommandée Déplacez l appareil vers une pièce plus petite Une grande superficie ou de nombreuses fenêtres diminuent l efficacité du rafraîchissement Couvrez les fenêtres avec des rideaux ou des volets Ne fonctionne pas et l...

Page 45: ...ES CODES D ERREUR CODE D ERREUR POSSIBLE CAUSE D ERREUR E1 Panne du capteur de température intérieure circuit ouvert ou court circuit E2 Panne du capteur de température du tuyau circuit ouvert ou court circuit FR ...

Page 46: ...NCIAS O CONFLICTOS ENTRE LA VERSIÓN INGLESA Y LA VERSIÓN EN ALGÚN OTRO IDIOMA DEL CONTENIDO DE ESTE MANUAL PREVALECERÁ LA VERSIÓN INGLESA ADVERTENCIA NO utilice medios para limpiar o acelerar el proceso de descongelación salvo aquellos recomendados por el fabricante El aparato debe guardarse en una habitación donde no haya fuentes de ignición que funcionen de manera continua p ej llamas abiertas o...

Page 47: ...en circuitos de refrigeración personas autorizadas por una agencia acreditada que certifique su competencia para manipular refrigerantes cumpliendo con la normativa del sector El mantenimiento y las reparaciones que requieran la asistencia de algún otro personal acreditado deberán realizarse bajo la supervisión de especialistas en el uso de refrigerantes inflamables Cualquier procedimiento que afect...

Page 48: ...n él o desconectarlo accidentalmente Una vez instalados los tubos de evacuación asegúrese de que estén bien conectados y no tengan dobleces o torceduras Cuando quiera ajustar las lamas superiores e inferiores de la salida de aire cójalas con cuidado para evitar dañarlas El aparato debe transportarse derecho o de costado NO utilice el aparato en los casos siguientes En una habitación con fuentes de...

Page 49: ...inas o cantos agudos No perfore o queme los refrigerantes Se advierte que las ranuras de ventilación deben permanecer libre de obstrucciones Apague y desenchufe siempre la unidad cuando lleve a cabo tareas de limpieza o mantenimiento Desenchufe la unidad cuando la guarde o no la utilice El gas refrigerante podría ser inodoro El gas refrigerante estacando de una posible fuga en habitaciones sin ven...

Page 50: ...rvicio técnico autorizado en caso de requerirse alguna reparación Las reparaciones solo deben llevarlas a cabo talleres autorizados por el fabricante Incumplir esto puede resultar peligroso El transporte de equipos que contienen refrigerantes inflamables debe cumplir con las normativas de transporte La marcación del aparato mediante el uso de símbolos debe cumplir con las normas locales La eliminac...

Page 51: ... Este símbolo indica que esta unidad debería ser manipulada por un técnico siguiendo el manual de instalación ATENCIÓN Este símbolo indica que la información está disponible en documentos tales como el manual de instrucciones o el manual de instalación Esta marca indica que el producto no debe eliminarse con otros residuos domésticos en ningún lugar de la UE Para prevenir posibles daños al medioam...

Page 52: ...camente la condensación a través del tubo de escape Salvo en condiciones de humedad no es necesario vaciar el depósito de agua condensada Lea y siga las instrucciones detenidamente Mantenga las puertas y las ventanas cerradas cuando lo utilice como un aire acondicionado o un deshumidificador para garantizar una eficiencia óptima Si el producto se utiliza solamente con la función de ventilación la ci...

Page 53: ...uedas 10 Conector de tubo de escape 4 Salida de aire 11 Salida de agua inferior de goma Modo aire acondicionado 5 Mando a distancia 12 Tapón de la boca de drenaje 6 Filtro de polvo superior 13 Cable de alimentación 7 Recogecable 14 Luz ambiental 7 6 1 2 3 8 9 4 10 14 11 12 13 5 Aplicable solamente a modelos con luz ambiental ...

Page 54: ... proceso de instalación Installation Kit Pasos de la instalación El tubo de escape el conector del tubo de escape y el adaptador del panel de ventana vienen preensamblados 1 1 Panel de ventana 1 Set 4 Tubo de escape 1 Pieza 2 Adaptador de panel de ventana 1 Pieza 5 Tubo de drenaje 1 Pieza 3 Conector del tubo de escape 1 Pieza 6 Tornillo de mariposa 1 Pieza 4 5 6 1 3 x1 x1 x1 x1 x1 x1 2 Tubo de esc...

Page 55: ...ntinuación Tubo de escape Diámetro 5 9 15 cm Longitud 10 23 a 47 26 cm a 120 cm Panel de ventana Este kit para ventanas está diseñado para ajustarse a la mayoría de las ventanas deslizantes estándar Si su ventana está fuera de los parámetros de longitud mencionados anteriormente el panel de ventana puede ser acortado en una ferretería cercana Ventana deslizante horizontal Ventana deslizante vertic...

Page 56: ...ana deslizante horizontal Ventana deslizante vertical Conecte el panel de ventana a la ventana 3a Conecte el panel de ventana al adaptador del panel Asegúrese de que todas las conexiones estén bien insertadas e instaladas correctamente ...

Page 57: ...cione bien o se apague Asegúrese de que la parte trasera esté a una distancia mínima de 20 50 cm de la pared No coloque la unidad delante de cortinas o coberturas ya que podrían obstruir el flujo de aire ADVERTENCIA Cualquier garantía incluida con este producto quedará anulada si se añade un conducto adicional al provisto con el kit de instalación o si la instalación se realiza sin seguir las instr...

Page 58: ... de 3 minutos podrá encender la unidad como de costumbre CONTROL DE ALIMENTACIÓN 5 3 2 1 6 7 4 2 niveles Alta y Baja Nota la velocidad del ventilador no puede ser ajustada en los modos de reposo y deshumidificación CONTROL DE LA VELOCIDAD DEL VENTILADOR SELECTOR DE MODO Modos aire acondicionado deshumidificación ventilación calefacción La luz indicadora correspondiente se iluminará para indicar el m...

Page 59: ...á cuando el depósito se llene y reanudará su funcionamiento una vez vaciado Se recomienda usar el modo de calefacción en una habitación con un nivel de humedad igual o inferior al 50 No utilice productos o aparatos que produzcan humedad tales como humidificadores o hervidores cuando use la unidad en el modo de calefacción Consulte el apartado Drenaje del agua condensada en el modo de calefacción p...

Page 60: ... función de calefacción Aplicable solamente a modelos con luz ambiental CONTROL DEL TEMPORIZADOR Con la unidad encendida pulse el botón del temporizador y use los botones y para ajustar el número de horas que quiere que la unidad siga funcionando La unidad se encenderá y apagará automáticamente APAGADO AUTOMÁTICO Con la unidad en funcionamiento use los botones y para ajustar el número de horas que...

Page 61: ...mativas de la FCC Su uso está sujeto a las dos condiciones siguientes 1 este aparato no debe causar interferencias dañinas y 2 debe aceptar cualquier interferencia recibida incluyendo aquellas que puedan causar un funcionamiento indeseado Tras someterlo a una serie de pruebas se ha constatado que este aparato cumple los límites exigidos para dispositivos digitales pertenecientes a la Categoría B s...

Page 62: ...puede usar una aspiradora para limpiar el polvo Vuelva a colocar la rejilla superior y atornille de nuevo la rejilla inferior 1 2 3 4 Mantenimiento del filtro de polvo El filtro de polvo debe limpiarse cada dos semanas para mantener la eficiencia de refrigeración Por favor siga las instrucciones siguientes para limpiar los filtros de polvo ADVERTENCIA NO encienda u opere el aire acondicionado cuando l...

Page 63: ...uardar las piezas del kit para ventanas en una bolsa junto con el mando a distancia y el tubo de drenaje y ponerlos en el mismo lugar que el aire acondicionado portátil De ser necesario puede limpiar el kit para ventanas con un paño húmedo y agua antes de guardarlo Asegúrese de que todas las piezas del kit para ventanas están secas antes de guardarlas Cubra el aire acondicionado portátil con una f...

Page 64: ... deshumidificación El agua no puede ser drenada usando la opción de drenaje continuo en el modo de calefacción En el modo de calefacción el depósito de agua interno recoge el agua condensada a un mayor ritmo y puede requerir un vaciado más frecuente del depósito en habitaciones húmedas Se recomienda usar el modo de calefacción en una habitación con un nivel de humedad igual o inferior al 50 No util...

Page 65: ...pilas del mando a distancia El cable de alimentación no está bien enchufado Desconecte el cable de alimentación y vuelva a conectarlo El enchufe LCDI ha saltado EE UU Canadá México solamente Restablezca el enchufe LCDI y contacte con nuestro servicio de atención al cliente si el problema persiste EE UU Canadá México solamente Solo funciona brevemente La temperatura establecida del termostato está ...

Page 66: ...lación La temperatura seleccionada es demasiado elevada Reduzca la temperatura seleccionada La salida o la entrada de aire están obstruidas Retire la obstrucción La habitación excede el tamaño recomendado Mueva la unidad a una habitación más pequeña Su gran tamaño o el número de ventanas están reduciendo su efectividad refrigerante Cubra las ventanas con cortinas o persianas No funciona y el indic...

Page 67: ...OS DE ERRORES CÓDIGO DE ERROR POSIBLE CAUSA DEL ERROR E1 Fallo del sensor de la temperatura interior circuito abierto o cortocircuito E2 Fallo del sensor de temperatura de la tubería circuito abierto o cortocircuito ES ...

Page 68: ...INCONSISTENTIE OF VERSCHIL IS TUSSEN DE ENGELSE VERSIE EN EEN ANDERE TALENVERSIE VAN DE INHOUD VAN DIT MATERIAAL IS DE ENGELSE VERSIE LEIDEND WAARSCHUWING GEBRUIK GEEN middelen om het ontdooiingsproces te versnellen of om schoon te maken tenzij geadviseerd door de fabrikant Het toestel moet in een ruimte worden opgeslagen zonder ontstekingsbronnen zoals open vlammen een werkend gastoestel of elekt...

Page 69: ...n van ander gekwalificeerd personeel moeten worden uitgevoerd onder toezicht van specialisten op het gebied van ontvlamare koelmiddelen Alle werkwijze die veiligheidsmiddelen beïnvloeden dienen slechts te worden uitgevoerd door bekwame personen Dit toestel mag niet worden gebruikt door kinderen en personen met verminderde fysieke sensorische of geestelijke beperkingen of gebrek aan ervaring en kenn...

Page 70: ... Het toestel dient rechtop of op zijn kant te worden vervoerd Gebruik het apparaat NIET in de volgende gevallen in een ruimte met ontstekingsbronnen b v open vlammen een werkend gastoestel of werkende elektrische verwarmers In gebieden waar benzine zwavel olie verf of andere brandbare goederen worden opgeslagen In een ruimte waar water gespoten kan worden Raak het stopcontact of het apparaat NIET ...

Page 71: ...kunnen brand of explosiegevaar veroorzaken indien het koelmiddel in contact komt met elektrische verwarmers fornuizen of andere bronnen van ontsteking Zorg ervoor dat het toestel goed wordt opgeborgen om mechanische defecten te voorkomen Gebruik alleen producten die door de fabrikant zijn aanbevolen voor ontdooiing of schoonmaak Gebruik GEEN verlengsnoer voor dit toestel Steek nooit uw vingers in ...

Page 72: ...e regelgeving De opslag van materiaal dient in overeenstemming te zijn met de instructies van de fabrikant Opslag dient zodanig te worden verricht dat mechanische schade aan het apparatuur in het pakket geen lek veroorzaakt aan het koelmiddel Het maximum aantal apparatuur dat samen opgeslagen mag worden wordt bepaald door lokale regelgeving Dit teken geeft aan dat dit product niet met andere huish...

Page 73: ...RING WAARSCH UWING Dit symbool laat zien dat dit toestel een ontvlambare koelmiddel gebruikt Als het koelmiddel lekt en is blootgesteld aan een externe ontstekingsbron is er een risico op brand LET OP Dit teken laat zien dat de handleiding zorgvuldig moet worden gelezen LET OP Dit teken laat zien dat een servicemedewerker het apparatuur dient te installeren aan de hand van de installatiehandleidin...

Page 74: ...t toestel verdampt automatisch condens door de slang Het is niet nodig om de drainagetank te legen tenzij in vochtige omstandigheden Lees en volg de instructies zorgvuldig Voor optimale efficiëntie van het product dient u de deuren en ramen te sluiten tijdens het gebruik van de airconditioner of ontvochtiger Als het product alleen met met de ventilatorfunctie wordt gebruikt kan een open venster de ...

Page 75: ...ste stoffilter 3 Zwenkwielen 10 Slangverbinder 4 Luchtuitlaat 11 Onderste rubberen afvoerplug Airconditioning modus 5 Afstandsbediening 12 Afvoerplug dop 6 Bovenste stoffilter 13 Stroomkabel 7 Oprolmechanisme 14 Sfeerlicht 7 6 1 2 3 8 9 4 10 14 11 12 13 5 Slechts toepasbaar voor modellen met een sfeerlicht ...

Page 76: ...n of vragen heeft over deze installatieprocedures Installatiekit Installatie stappen Afvoerslang verloopstuk afvoerslang en raambevestiging paneel adapter zijn voorgemonteerd in het pakket 1 1 Raambevestigingskit 1 Set 4 Afvoerslang 1 Stuk 2 Raambevestiging paneel adapter 1 Stuk 5 Afvoerbuis 1 Stuk 3 Afvoerslang verloopstuk 1 Stuk 6 Vleugelmoeren 1 Stuk 4 5 6 1 3 x1 x1 x1 x1 x1 x1 2 Slang Lengte 2...

Page 77: ... raam en onderstaande instructies te volgen Slang Dia 15 cm Lengte 26 cm tot 120 cm Raambevestigingskit Deze raamkit is ontworpen voor de meeste standaard schuiframen Als uw raam groter is dan de parameters zoals hierboven geschetst kan de raambevestiging verkort worden zodat het past door het naar een nabijgelegen bouwmarkt te brengen Horizontale schuifraam Verticale schuifraam Deel A Lengte 50 5...

Page 78: ...ERVOLG Horizontale schuifraam Verticale schuifraam Plaats de raambevestiging aan het raam 3a Verbind de raambevestiging aan de raambevestiging paneel adapter Zorg ervoor dat alle verbindingen goed vast en bevestigd zijn ...

Page 79: ...l defect raakt of uitschakelt Zorg ervoor de achterkant van het toestel minstens 50 cm vanaf de muur staat Plaats het toestel niet voor gordijnen aangezien dit de luchtstroom kan belemmeren WAARSCHUWING Garantie inbegrepen met dit product zal nietig worden verklaard als een extra verlengslang wordt toegevoegd aan de oorspronkelijk verstrekte installatiekit of als de installatie anders wordt uitgev...

Page 80: ... Na 3 minuten kunt u het toestel AAN zetten zoals gebruikelijk AAN UIT INSTELLINGEN 5 3 2 1 6 7 4 2 instellingen Hoog en Laag OPMERKING De Ventilatorsnelheid kan niet worden aangepast in Slaapmodus en Ontvochtigingsmodus VENTILATORSNELHEID INSTELLINGEN MODUS INSTELLINGEN Instellingen Airconditioning Ontvochtigen Ventilator Verwarmen Het overeenkomstige indicatielicht zal gaan verlichten om de huid...

Page 81: ...condenseert Het toestel pauzeert wanneer de tank geheel vol is en zal herstarten wanneer de tank is leeggemaakt Advies is om de Verwarmingsmodus te gebruiken in een ruimte met minder dan 50 vocht of lager Vermijd producten die zorgen voor vocht of toestellen zoals een luchtbevochtiger of een ketel tijdens het gebruik van het toestel in Verwarmingsmodus Raadpleeg Drainage Water Condensatie in Verwa...

Page 82: ...h Heating feature only Slechts toepasbaar voor modellen met een sfeerlicht TIMER INSTELLINGEN Wanneer het toestel is ingeschakeld drukt u op de of om het aantal uren te selecteren voor hoelang u wilt dat het toestel werkt Het toestel zal automatisch in uitschakelen AUTOMATISCH UITSCHAKELEN Terwijl het toestel aanstaat drukt u op de of knop om het aantal uren te selecteren voor hoelang u wilt dat h...

Page 83: ... aan de volgende twee voorwaarden 1 dit toestel mag geen schadelijke storing veroorzaken en 2 dit toestel moet elke ontvangen storing goedkeuren inclusief interferentie die ongewenste werking kan veroorzaken Dit materiaal is getest en bevonden te voldoen aan de normen voor een digitaal apparaat van Klasse B overeenkomstig aan deel 15 van de FCC regels Deze normen zijn bedoeld om redelijke bescherm...

Page 84: ...een stofzuiger gebruiken om stof te verwijderen Plaats het Bovenste Rooster terug aan het toestel en plaats het Onderste Rooster terug met de schroef 1 2 3 4 Onderhoud van de stoffilter De stoffilter moet om de twee weken worden schoongemaakt om efficiënte luchtkoeling te behouden Volg onderstaande instructies voor het schoonmaken van de stoffilters WAARSCHUWING NIET de Verplaatsbare Airconditioner in...

Page 85: ...aambevestiging paneel adapter en Slangverbinder Het wordt aanbevolen om de Raamkit onderdelen samen met de afstandsbediening Afvoerbuis en Verplaatsbare airconditioner te bewaren Indien nodig kunt u de Raamkit met een vochtige doek en water schoonmaken alvorens op te slaan Zorg ervoor dat alle onderdelen van de Raamkit droog zijn voor opslag Bedek de Verplaatsbare airconditioner met een doek plast...

Page 86: ...oestel is ingeschakeld in de Ontvochtigingsmodus Het water kan niet worden afgevoerd met de ononderbroken afvoeroptie tijdens verwarmings modus Tijdens Verwarmingsmodus verzamelt de interne watertank sneller condensatie en kan het nodig zijn om de tank in vochtigere ruimten vaker te legen Advies is om de Verwarmingsmodus te gebruiken in een ruimte met minder dan 50 vochtigheid of lager Vermijd pro...

Page 87: ...batterijen in de afstandsbediening Het netsnoer is niet correct aangesloten Het netsnoer verwijderen en opnieuw aansluiten De veiligheids LCDI plug is in werking gesteld alleen in de V S Canada Mexico Reset de veiligheid LCDI Als het probleem voortduurt neem dan contact op met onze klantenservice alleen V S Canada Mexico Werkt slechts voor korte tijd De instelling van de thermostaat temperatuur li...

Page 88: ...allatie De temperatuursinstelling is te hoog Verlaag de temperatuurinstelling Luchtafvoer of ingang wordt geblokkeerd Verwijder de verstopping De kamer overschrijdt de geadviseerde grootte Plaats het toestel in een kleinere ruimte De grootte of het aantal vensters vermindert het verkoelend effect Bedek de vensters met gordijnen of jaloezieën Werkt niet en het WATER IS VOL indicatielampje licht op ...

Page 89: ...16 HANDLEIDING FOUTCODES FOUTCODE DE MOGELIJKE OORZAAK VAN DE FOUT E1 Storing temperatuursensor binnenshuis open circuit of kortsluiting E2 Storing temperatuursensor buis open circuit of kortsluiting NL ...

Page 90: ...SEN AUFBEWAHREN FALLS ZWISCHEN DER ENGLISCHEN UND DEN ÜBERSETZTEN VERSIONEN DES INHALTS DIESES MATERIALS UNSTIMMIGKEITEN ODER WIDERSPRÜCHE BESTEHEN IST DIE ENGLISCHE VERSION MASSGEBEND WARNUNG Verwenden Sie KEINE anderen als die vom Hersteller empfohlenen Hilfsmittel zur Beschleunigung des Abtauvorgangs oder zur Reinigung des Geräts Das Gerät sollte in einem Raum ohne kontinuierlich arbeitende Zün...

Page 91: ...nur Personen mit einer Zulassung von einer akkreditierten Behörde die deren Kompetenz im Umgang mit Kältemittel unter Einhaltung der Branchengesetze bestätigt an dem Kältemittelkreislauf arbeiten Wartungsarbeiten und Reparaturen die die Hilfe anderer Fachkräfte erfordern müssen unter Aufsicht von Fachleuten im Umgang mit brennbaren Kältemitteln durchgeführt werden Alle Arbeitsvorgänge die Sicherhe...

Page 92: ...ie bei der Verlegung von Abflussrohren darauf dass die Abflussrohre richtig angeschlossen und nicht verzogen oder gebogen sind Zupfen Sie bei der Einstellung der oberen und unteren Windleitstreifen des Luftauslasses diesen vorsichtig mit den Händen um eine Beschädigung der Windleitstreifen zu vermeiden Das Gerät sollte in aufrechter Position oder auf der Seite transportiert werden Das Gerät NICHT in...

Page 93: ...NICHT in der Tür einklemmen und NICHT über scharfe Kanten oder um scharfkantige Ecken ziehen Das Gerät nicht durchstechen oder Kältemittel verbrennen Eine Warnung dass alle Lüftungsöffnungen frei von Hindernissen zu halten sind Schalten Sie das Gerät zum Reinigen oder Warten immer aus und ziehen Sie den Netzstecker aus der Steckdose Ziehen Sie den Netzstecker des Geräts aus der Steckdose wenn es g...

Page 94: ... andere Weise als in dieser Bedienungsanleitung gezeigt zu installieren Bei einer unsachgemäßen Installation entfällt jede Gewährleistung Für die Wartung ist ein zugelassener Kundendienst zu kontaktieren Reparaturen dürfen nur von autorisierten Kundenzentren des Herstellers durchgeführt werden Bei Nichteinhaltung besteht Gefahr Beim Transport von Geräten mit brennbaren Kältemitteln sind die Transp...

Page 95: ...f hin dass qualifiziertes Fachpersonal dieses Gerät unter Einbeziehung der Installationsanleitung handhaben sollte ACHTUNG Dieses Symbol weist darauf hin dass Informationen vorhanden sind wie z B Bedienungsanleitung oder Installationsanleitung Diese Kennzeichnung weist daraufhin dass dieses Produkt nicht mit dem normalen Hausmüll innerhalb der EU entsorgt werden sollte Um mögliche Gefahren für die ...

Page 96: ...unsten Der Wasserbehälter muss nur in feuchten Umgebungsbedingungen entleert werden Lesen und folgen Sie den Anleitungen sorgfältig Um eine optimale Effizienz des Produktes sicherzustellen sollten Türen und Fenster geschlossen werden wenn das Produkt als Klimagerät oder Luftentfeuchter verwendet wird Wird das Produkt nur mit der Ventilatorfunktion verwendet kann ein offenes Fenster die Luftzirkulat...

Page 97: ...er Staubfilter 3 Rollen 10 Schlauchverbinder 4 Luftauslass 11 Unterer Gummiablassstutzen Kühlungsmodus 5 Fernbedienung 12 Verschluss des Ablassstutzen 6 Oberer Staubfilter 13 Netzkabel 7 Kabelaufwicklung 14 Anzeigeleuchte 7 6 1 2 3 8 9 4 10 14 11 12 13 5 Gilt nur für Modelle mit Anzeigeleuchten Funktionen ...

Page 98: ...n Installationsschritten haben Installationsset Installationsschritte Abluftschlauchverbinder Abluftschlauch und Scheibenadapter wurden bereits vormontiert verpackt 1 1 Fensterhalterungsset 1 Satz 4 Abluftschlauch 1 Teil 2 Scheibenadapter der Fensterhalterung 1 Teil 5 6 Ablaufschlauch Flügelschraube 1 Teil 1 Teil 3 Abluftschlauchverbinder 1 Teil 4 5 6 1 3 x1 x1 x1 x1 x1 x1 2 Schlauch Länge 26 cm b...

Page 99: ...r und folgen Sie den unterstehenden Anleitungen Schlauch Durchmesser 15 cm 5 9 Zoll Länge 26 cm bis 120 cm 10 23 Zoll bis 47 Zoll Fensterhalterungsset Dieses Fensterset passt zu den meisten Standard Schiebefenstern Wenn sich Ihr Fenster nicht den oben stehenden Größenangaben entspricht kann die Fensterhalterung in einem Baumarkt in Ihrer Nähe gekürzt werden Waagerechtes Schiebefenster Senkrechtes ...

Page 100: ...htes Schiebefenster Senkrechtes Schiebefenster Bringen Sie die Fensterhalterung am Fenster an Oder 3a Verbinden Sie die Fensterhalterung mit dem Scheibenadapter Vergewissern Sie sich dass alle Verbindungen fest und korrekt hergestellt sind ...

Page 101: ...s führen Achten Sie darauf dass die Rückseite des Gerätes mindestens 50 cm 20 Zoll von der Wand entfernt ist Platzieren Sie das Gerät nicht vor Vorhängen oder Gardinen da sonst der Luftfluss behindert wird WARNUNG Alle Garantien mit denen dieses Produkt versehen ist erlöschen wenn ein weiterer Verlängerungsschlauch zusätzlich zu dem ursprünglich mitgelieferten Installationsset hinzugefügt wird oder...

Page 102: ...ressors hinzugefügt wurde Nach 3 Minuten können Sie das Gerät wie üblich einschalten EIN AUS TASTE 5 3 2 1 6 7 4 2 Stufen Hoch und Niedrig Hinweis Die Ventilatorgeschwindigkeit kann nicht im Schlafmodus oder Luftentfeuchtungsmodus eingestellt werden VENTILATORGESCHWINDIGKEITSREGELUNG MODUSAUSWAHL Modi Luftkühlung Luftentfeuchtung Ventilator Heizung Die entsprechende Kontrollleuchte leuchtet auf um...

Page 103: ...ierten Wasserbehälter kondensiert Das Gerät schaltet sich aus wenn der Behälter voll ist und schaltet sich wieder ein nachdem der Behälter entleert wurde Es empfiehlt sich den Heizungsmodus in einem Zimmer mit einer Luftfeuchtigkeit von maximal 50 zu nutzen Es sollten keine Produkte oder Geräte z B Luftbefeuchter oder Wasserkocher in Betrieb sein wenn das Gerät im Heizungsmodus genutzt wird Lesen ...

Page 104: ...turen fort wenn das System abgetaut ist Gilt nur für Modelle mit Heizfunktion Gilt nur für Modelle mit Anzeigeleuchten Funktionen TIMER TASTE Drücken Sie die Timer Taste wenn das Gerät eingeschaltet ist und dann die oder Taste um die Betriebsdauer des Geräts einzustellen Anzahl der Stunden Das Gerät schaltet sich automatisch ein aus AUTOMATISCHE AUSSCHALTUNG Drücken Sie die oder Taste während das ...

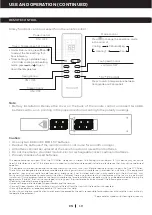
Page 105: ...ese Taste um zwischen Celsius und Fahrenheit zu wechseln Modus Auswahltaste Ventilatorschwindigkeitsregler C F Taste Hoch Niedrig Gilt nur für Modelle mit Heizfunktion Dieses Gerät wurde getestet und entspricht den Grenzwerten für ein digitales Gerät der Klasse B gemäß Teil 15 der FCC Bestimmungen Ziel dieser Bestimmungen ist es innerhalb einer Wohnumgebung einen angemessenen Schutz gegen störende...

Page 106: ...Hinweis Sie können mithilfe eines Staubsaugers den Staub entfernen Setzen Sie das obere Gitter wieder auf das Gerät und befestigen Sie das untere Gitter wieder mit der Schraube 1 2 3 4 Reinigung und Wartung des Staubfilters Der Staubfilter muss alle zwei Wochen gereinigt werden um die Kühlleistung aufrechtzuerhalten Folgen Sie bitte den nachfolgenden Anleitungen zur Reinigung des Staubfilters WARNUNG...

Page 107: ...rung und den Schlauchverbinder Es empfiehlt sich die Teile des Fensterinstallationssets zusammen mit der Fernbedienung dem Ablaufschlauch in einem Beutel aufzubewahren und zusammen mit dem lokalen Klimagerät zu verstauen Sie können das Fensterinstallationsset gegebenenfalls mit einem feuchten Tuch und Wasser reinigen bevor Sie es lagern Stellen Sie vor der Lagerung sicher dass alle Teile des Fenste...

Page 108: ...rd Im Heizungsmodus kann das Wasser nicht mithilfe der kontinuierlichen Ablaufoption abgelassen werden Im Heizungsmodus sammelt der integrierte Wasserbehälter das Kondenswasser schneller und muss eventuell in feuchteren Räumen häufiger entleert werden Es empfiehlt sich den Heizungsmodus in einem Zimmer mit einer Luftfeuchtigkeit von maximal 50 zu nutzen Es sollten keine Produkte oder Geräte z B Lu...

Page 109: ...er Fernbedienung auswechseln Das Netzkabel ist nicht korrekt verbunden Kabel von der Stromquelle trennen und wieder verbinden Der LCDI im Sicherheitsstecker wurde ausgelöst nur USA Kanada Mexiko LCDI des Sicherheitssteckers zurücksetzen falls das Problem weiterbesteht wenden Sie sich bitte an unseren Kundendienst nur USA Kanada Mexiko Läuft nur für kurze Zeit Die Temperatureinstellung entspricht o...

Page 110: ...he Installationsabschnitt Temperatur ist zu hoch eingestellt Temperatureinstellung verringern Luftauslass oder einlass ist blockiert Blockade entfernen Das Zimmer ist größer als die empfohlene Größe Gerät in ein kleineres Zimmer stellen Ein großes Zimmer oder viele Fenster verringern die Kühlleistung Fenster mit Vorhängen oder Fensterläden verdecken Läuft nicht und die WASSERBEHÄLTER VOLL Anzeige ...

Page 111: ...LÄRUNG DER FEHLERCODES FEHLERCODE MÖGLICHE FEHLERURSACHE E1 Ausfall des Innentemperatursensors offener Schaltkreis oder Kurzschluss E2 Ausfall des Rohrtemperatursensors offener Schaltkreis oder Kurzschluss DE ...

Page 112: ...NCONGRUENZE O CONFLITTI TRA LA VERSIONE INGLESE E LA VERSIONE IN ALTRE LINGUE DEL CONTENTUTO DEL PRESENTE MATERIALE PREVARRA LA VERSIONE IN LINGUA INGLESE AVVERTENZA NON usare mezzi per accelerare il processo di scongelamento o per la pulizia diversi da quelli raccomandai dal produttore Il dispositivo deve essere conservato in una stanza priva di fonti di ignizione in continuo funzionamento come c...

Page 113: ...a manutenzione e la riparazione che richiedono assistenza da parte di altro personale qualificato devono essere eseguite sotto la supervisione di esperti nell utilizzo di refrigeranti infiammabili La globalità delle procedure che influiscono sulla sicurezza deve essere eseguita da personale competente Questo dispositivo non può essere utilizzato da bambini e persone con ridotte capacità fisiche sensor...

Page 114: ...i danneggiare le strisce Il dispositivo deve essere trasportato in posizione eretta o su un lato NON usare il dispositivo nei seguenti casi in una stanza in cui vi siano fonti di ignizione a funzionamento continuo es apparecchi a gas o elettrici In aree in cui sono conservati benzina zolfo olio vernice o altri prodotti infiammabili In un area in cui può fuoriuscire dell acqua NON toccare la spina o...

Page 115: ...one o quando non è in uso Il gas refrigerante potrebbe essere inodore Il ristagno di possibili perdite di gas refrigerante in stanze non ventilate può comportare rischi di incendio o esplosione laddove il refrigerante dovesse entrare in contatto con riscaldatori elettrici stufe o altre fonti di ignizione Fare attenzione quando si ripone il dispositivo al fine di evitare danni meccanici Usare solo s...

Page 116: ...gni Conformità con le norme locali Smaltimento dell apparecchiatura usando refrigeranti infiammabili Conformità con le norme nazionali La conservazione dell apparecchiatura deve avvenire nel rispetto delle istruzioni del produttore La conservazione dell imballo deve avvenire in modo tale da evitare che danni meccanici al dispositivo all interno della confezione causino una perdita di carica refrige...

Page 117: ...ostra che il dispositivo impiega un refrigerante infiammabile In caso di perdite di refrigerante e se questo è esposto a fonti di ignizione esterne sussiste rischio di incendio ATTENZIONE Questo simbolo mostra che il manuale operativo deve essere letto con attenzione ATTENZIONE Questo simbolo mostra che il personale di servizio deve maneggiare il dispositivo facendo riferimento al manuale di instal...

Page 118: ...il tubo Non vi è necessità di svuotare il serbatoio di drenaggio salvo in caso di condizioni di umidità Leggere e seguire attentamente le istruzioni Per garantire un efficienza ottimale del prodotto tenere porte e finestre chiuse quando si usa il condizionatore d aria o il deumidificatore Se il prodotto viene usato solo con la funzione ventilatore la presenza di una finestra aperta potrebbe migliora...

Page 119: ...3 Rotelle 10 Raccordo rapido 4 Bocchettone dell aria 11 Tappo di scarico inferiore Modalità climatizzatore 5 Telecomando 12 Cappuccio del tappo di scarico 6 Filtro antipolvere superiore 13 Cavo di alimentazione 7 Avvolgicavo 14 Luce d atmosfera 7 6 1 2 3 8 9 4 10 14 11 12 13 5 Applicabile solo ai modelli con la funzione Luce d atmosfera ...

Page 120: ...i installazione Kit di installazione Passaggi di installazione Raccordo tubo di scarico tubo di scarico e adattatore per pannello staffe per finestra sono pre assemblati nella confezione 1 1 Kit staffe per finestra 1 Kit 4 Tubo di scarico 1 Pezzo 2 Adattatore per pannello staffe per finestra 1 Pezzo 5 Tubo di drenaggio 1 Pezzo 3 Raccordo tubo di scarico 1 Pezzo 6 Viti a farfalla 1 Piece 4 5 6 1 3 x1 ...

Page 121: ...Lunghezza da 10 23 a 47 da 26cm a 120cm Kit staffe per finestra Questo kit per finestra è progettato per essere adattato alla maggior parte delle finestre scorrevoli Se la finestra si trova all esterno dei parametri dimensionali come accennato in precedenza la staffa della finestra può essere ridotta per essere adattata portandola in negozio di ferramenta nelle vicinanze Finestra scorrevole orizzontale...

Page 122: ...ntale Finestra scorrevole verticale Collegare la staffa della finestra alla finestra O 3a Collegare la staffa della finestra all adattatore del pannello della staffa della finestra Assicurarsi che tutti i collegamenti siano ben saldi e installati correttamente ...

Page 123: ...eriore del dispositivo si trovi almeno a 20 50 cm dalla parete Non posizionare il dispositivo di fronte a tende o drappi in quanto questi potrebbero ostacolare il flusso dell aria AVVERTENZA qualsiasi garanzia inclusa nel presente prodotto sarà inficiata laddove venisse aggiunta una prolunga del tubo rispetto al kit di installazione originale o l installazione venisse eseguita in modo diverso dalle...

Page 124: ...compressore Dopo 3 minuti sarà possibile accendere il dispositivo come di consueto CONTROLLO DELLA POTENZA 5 3 2 1 6 7 4 2 impostazioni alta e bassa Nota la velocità della ventola non può essere regolata in Modalità Sonno e Deumidificazione CONTROLLO VELOCITA DELLA VENTOLA CONTROLLO MODALITA Impostazioni condizionatore deumidificatore ventilatore riscaldamento La spia luminosa corrispondente si illu...

Page 125: ...à dall aria la quale condensa nel serbatoio dell acqua interno Il dispositivo interrompe il funzionamento quando il serbatoio è pieno e si riavvia quando viene svuotato Si raccomanda di usare la modalità Riscaldamento in stanze con tasso di umidità pari al 50 o inferiore Evitare di usare prodotti o dispositivi che producano umidità come umidificatori o bollitori mentre si usa il dispositivo in mod...

Page 126: ...o con funzione Riscaldamento Applicabile solo ai modelli con la funzione Luce d atmosfera CONTROLLO TIMER Quando il dispositivo è acceso premere il tasto del timer quindi premere o per selezionare il numero di ore che si desidera che il dispositivo continui a funzionare Il dispositivo si accende spegne automaticamente SPEGNIMENTO AUTOMATICO Mentre il dispositivo è in funzione premere il tasto o pe...

Page 127: ... FCC Il funzionamento è soggetto alle due seguenti condizioni 1 questo dispositivo potrebbe non causare interferenze dannose e 2 questo dispositivo deve accettare qualsiasi interferenza ricevuta inclusi interferenze che possono causare malfunzionamento Questa attrezzatura è stata testata ed è risultata conforme ai limiti dei dispositivi digitali di classe B ai sensi della parte 15 delle Norme FCC ...

Page 128: ... Riposizionare la griglia superiore nel dispositivo e reinstallare la griglia inferiore con la vite 1 2 3 4 Manutenzione filtro antipolvere Il filtro antipolvere deve essere pulito ogni due settimane al fine di mantenere un certo grado di efficienza di raffreddamento dell aria Seguire le istruzioni sotto riportate inerenti alla pulizia dei filtri antipolvere AVVISO NON accendere o usare il condizionato...

Page 129: ...ttore del tubo Si raccomanda di conservare le parti del kit da finestra in una borsa assieme al telecomando al tubo di scarico e di posizionarla assieme al condizionatore d aria locale Se necessario è possibile pulire il kit da finestra a mezzo di un panno umido e acqua prima di riporlo Assicurarsi che tutte le parti del kit da finestra siano asciutte prima di riporle Coprire il condizionatore d aria...

Page 130: ...o l opzione di drenaggio continuo in modalità riscaldamento In modalità Riscaldamento il serbatoio dell acqua interno raccoglie la condensa più rapidamente e può richiedere uno svuotamento più frequente del serbatoio in stanze più umide Si raccomanda di usare la modalità riscaldamento in una stanza con tasso di umidità del 50 o inferiore Evitare di usare prodotti e apparecchiature che creano umidi...

Page 131: ... sostituite Batterie del telecomando Il cavo di alimentazione non è collegato correttamente Rimuovere e ricollegare il cavo di alimentazione La spina LCDI di sicurezza è scattata solo USA Canada Messico Ripristinare la spina LCDI di sicurezza se il problema persiste contattare l assistenza clienti solo USA Canada Messico Funziona solo per poco tempo La temperatura del termostato è troppo vicina al...

Page 132: ...iferimento alla sezione Installazione La temperatura è troppo alta Abbassare la temperatura Il bocchettone dell aria è bloccato Rimuovere l ostruzione La stanza supera le dimensioni consigliate Spostare il dispositivo in una stanza più piccola Le grandi dimensioni o il numero elevato di finestre riducono l efficacia del raffreddamento Coprire le finestre con tende o veneziane Non funziona e la spia S...

Page 133: ...DICE DI ERRORE CODICE DI ERRORE POSSIBILE CAUSA DELL ERRORE E1 Guasto del sensore temperatura interna circuito aperto o corto circuito E2 Guasto del sensore temperatura del tubo circuito aperto o corto circuito IT ...

Page 134: ...ŚĆ WAŻNE INSTRUKCJE BEZPIECZEŃSTWA UWAŻNIE PRZEC Z Y TAĆ I Z ACHOWAĆ JE NA PRZ YSZŁOŚĆ W PRZ YPADKU W YSTĘPOWANIA JAKICHKOLWIEK NIEZGODNOŚCI LUB SPRZECZNOŚCI POMIĘDZ Y WERSJĄ ANGIELSK Ą A INNĄ WERSJĄ JĘZ YKOWĄ TREŚCI TEGO MATERIAŁU WERSJA ANGIELSKA BĘDZIE ROZSTRZYGAJĄCA OSTRZEŻENIE NIE WOLNO używać środków przyspieszających proces rozmrażania lub czyszczenia innych niż zalecane przez producenta Ur...

Page 135: ...z czynnikami chłodniczymi zgodnie z uznaną w branży specyfikacją oceny Tylko osoby upoważnione przez akredytowaną agencję która poświadcza ich kompetencje w zakresie obchodzenia się z czynnikami chłodniczymi zgodnie z przepisami branżowymi powinny pracować przy obwodach chłodniczych Konserwacje i naprawy wymagające pomocy innego wykwalifikowanego personelu muszą być wykonywane pod nadzorem specjalis...

Page 136: ...niazdka elektrycznego Przewód zasilający należy umieścić w taki sposób aby nikt się o niego nie potknął ani nie wyciągnął wtyczki W przypadki montażu rur drenażowych należy upewnić się że są one prawidłowo podłączone i nie są zniekształcone ani zgięte Regulując górne i dolne listwy prowadzące wiatr w wylocie powietrza delikatnie pociągnąć je rękoma aby nie uszkodzić listew prowadzących wiatr Urząd...

Page 137: ...iągnąć go wzdłuż krawędzi lub ostrych narożników Nie przekłuwać ani nie spalać czynników chłodniczych Nie blokować otworów wentylacyjnych Zawsze wyłączać urządzenie i odłączać je od zasilania na czas czyszczenia lub serwisowania Wyjąć wtyczkę urządzenia z gniazdka elektrycznego na czas przechowywania lub jeśli nie jest używane Gaz chłodniczy może być bezwonny Stagnacja możliwych wycieków gazowego ...

Page 138: ...oduje unieważnienie wszelkich istniejących gwarancji Jeśli konieczne jest serwisowanie należy skontaktować się z autoryzowanym przedstawicielem serwisu Naprawy mogą być wykonywane wyłącznie przez autoryzowane centra serwisowe producenta Nieprzestrzeganie tego warunku może być niebezpieczne Transport sprzętu zawierającego łatwopalne czynniki chłodnicze Zgodność z przepisami transportowymi Oznakowan...

Page 139: ...l wskazuje że personel serwisowy powinien obsługiwać ten sprzęt zgodnie z instrukcją instalacji PRZESTROGA Ten symbol oznacza że dostępne są informacje takie jak instrukcja obsługi lub instrukcja montażu To oznaczenie wskazuje że tego produktu nie należy wyrzucać razem z innymi odpadami gospodarstwa domowego w całej UE Aby zapobiec możliwym szkodom dla środowiska lub zdrowia ludzkiego w wyniku nie...

Page 140: ...potrzeby opróżniania zbiornika na skropliny z wyjątkiem sytuacji gdy jest wilgotno Należy uważnie przeczytać instrukcje i postępować według nich Aby zapewnić optymalną wydajność produktu należy zamykać drzwi i okna gdy jest on używany jako klimatyzator lub osuszacz Jeśli produkt jest używany tylko z funkcją wentylatora otwarte okno może poprawić cyrkulację powietrza PL Ważne przed zainstalowaniem ...

Page 141: ... Kółka 10 Złącze węża 4 Wylot powietrza 11 Dolny gumowy korek spustowy tryb klimatyzacji 5 Pilot zdalnego sterowania 12 Korek spustowy 6 Górny filtr przeciwpyłowy 13 Przewód zasilający 7 Zwijacz przewodu 14 Nastrojowe oświetlenie 7 6 1 2 3 8 9 4 10 14 11 12 13 5 Dotyczy wyłącznie modeli z funkcjami nastrojowego oświetlenia ...

Page 142: ...bsługi klienta Zestaw instalacyjny Kroki instalacji Złącze węża wylotowego przewód wylotowy i adapter panelu wspornika okna są wstępnie zmontowane wewnątrz opakowania 1 1 Zestaw wsporników do okien 1 Zestaw 4 Wąż wydechowy 1 Sztuka 2 Adapter panelu wspornika okna 1 Sztuka 5 Rurka spustowa 1 Sztuka 3 Złącze węża wydechowego 1 Sztuka 6 Śruby motylkowe 1 Sztuka 4 5 6 1 3 x1 x1 x1 x1 x1 x1 2 Wąż długo...

Page 143: ...dnica 15 cm 5 9 długość od 26 cm do 120 cm od 10 23 do 47 Zestaw wsporników do okien Ten zestaw do okien jest zaprojektowany tak aby pasował do większości standardowych okien przesuwnych Jeśli okno nie spełnia parametrów podanych powyżej wspornik okna można skrócić aby pasował dostarczając go do pobliskiego sklepu z narzędziami Poziome okno przesuwne Pionowe okno przesuwne Część A długość 50 5 cm ...

Page 144: ...CJA Poziome okno przesuwne Pionowe okno przesuwne Podłączyć wspornik okna do okna Lub 3a Podłączyć wspornik okna do adaptera panelu wspornika okiennego Upewnić się że wszystkie połączenia są szczelne i prawidłowo zainstalowane ...

Page 145: ...e się co najmniej 50 cm 20 od ściany Nie umieszczać urządzenia przed zasłonami lub kotarami ponieważ może to utrudniać przepływ powietrza OSTRZEŻENIE Wszelkie gwarancje dołączone do tego produktu zostaną unieważnione jeśli do oryginalnie dostarczonego zestawu instalacyjnego zostanie dodany dodatkowy wąż przedłużający lub jeśli instalacja zostanie przeprowadzona w inny sposób niż według instrukcji ...

Page 146: ...u ochrony i przedłużenia żywotności sprężarki Po 3 minutach będzie można normalnie włączyć urządzenie STEROWANIE ZASILANIEM 5 3 2 1 6 7 4 2 ustawienia wysokie i niskie Uwaga Prędkości wentylatora nie można ustawić w trybie uśpienia ani w trybie osuszania STEROWANIE WENTYLATOREM STEROWANIE TRYBAMI Ustawienia klimatyzacja osuszania wentylator ogrzewanie Odpowiednia kontrolka zaświeci się wskazując a...

Page 147: ... w wewnętrznym zbiorniku na wodę Urządzenie przerwie pracę gdy zbiornik jest pełny i uruchomi się ponownie gdy zbiornik zostanie opróżniony Zaleca się używanie trybu ogrzewania w pomieszczeniu o wilgotności 50 lub niższej Unikać używania produktów lub urządzeń wytwarzających wilgoć takich jak nawilżacz lub czajnik podczas korzystania z urządzenia w trybie ogrzewania Więcej informacji na temat opró...

Page 148: ... roboczych Dotyczy tylko modeli z funkcją ogrzewania Dotyczy wyłącznie modeli z funkcjami nastrojowego oświetlenia STEROWANIE TIMEREM Gdy urządzenie jest włączone naciśnij przycisk timera a następnie naciśnij lub aby wybrać liczbę godzin przez które urządzenie ma nadal pracować Urządzenie włączy się wyłączy się automatycznie AUTOMATYCZNE WYŁĄCZANIE Gdy urządzenie pracuje naciśnij przycisk lub aby ...

Page 149: ...o działanie podlega następującym dwóm warunkom 1 to urządzenie nie może powodować szkodliwych zakłóceń oraz 2 to urządzenie musi akceptować wszelkie odbierane zakłócenia w tym zakłócenia które mogą powodować niepożądane działanie To urządzenie zostało przetestowane i uznane za zgodne z ograniczeniami dla urządzeń cyfrowych klasy B zgodnie z częścią 15 przepisów FCC Limity te mają na celu zapewnien...

Page 150: ...órną kratkę na urządzenie i zamontuj dolną kratkę za pomocą śruby 1 2 3 4 Konserwacja filtra przeciwpyłowego Filtr przeciwpyłowy należy czyścić co dwa tygodnie aby zachować wydajność chłodzenia powietrzem Aby wyczyścić filtry przeciwpyłowe należy postępować zgodnie z poniższymi instrukcjami OSTRZEŻENIE NIE WOLNO zasilać ani obsługiwać lokalnego klimatyzatora podczas czyszczenia po wyjęciu filtra prze...

Page 151: ...ęści zestawu okiennego w torbie razem z pilotem i rurką spustową oraz umieszczenie ich razem z lokalnym klimatyzatorem W razie potrzeby przed przechowywaniem zestaw do okien można wyczyścić wilgotną ściereczką i wodą Przed przechowywaniem należy upewnić się że wszystkie części zestawu do okien są suche Przed przechowywaniem przykryj lokalny klimatyzator tkaniną plastikową torbą aby zabezpieczyć go...

Page 152: ...stawione w trybie osuszania Wody nie można spuścić za pomocą opcji ciągłego odprowadzania wody w trybie ogrzewania W trybie ogrzewania wewnętrzny zbiornik wody napełnia się szybciej i może wymagać częstszego opróżniania w bardziej wilgotnych pomieszczeniach Zaleca się używanie trybu ogrzewania w pomieszczeniu o wilgotności 50 lub niższej W przypadku używania urządzenia w trybie ogrzewania unikać u...

Page 153: ...iany Wymień baterie pilota zdalnego sterowania Przewód zasilający nie jest prawidłowo podłączony Odłącz i podłącz ponownie kabel zasilający Zadziałała wtyczka bezpieczeństwa LCDI tylko USA Kanada Meksyk Zresetuj wtyczkę bezpieczeństwa LCDI Jeśli problem będzie się powtarzał skontaktuj się z naszym działem obsługi klienta tylko USA Kanada Meksyk Urządzenie działa tylko przez krótką chwilę Temperatu...

Page 154: ...ś się do sekcji instalacji Ustawienie temperatury jest zbyt wysokie Zmniejsz ustawienie temperatury Wylot lub wlot powietrza jest zablokowany Usuń przeszkodę Pomieszczenie jest większe niż zalecane Przenieś urządzenie do mniejszego pomieszczenia Duże okna lub duża liczba okien zmniejszają skuteczność chłodzenia Zasłoń okna zasłonami lub roletami Urządzenie nie działa i świeci się wskaźnik pełnego ...

Page 155: ...6 PRZEWODNIK KODÓW BŁĘDÓW KOD BŁĘDU BŁĄD MOŻLIWA PRZYCZYNA E1 Awaria czujnika temperatury wewnętrznej przerwa w obwodzie lub zwarcie E2 Awaria czujnika temperatury rury przerwa w obwodzie lub zwarcie PL ...

Page 156: ...CONFLITO ENTRE A VERSÃO INGLESA E QUALQUER OUTRA VERSÃO DO CONTEÚDO DESTE MATERIAL NOUTRO IDIOMA A VERSÃO INGLESA PREVALECE ADVERTÊNCIA NÃO utilize meios para acelerar o processo de descongelamento ou para limpar diferentes dos recomendados pelo fabricante O aparelho deve ser armazenado num espaço sem fontes de ignição em funcionamento contínuo como chamas abertas aparelhos a gás ou aquecedores el...

Page 157: ...nformidade com a legislação do setor deverão realizar trabalhos nos circuitos refrigerantes Os trabalhos de manutenção e as reparações que exijam a assistência de outro pessoal qualificado devem ser realizados sob a supervisão de especialistas na utilização de refrigerantes inflamáveis Todos os métodos de trabalho que afetem a segurança só devem ser realizados por pessoas competentes Este aparelho n...

Page 158: ...e ligados e não estão deformados ou dobrados Para ajustar as palhetas superiores e inferiores que guiam o fluxo pela saída de ar puxe delicadamente com as mãos para evitar danificar as lâminas de direção do vento O aparelho deve ser transportado na vertical ou de lado NÃO utilize o dispositivo nos seguintes casos numa divisão com fontes de ignição em funcionamento contínuo p ex chamas abertas aparel...

Page 159: ...bo de alimentação na porta e NÃO o puxe ao longo de arestas ou cantos afiados Não perfure ou queime os refrigerantes Uma advertência para manter as aberturas de ventilação desobstruídas Desligue sempre a unidade e retire a ficha da tomada quando for necessário limpar ou realizar serviço de assistência técnica na unidade Desligue a unidade da tomada quando armazenada ou não estiver a ser utilizada O ...

Page 160: ...ferentes dos apresentados neste manual A instalação indevida anulará quaisquer garantias existentes Se for necessário recorrer ao serviço de assistência técnica contacte um agente de assistência técnica autorizado As reparações só devem ser realizadas por centros de serviço de assistência técnica autorizados do fabricante O incumprimento destes requisitos pode constituir perigo O transporte de equ...

Page 161: ...referência ao manual de instalação ATENÇÃO Este símbolo indica que estão disponíveis informações tais como o manual de utilização ou instalação Esta marcação indica que este produto não deve ser eliminado com outros resíduos domésticos em toda a UE Para evitar possíveis danos para o ambiente ou para a saúde humana devido à eliminação não controlada de resíduos recicle o aparelho de forma responsáv...

Page 162: ...gueira Não é preciso esvaziar o depósito de drenagem a não ser em condições húmidas Leia e siga cuidadosamente as instruções Para garantir a eficiência ideal do produto mantenha as portas e as janelas fechadas quando o aparelho estiver a ser utilizado como ar condicionado ou desumidificador Se o produto estiver a ser utilizado apenas com a função de ventilador uma janela aberta pode melhorar a circ...

Page 163: ...10 Conector da mangueira 4 Saída de ar 11 Bujão de drenagem de borracha inferior Modo de ar condicionado 5 Controlo remoto 12 Tampa do bujão de drenagem 6 Filtro de pó superior 13 Cabo de alimentação 7 Enrolador do cabo 14 Luz ambiente 7 6 1 2 3 8 9 4 10 14 11 12 13 5 Aplicável apenas a modelos com funcionalidades de luz ambiente ...

Page 164: ... instalação Passos da instalação O conector da mangueira de escape a mangueira de escape e o adaptador de painel do suporte para janela vêm pré montados dentro da embalagem 1 1 Kit de suporte para janela 1 Conjunto 4 Mangueira de escape 1 Peça 2 Adaptador de painel do suporte para janela 1 Peça 5 Tubo de drenagem 1 Peça 3 Conector da mangueira de escape 1 Peça 6 Parafusos de orelhas 1 Peça 4 5 6 1...

Page 165: ...Comprimento 26 cm a 120 cm 10 23 pol a 47 pol Kit de suporte para janela Este kit para janela foi desenhado para se adaptar à maioria das janelas deslizantes padrão Se a sua janela estiver fora dos parâmetros de tamanho descritos acima o suporte para janela pode ser encurtado Basta levá lo à loja de ferragens mais próxima Janela deslizante horizontal Janela deslizante vertical Parte A Comprimento ...

Page 166: ...te horizontal Janela deslizante vertical Encaixe o suporte para janela na janela Ou 3a Encaixe o suporte para janela no adaptador de painel do suporte para janela Certifique se de que todas as ligações estão bem apertadas e devidamente instaladas ...

Page 167: ...unidade Certifique se de que a traseira da unidade fica a uma distância mínima de 50 cm 20 pol da parede Não coloque a unidade à frente de cortinados ou reposteiros porque estes podem obstruir o fluxo de ar ADVERTÊNCIA Quaisquer garantias incluídas com este produto serão anuladas se uma mangueira de prolongamento extra for adicionada ao kit de instalação originalmente fornecido ou se a instalação for...

Page 168: ...sor Após 3 minutos poderá LIGAR a unidade normalmente CONTROLO DE ALIMENTAÇÃO 5 3 2 1 6 7 4 2 definições Alta Baixa Nota Não é possível ajustar a velocidade do ventilador no modo de repouso Sleep e no modo de desumidificação CONTROLO DA VELOCIDADE DO VENTILADOR CONTROLO DO MODO Definições Ar condicionado Desumidificação Ventilador Aquecimento A luz indicadora correspondente acender se á para indicar a...

Page 169: ...A unidade interrompe o funcionamento quando o depósito fica cheio e reinicia quando o depósito tiver sido esvaziado Recomenda se a utilização do modo de aquecimento numa divisão com teor de humidade igual ou inferior a 50 Evite utilizar produtos ou aparelhos que produzam humidade como um humidificador ou uma chaleira quando estiver a utilizar a unidade no modo de aquecimento Consulte a secção Drena...

Page 170: ...elado e voltado à temperatura operacional padrão Aplicável apenas a modelos com funcionalidade de aquecimento Aplicável apenas a modelos com funcionalidades de luz ambiente CONTROLO DE TEMPORIZADOR Com a unidade ligada prima o botão do temporizador e em seguida prima ou para selecionar o número de horas que pretende que a unidade continue a funcionar A unidade ligar se á desligar se á automaticame...

Page 171: ...5 das normas da FCC A utilização está sujeita às duas condições seguintes 1 este dispositivo não poderá causar interferências nocivas e 2 este dispositivo tem de aceitar quaisquer interferências recebidas incluindo interferências que possam causar anomalias no funcionamento Este equipamento foi testado e encontra se em conformidade com os limites especificados para um dispositivo digital de Classe ...

Page 172: ...usar um aspirador para remover o pó Volte a colocar a grelha superior na unidade e volte a instalar a grelha inferior com o parafuso 1 2 3 4 Manutenção do filtro de pó O filtro de pó deve ser limpo quinzenalmente para manter a eficiência do arrefecimento do ar Siga as instruções abaixo para limpar os filtros de pó ADVERTÊNCIA NÃO ligue nem utilize o Ar condicionado local quando efetuar a limpeza do me...

Page 173: ...anela e o conector da mangueira Recomenda se que armazene as peças do kit para janela num saco juntamente com o controlo remoto o tubo de drenagem e os guarde juntamente com a unidade de Ar condicionado local Se necessário pode limpar o kit para janela com um pano húmido e água antes de o armazenar Certifique se de que todas as peças do kit para janela estão secas antes de as armazenar Cubra o Ar c...

Page 174: ...a não pode ser drenada utilizando a opção de drenagem contínua no modo de aquecimento No modo de aquecimento o depósito de água interno recolhe a condensação mais rápido e em divisões mais húmidas pode ser necessário esvaziá lo com mais frequência Recomenda se a utilização do modo de aquecimento numa divisão com teor de humidade igual ou inferior a 50 Evite utilizar produtos ou aparelhos que criem...

Page 175: ...rolo remoto O cabo de alimentação não está devidamente ligado Retire e volte a ligar o cabo de alimentação O interruptor de proteção contra fugas elétricas disparou apenas EUA Canadá México Reinicie o interruptor de proteção contra fugas elétricas Se o problema persistir contacte o nosso apoio ao cliente apenas EUA Canadá México Funciona apenas durante um curto período A temperatura definida no ter...

Page 176: ...alação A temperatura definida é demasiado alta Reduza a temperatura definida A saída ou admissão de ar está obstruída Remova a obstrução O espaço excede o tamanho recomendado Mova a unidade para um espaço mais pequeno As grandes dimensões ou o número de janelas estão a diminuir a eficácia do arrefecimento Cubra as janelas com cortinas ou persianas Não funciona e o indicador de DEPÓSITO CHEIO acende s...

Page 177: ...DE CÓDIGOS DE ERRO CÓDIGO DE ERRO ERRO POSSÍVEL CAUSA E1 Falha do sensor de temperatura interior circuito aberto ou curto circuito E2 Falha do sensor de temperatura do tubo circuito aberto ou curto circuito PT ...

Page 178: ... fait aucune déclaration et ne donne aucune garantie à l égard de ce produit Ce produit est fabriqué par Airtek Int l Corp ltée une filiale de JMATEK Limited FR Hergestellt in China 2021 JMATEK Limited Alle Rechte vorbehalten Die Honeywell Handelsmarke wird laut Lizenz unter Honeywell International Inc Verwendet Honeywell International Inc macht keine Darstellungen oder Garantien in Bezug auf diese...

Reviews: