background image

1

Introduction

This Performance Lite SD 2MP IP cameras (short for IP-CAM) is designed for high performance CCTV solutions. It adopts 
state of the art video processing chips, integrated with the most advanced technologies (like video encoding and decoding 
technology) to make the image transmission more stable and smooth. Moreover, the built-in WEB server of this series improves 
the performance of the traditional surveillance system so that users can be easy to operate and monitor.

This product is widely used in banks, telecommunication systems, electricity power departments, law systems, factories, 
storehouses, uptowns, etc. In addition, it is also an ideal choice for surveillance sites with middle or high risks.

Main Features

•  ICR auto switch, true day/night

•  3D DNR, digital WDR

•  ROI coding

•  Support smart phone, iPad, remote monitoring

or

IPC

Network

Computer

or

NVR

IPC

Network

Hybrid DVR

Moniter

or

IPC

Network

CMS/NVMS

Performance Lite 2MP SD Camera - User Manual  |   

Introduction

Summary of Contents for HIB2PI-S

Page 1: ...PERFORMANCE LITE 2MP SD CAMERA HIE2PI S HIB2PI S HIE2PIV S HIB2PIV S User Manual ...

Page 2: ......

Page 3: ...eived Do not operate when temperature relative humidity and power supply are beyond the limited stipulations Keep away from heat sources such as radiators heat registers stove etc Do not expose the product to the direct airflow from an air conditioner This a product instruction manual not quality warranty We may reserve the rights of amending the typographical errors inconsistencies with the lates...

Page 4: ......

Page 5: ...nspection or other internet security risks however our company will provide timely technical support if necessary Surveillance laws vary from country to country Check all laws in your local region before using this product for surveillance purposes We shall not take the responsibility for any consequences resulting from illegal operations BIS Marking The products have been manufactured to comply w...

Page 6: ......

Page 7: ...ream 13 OSD Configuration 14 Video Mask 15 ROI Configuration 16 Alarm Configuration 17 Motion Detection 17 Other Alarms 18 Alarm Server 19 Network Configuration 19 TCP IP 19 Port 20 Server Configuration 21 DDNS Configuration 21 802 1x 23 RTSP 24 UPNP 25 Mail configuration 25 HTTPS 26 QoS 27 Security Configuration 28 User Configuration 28 Online Video User 29 Block and Allow List 29 Security Manage...

Page 8: ......

Page 9: ...ormance of the traditional surveillance system so that users can be easy to operate and monitor This product is widely used in banks telecommunication systems electricity power departments law systems factories storehouses uptowns etc In addition it is also an ideal choice for surveillance sites with middle or high risks Main Features ICR auto switch true day night 3D DNR digital WDR ROI coding Su...

Page 10: ...re are two ways to access IP Cam 1 Access through IP Tool 2 Directly access through IE browser Access through IP Tool Network connection 1 Make sure the PC and IP Cam are connected to the LAN and the IP Tool is installed in the PC from the CD 2 Double click on the IP Tool icon on the desktop to run this software as shown below Performance Lite 2MP SD Camera User Manual Network Connection ...

Page 11: ... X After modification please enter the password of the administrator and click on the Modify button to modify the setting The default password of the administrator is 123456 The default password of the administrator is 123456 4 Double click on the IP address and then the system will pop up the IE browser to connect IP CAM Then follow directions to install and run the applicable plug in Enter the u...

Page 12: ...connect the camera to the computer through network cable 1 Manually set the IP address of the PC and the network segment should be same as the default settings of the IP camera Open the network and share centre Click Local Area Connection to pop up the following window Select Properties and then select internet protocol according to the actual situation for example IPv4 Next click Properties butto...

Page 13: ...lt address of IP CAM and confirm 3 Follow directions to download and install the Active X control 4 Enter the default username and password in the login window and then enter to view Performance Lite 2MP SD Camera User Manual Network Connection ...

Page 14: ...go to Config Network Port menu to set the port number WAN Access through the router or virtual server 2 Go to Config Network TCP IPv4 menu to modify the IP address or IPC Router Computer Network Cable Network Cable Network Cable Internet Performance Lite 2MP SD Camera User Manual Network Connection ...

Page 15: ...AN IP and http port to access Access through static IP Network connection The setup steps are as follow 1 Go to Config Network Port menu to set the port number 2 Go to Config Network TCP IP menu to set the IP address Check Use the following IP address and then enter the static IP address and other parameters 3 Open the IE browser and enter its WAN IP and http port to access Performance Lite 2MP SD...

Page 16: ...m in Full screen Zoom out The following table is the instructions of the icons on the live view interface The motion detection indicator will flash in live view interface only when the motion detection alarm is enabled In full screen mode double click on the mouse to exit or press the ESC key on the keyboard Performance Lite 2MP SD Camera User Manual List View ...

Page 17: ...the Basic Information interface the system information of the device is listed Date Time Go to Config System Date and Time Please refer to the following interface Select the time zone and DST as desired Performance Lite 2MP SD Camera User Manual Configuration ...

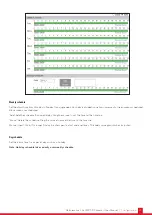
Page 18: ...utton to format the SD card All data will be cleared by clicking this button Click the Eject button to stop writing data to SD card Then the SD card can be ejected safely Schedule Recording Settings 1 Go to Config System Storage Record to go to the interface as shown below 2 Set record stream pre record time and cycle writing Pre Record Time Set the time to record before the actual recording begin...

Page 19: ...he mouse to set the time on the timeline Erase Delete the schedule Drag the mouse to erase the time on the timeline Manual Input Click it for a specific day to enter specific start and end times This adds more granularities minutes Day schedule Set the alarm time for a special day such as a holiday Note Holiday schedule takes priority over weekly schedule Performance Lite 2MP SD Camera User Manual...

Page 20: ...ightness of the bright area and increasing the brightness of the dark area Sharpness Set the resolution level of the image plane and the sharpness level of the image edge Noise Reduction Decrease the noise and make the image more thorough Increasing the value will make the noise reduction effect better but it will reduce the image resolution Defog Activating this function and setting an appropriat...

Page 21: ...Stream The following interface will be displayed by clicking Config Image Video Audio Infrared Mode Choose ON OFF and Auto Some models may not support the infrared mode Exposure Mode Choose Auto or Manual If manual is chosen the digital shutter speed can be adjusted Gain Limit The higher the gain value is the higher the brightness of the image is and the more noises of the image are Image Mirror T...

Page 22: ...roup of frames or pictures can be considered as a group of pictures If there is not much movement in the scene setting the value higher than the frame rate is fine potentially resulting in less bandwidth usage However if the value is set too high and there is a high frequency of movement in the video there is a risk of frame skipping Video Compression H264 H265 MJPEG can be selected Profile For H ...

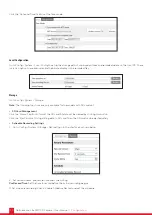
Page 23: ... 2 Click the Draw Area button and then drag the mouse to draw the video mask area 3 Click the Save button to save the settings 4 Return to the live to verify that the area have been drawn as shown as blocked out in the image To clear the video mask Click the Clear button to delete the current video mask area Performance Lite 2MP SD Camera User Manual Configuration ...

Page 24: ...ea will have a higher bitrate than the rest of the image resulting in better image quality for the identified area To set up ROI 1 Check Enable and then click the Draw Area button 2 Drag the mouse to set the ROI area 3 Set the level 4 Click the Save button to save the settings Performance Lite 2MP SD Camera User Manual Configuration ...

Page 25: ...ust be set first in the Email configuration interface the captured pictures and triggered event will be sent into those addresses 2 Set motion detection area and sensitivity Click the Area and Sensitivity tab to go to the interface as shown below Move the Sensitivity scroll bar to set the sensitivity Higher sensitivity value means that motion will be triggered more easily Select Add and click Draw...

Page 26: ...en there are some errors in writing SD card the corresponding alarms will be triggered 1 Go to Config Alarm Anomaly SD Card Error as shown below 2 Click Enable and set the alarm holding time 3 Tick Trigger Email 4 Click Save to save the settings Note SD card full and SD card error are only available for the models with SD card slot Performance Lite 2MP SD Camera User Manual Configuration ...

Page 27: ...an alarm occurs the camera will transfer the alarm event to the alarm server If an alarm server is not needed there is no need to configure this section Network Configuration TCP IP Go to Config Network TCP IP interface as shown below There are two ways for network connection Performance Lite 2MP SD Camera User Manual Configuration ...

Page 28: ...PPoE Config tab to go to the interface as shown below Enable PPPoE and then enter the user name and password from your ISP Port Go to Config Network Port HTTP port Data port and RTSP port can be set HTTP Port The default HTTP port is 80 It can be changed to any port which is not occupied HTTPs Port Optional The default HTTP port is 443 It can be changed to any port which is not occupied Data Port ...

Page 29: ...l auto allot a device ID Please check it in the ECMS NVMS 3 Input the above mentioned server address server port and device ID in the responding boxes Click Save button to save the settings DDNS Configuration If the camera is set up with a DHCP connection DDNS should be set for the internet 1 Go to Config Network DDNS Server Configuration This function is mainly used for connecting network video m...

Page 30: ...ite Then click Registration button Create domain name After the domain name is successfully applied for the domain name will be listed as below 3 Input the username password domain you apply for in the DDNS configuration interface 4 Click Save button to save the settings Performance Lite 2MP SD Camera User Manual Configuration ...

Page 31: ...ings User name and password The user name and password must be the same with the user name and password applied for and registered in the authentication server The structure of 802 1x 1 The network camera initiates the authentication of 802 1x protocol via web client and then the authentication is received by the switch supporting 802 1x protocol 2 The switch provides the camera with a physical or...

Page 32: ...e multicast received data should be added into a VLC player to play the video Note 1 This camera support local play through a VLC player Enter the RTSP address unicast or multicast eg rtsp 192 168 226 201 554 profile1 transportmode mcast in a VLC player to realize the simultaneous play with the web client 2 The IP address mentioned above cannot be the address of IPV6 3 Avoid the use of the same mu...

Page 33: ... an alarm happens or IP address is changed please set the Email here first Go to Config Network Email Sender Address sender s e mail address User name and password sender s user name and password Server Address The SMTP IP address or host name Select the secure connection type at the Secure Connection pull down list according to what s required Performance Lite 2MP SD Camera User Manual Configurat...

Page 34: ...ent Address receiver s e mail address HTTPS HTTPs provides authentication of the web site and protects user privacy Go to Config Network HTTPS as shown below There is a certificate installed by default as shown above Enable this function and save it Then the camera can be accessed by entering https IP https port via the web browser eg https 192 168 226 201 443 A private certificate can be created ...

Page 35: ...eceiving the signed certificate import the certificate to the device QoS QoS Quality of Service function is used to provide different quality of services for various network applications Under the deficient bandwidth the router or switch will sort the data streams and transfer them according to their priority to solve the network delay and network congestion by using this function Go to Config Net...

Page 36: ... as an Administrator except for user backup settings factory reset and upgrading the firmware 5 Enter the MAC address of the PC in Bind MAC textbox If this option is enabled only the PC with the specified MAC address can access the camera for that user 6 Click the OK button and then the newly added user will be displayed in the user list Modify user 1 Select a user to modify password and MAC addre...

Page 37: ...leted in the user configuration list box 2 Click the Delete button to delete the user Note The default administrator account cannot be deleted Online Video User Go to Config Security Online User to view the user who is viewing the live video Block and Allow List Go to Config Security Block and Allow Lists The setup steps are as follows Check the Enable address filtering check box Select Block Allo...

Page 38: ...some specified versions anonymous login with a private protocol can be enabled here if no such function please skip the following instructions If this function is enabled enter http host port Anonymous 1 2 3 eg http 192 168 226 201 80 Anonymous 1 via web browser to access the camera 1 indicates main stream 2 indicates sub stream 3 indicates third stream Only video can be viewed by this means and n...

Page 39: ...he date and time and then Click the Save button to save the settings Upgrade Go to Config Maintenance Upgrade In this interface the camera firmware can be updated 1 Click the Browse button to select the save path of the upgrade file 2 Click the Upgrade button to start upgrading the firmware 3 The device will restart automatically Caution Do not close the browser or disconnect the camera from the n...

Page 40: ... log 1 Go to Config Maintenance Operation Log 2 Select the main type sub type start and end time 3 Click Search to view the operation log 4 Click Export to export the operation log Performance Lite 2MP SD Camera User Manual Configuration ...

Page 41: ... Description Close Select an image and click this button to close the image Close all Click this button to close all images Fit size Click to fit the image on the screen Actual size Click this button to display the actual size of the image Zoom in Click this button to digitally zoom in Zoom out Click this button to digitally zoom out Slide show play Click this button to start the slide show mode S...

Page 42: ... were recorded locally to the PC can be played in this interface 1 Choose Record Local 2 Set search time Select the date and choose the start and end time 3 Click to search the images 4 Double click on a file name in the list to start playback Performance Lite 2MP SD Camera User Manual Search ...

Page 43: ...re recorded on the SD card can be played in this interface Note This function is only available for the models with SD card slot If no such function please skip the following instruction 1 Choose Record SD Card 2 Set search time Select the date and choose the start and end time 3 Click to search the images 4 Select the alarm events at the bottom of the interface 5 Select mix stream video and audio...

Page 44: ...ime table 3 Click to set the start time and then this button turns blue 4 Select the end time by clicking on the time table Then click to set the end time 5 Click to download the video file in the PC Click Set up to set the storage directory of the video files Click Open to play the video Click Clear List to clear the downloading list Click Close to close the downloading window Performance Lite 2M...

Page 45: ...bove reasons Recover default setting by IP Tool Note Default IP 192 168 226 201 mask number 255 255 255 0 Q IP tool cannot search devices why A It may be caused by the anti virus software in your computer Please exit it and try to search device again Q IE cannot download ActiveX control How can I do a IE browser blocks ActiveX Please try as below 1 Open IE browser Click Tools Internet Options 2 Se...

Page 46: ...ect honeywell com Call 1 800 103 0339 Email HoneywellSecurity Fire honeywell com Honeywell HBT India Buildings Unitech Trade Center 5th Floor Sector 43 Block C Sushant Lok Phase I Gurgaon 122 002 www honeywell com SF SMB SB Rev02 08 19 2018 Honeywell International Inc ...

Reviews: