background image

15

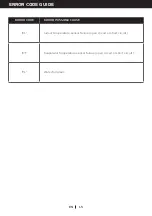
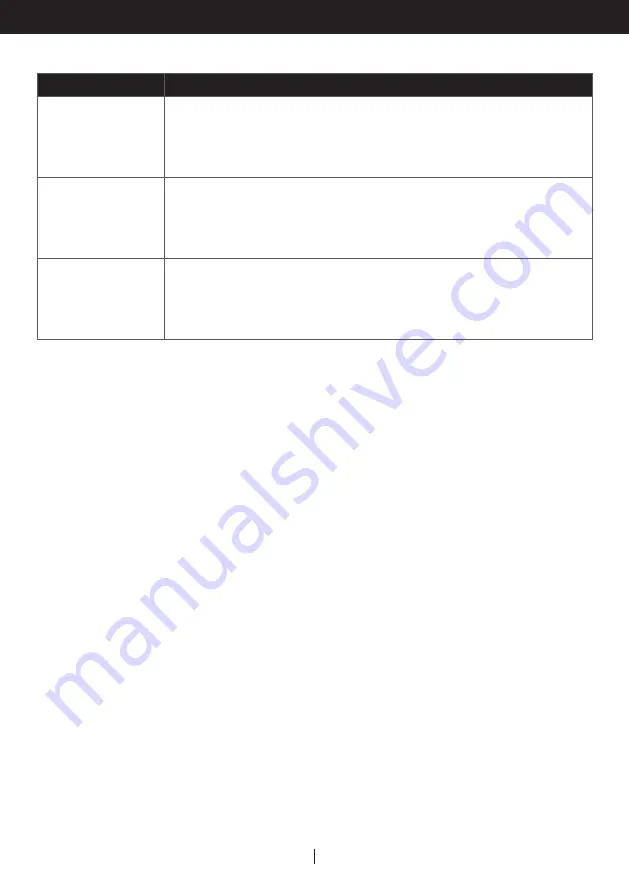
ERROR CODE GUIDE

ERROR CODE

ERROR POSSIBLE CAUSE

"E1"

Indoor temperature sensor failure (open circuit or short circuit).

"E3"

Evaporator temperature sensor failure (open circuit or short circuit).

"P1"

Water full alarm.

EN

Summary of Contents for HN Series

Page 1: ...Portable Air Conditioner User Manual Read and save these instructions before use Model HN Series o Co F F www honeywellportableac com E mail info honeywellportableac com ...

Page 2: ...OT pinch the wire in the door and DO NOT pull it along edges or sharp corners DO NOT run the power cord under carpeting and rugs Use caution to prevent tripping on cord DO NOT use the device in the following cases Near a fire source In areas where gasoline paint or other flammable goods are stored In an area where the water can be projected DO NOT touch the plug or the device with wet hands Basic ...

Page 3: ...rning use of the appliance in a safe way and understand the hazards involved Children shall not play with the appliance Cleaning and user maintenance shall not be made by children without supervision Never insert your fingers or rods into the air outlet Take special care to warn children of these dangers The manufacturer is not liable for injury caused to persons or property damage due to non comp...

Page 4: ...ution Auto Evaporation System The unit automatically evaporates the condensate through the exhaust hose There is no need to empty the drainage tank except in very humid conditions Read and follow the instructions carefully To ensure optimal efficiency of the product keep doors and windows closed when it is used as an air conditioner or dehumidifier If the product is being used with the fan functio...

Page 5: ...3 Remote Control 11 Drain Tube For Continuous Drain 4 Exhaust Hose Connector 12 Lower Rubber Drain Plug Air Conditioning Mode 5 Cord Winder 13 Power Supply Cord 6 Upper Grill 7 Upper Dust Filter 8 Upper Rubber Drain Plug Dehumidifying Mode o C o F 6 7 8 9 10 12 13 11 3 2 4 5 o C o F 1 ...

Page 6: ...both sides Ensure proper fit on both ends 1 2 Adjust the window bracket as per width or height of your window and insert the plastic pin to fix at the desired position There is a hole where the exhaust hose will be inserted later Make sure this hole is not blocked Hole for Window Bracket Panel Adapter Exhaust Hose Plastic Pin 26 6 3 2 to 52 67 5 cm 92 cm to 132cm 1 Window Bracket Kit 1 Set 4 Exhaus...

Page 7: ...t to the size of your window please remove it from the window and follow the instructions below Exhaust Hose Dia 5 9 15 cm Length 10 6 to 59 27 cm to 150 cm o C o F 4 Connect the window bracket to the window bracket panel adapter Ensure that all connections are tight and installed properly 5 Connect the window bracket to the window 6 The Portable Air Conditioner is now ready to use o C o F o C o F...

Page 8: ...t off Make sure the back of the unit is at least 50 cm 20 inches away from the wall Do not place the unit in front of curtains or drapes as this could obstruct the airflow WARNING Any warranties included with this product will be voided if an extra extension hose is added to the originally provided installation kit or if the installation is performed differently than the manufacturer s instruction...

Page 9: ...unit is turned OFF POWER CONTROL The Timer is adjustable between 1 24 hours AUTO TURN OFF While unit is running press the TIMER button and the display will flash While the display is flashing press the or button to select the number of hours you want the unit to turn OFF automatically AUTO TURN ON When unit is in a standby mode plugged in with power light on press the TIMER button and the display ...

Page 10: ...ond hour of cooling The unit will maintain this temperature for 5 hours The set temperature will then reduce by 1 F or 1 C on the seventh hour and reduce a further 1 F or 1 C on the tenth hour Sleep mode will then deactivate automatically In Heating Mode the set temperature will reduce by 2 F or 2 C after the first hour of heating and will reduce a further 2 F or 2 C after the second hour of heatin...

Page 11: ...ifier do not connect the exhaust hose Continuous drainage is then necessary refer to Continuous Draining for Dehumidifier Mode Fan Mode For air circulation without air conditioner cooling Heating Mode HEAT In this mode the desired temperature can be set between 16 C 32 C 60 F 90 F When in heating mode condensation must be drained from the lower drain plug Note The exhaust hoses must vent outside t...

Page 12: ...e setting for 1 hour intervals Mode Control HIGH MID LOW ON OFF Applicable for models with Heating feature only Press this button to change the operation mode Fan Speed Control Timer Control COOL DRY Heat Fan Note Battery Installation Remove the cover on the back of the remote control and insert two AAA batteries with and pointing in the proper direction according to the polarity markings Use only...

Page 13: ...C o F End of Season Storage Maintenance If the appliance will not be used for a long time follow these steps Be sure to drain the left over water condensation Remove the lower drain plug and use a shallow pan to collect the water make sure to replace the drain plug when finished To dry excess moisture run the unit in Fan only mode for 30 minutes before storing Turn off and unplug the air condition...

Page 14: ...idual water may spill so please have a pan to collect the water Connect the drain tube included to the upper or lower drain whichever is more convenient for your space See diagram The water can be continuously drained through the drain tube into a floor drain or bucket Replace the drain plug You can now turn on the unit 1 2 3 4 5 6 Continuous Draining for Dehumidifier Mode Upper Rubber Drain Plug D...

Page 15: ...SA Canada Mexico only Runs a short while only The thermostat temperature setting is too close to room temperature Lower the set temperature Air outlet is blocked Make sure the exhaust hose is properly connected There are tight bends in the air exhaust hose Connect exhaust hose as per instructions on page 3 In Heating Mode the unit keeps switching off frequently The room is too humid Water Tank nee...

Page 16: ...erly refer to Installation section Temperature setting is too high Reduce temperature setting on control panel Air outlet or intake is blocked Remove blockage Room exceeds recommended size Move unit to smaller room Large size or number of windows are decreasing cooling effectiveness Cover windows with curtains or blinds Will not run and WATER FULL indicator is on Excess water condensation inside t...

Page 17: ...is not switching ON Heating function not activated yet Temperature setting is too low Check that the Heating function has been activated will be illuminated when the Heater is switched ON Increase temperature setting Applicable for models with Heating feature only ...

Page 18: ...ROR CODE GUIDE ERROR CODE ERROR POSSIBLE CAUSE E1 Indoor temperature sensor failure open circuit or short circuit E3 Evaporator temperature sensor failure open circuit or short circuit P1 Water full alarm EN ...

Page 19: ...tek com Made in China 2019 JMATEK Limited All rights reserved The Honeywell Trademark is used under license from Honeywell International Inc Honeywell International Inc makes no representations or warranties with respect to this product This product is manufactured by Airtek Int l Corp Ltd subsidiary of JMATEK Ltd ...

Reviews: