7
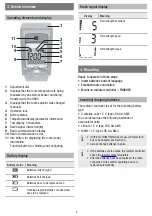
Securing the radiator controller
i
The radiator controller and the batteries can be
secured against removal by using the supplied
screws.
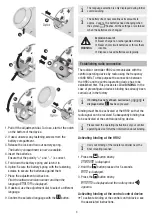
Setting the position of the display
In order to improve the legibility the display of the
radiator controller can be tilted to different positions
(10°, 20°, 30°, 40°).
The angle of 40° can be fixed with the supplied display
support.
1.
2.
Mounting
1. Lift the display and set it to the desired angle.
2. If desired, tilt the display by 40° and slide the display
support from above between the display and the
housing until it latches in.
Unmounting
f
Press the display support in at the back and remove
it upwards.
Connecting an external window contact
The floating external window contacts HCA30 can be
connected to the HR92 radiator controller.
i
The cable ACS90 is required to connect the external
window contact.
•
Micro B mini-plug / open ends
•
2 m long
•
Not included in the scope of delivery
Operation with window contact
When the window is opened, the window contact is
opened and the radiator valve closes. When the window
is closed again, the radiator controller returns to normal
operation.
The frost-protection function ensures that the radiator
valve opens when the temperature drops below 5 °C.
i
If a cabled window contact is removed, Parameter 11
has to be modified to 0 or 1, see Section 5.
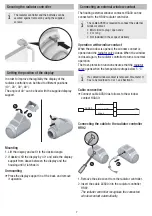
Cable connection
f
Connect cable ACS90 as follows to the window
contact HCA30:
white
green
black GND
ACS90
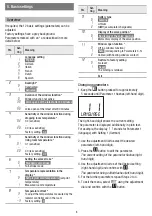
Connecting the cable to the radiator controller
HR92
2.
1.
1. Remove the side cover from the radiator controller.
2. Insert the cable ACS90 into the radiator controller
HR92.
The radiator controller recognises the connected
window contact automatically.


