HRXD Quick Installation Guide
For Front Panel Operation, see over.
For more detailed information, refer to the HRXD User Guide and the HRXD RAS Guide on your
CD and at www.honeywellvideo.com.
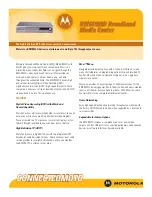
Step 1: Connect Cameras, Peripherals
Step 2: Configure the DVR
Settings Overview
1.
Connect the power cord to the unit. It takes approximately 60 seconds
to power up.
2.
Throughout the screens you will see
. Highlighting
and pressing
will reset the screen to its default settings.
3.
Press MENU on the front panel to enter the setup screens. Select a
User and enter the password by pressing the camera number buttons
and then
. There is no default password when logging in the admin
user for the first time.
4.
Highlight Information and press
. From the Information screen you
can set the DVR language and upgrade the software.
5.
Highlight Date/Time in the System menu and press
to set the date
and time. Select the appropriate DST option.
6.
To add, edit and delete users and groups of users, highlight User in
the System menu and press
(see
New User Setup
for details).
7.
To set up your Network connection and other network options,
highlight Network in the Network menu and press
.
8.
Highlight Camera in the Devices menu and press
to set up your
cameras and PTZ domes.
9.
Highlight Alarm-Out in the Devices menu and press
to change the
settings and establish a schedule for each alarm output device used.
10. Highlight Display and press
to select what information to display
on the main monitor (for example, date, time and camera number).
11. To set up your recording options, use the screens in the Record menu.
Here you will find general recording settings along with schedules, pre-
event and archive options.
12. Set up your Event options in the Event menu:
a.
Select Alarm-In and press
to set up your Alarm Inputs.
b.
Highlight Motion Detection and press
to change your motion
detections settings.
c.
Select Video Loss to set up Video Loss event options.
d.
Highlight Text-In and press
to set up your Text event options.
e.
Highlight Event Status and press
to check the current event
status of the DVR.
Edit Text/Screen Titles and Numerical Values
General Recording Settings
SVHS Out
Alarm
Inputs
Power Connector
Audio
In/Out
Video In
RS485
Factory
Reset
Switch
Video Out
Spot Out
Alarm
Outputs
USB
Port
RS232
Port
VGA
Port
SCSI
Port
Ethernet
Port
Alarm
Reset
In
Connect up to 16 cameras,
depending on your DVR model.
I/O Connector Pin Outs
AI (1 to 16)
Alarm Inputs 1 to 16
GND
Chassis Ground (9 connectors)
AO (1 to 16)
Alarm Outputs 1 to 16
ARI
Alarm Reset In
RS485 Connector Pin Outs
Master Unit
Slave Unit
+
!
To
!
TX+
–
!
To
!
TX–
+
!
To
!
RX+
–
!
To
!
RX–
Note
You cannot mix NTSC and PAL
equipment. For example, you
cannot use a PAL camera and an
NTSC monitor.
Note
Use the SVHS input for your
main monitor, if possible. It
will give you better quality
video display.
Press to move cursor up or to increase
numerical values by 1.
!
Select the line, then press .
"
If the field is numerical, use the cursor controls
Press to move
right.
Press to move cursor down or to decrease
numerical values by 1.
Press to
move left.
or inner jog wheel to adjust the value.
"
If the field is a text line, use the
Text Entry screen to edit the text.
Press to confirm the entry and
Use the inner jog
wheel to rapidly
increase or
decrease a
numerical value.
select OK to confirm entered text.
!
Record Menu
➤
Record.
Make sure Recycle is checked. Select your
Resolution, Event Record Dwell time and
Auto Deletion option. If you are using Panic
Recording, set those options as needed.
"
Record Menu
➤
Schedule.
Make sure Schedule On is checked to
program the DVR to record based on time,
day of the week, and holidays. Select + to
add a schedule item. For each new
schedule item you will need to set the day
and time range, recording mode and
channels to be recorded.
#
Record Menu
➤
Schedule
➤
Settings.
For each new schedule
item, select Settings and
press . You can set the
images per second and
Quality of the recording for
any modes you set in the
Mode column.
Set Event Alarm Settings
Set Motion Detection Settings
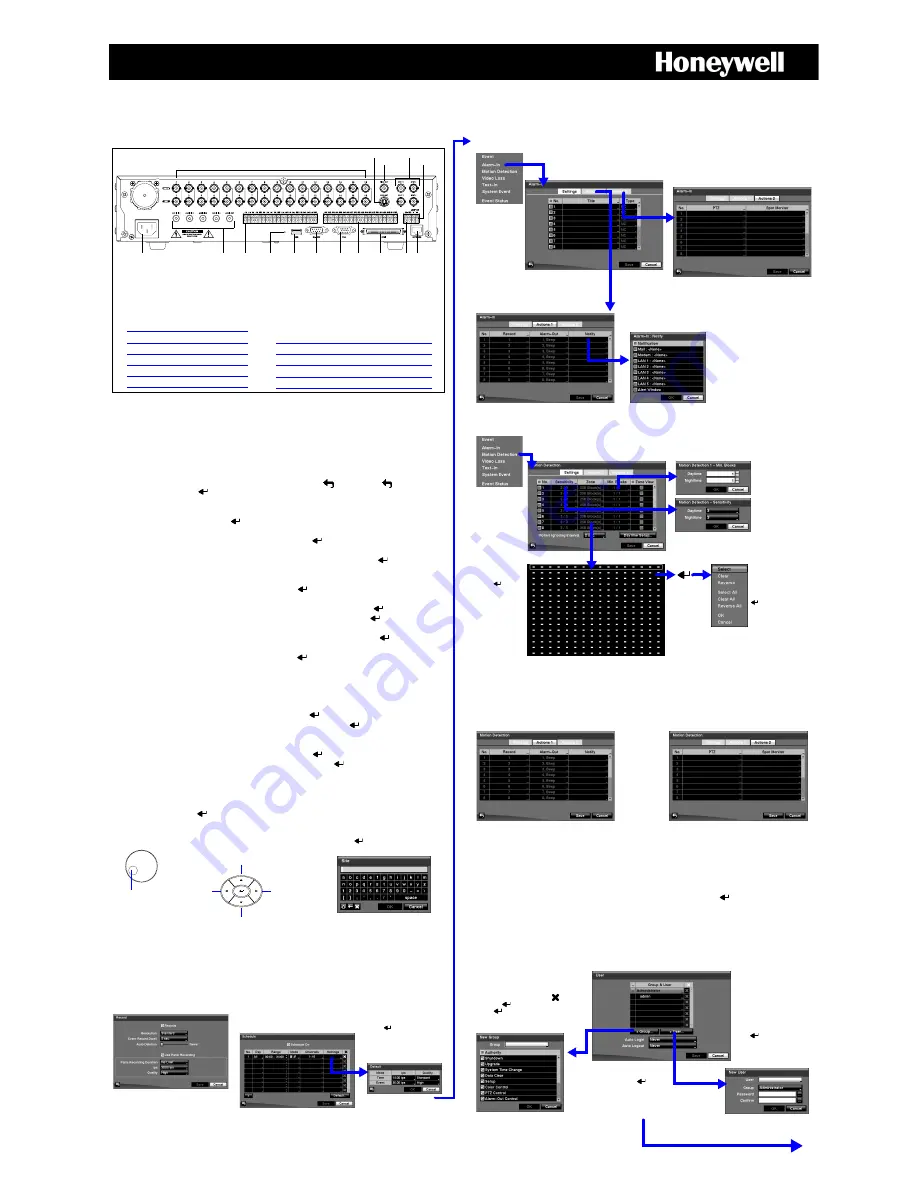
Step 3: Daily Operation
Password
Select a User and enter the password by pressing the appropriate
combination of Camera number buttons and then
. There is no default
password when logging in as the admin user for the first time.
Note
To assure the secure management of the system, setting up a
password is strongly recommended.
New User Setup
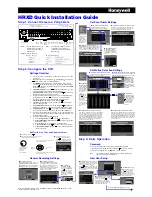
!
Event Menu
➤
Alarm-In Settings.
Set up each alarm input from the
terminal strip on the back of the DVR.
"
Activate each
input being used
and give it a
Title. Set each
input as either
normally open
(NO) or normally
closed (NC).
#
Event Menu
➤
Alarm-In
➤
Actions 1.
Highlight Actions 1 to open the Actions 1 setup
screen. Set the actions the DVR will take when it
senses an input in the Alarm-Out column. Also
select which cameras the DVR should record
when an alarm is present.
$
Event Menu
➤
Alarm-In
➤
Actions 1
➤
Notify.
Select the Notify field for an
alarm input to set who will
be notified when the alarm is
detected.
%
Event Menu
➤
Alarm-In
➤
Actions 2. Highlight
Actions 2 to open the Actions 2 setup screen. On
this screen, select the PTZ presets to run and spot
monitors to display when an alarm is present.
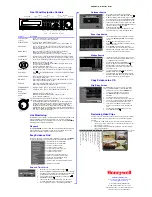
!
Event Menu
➤
Motion Detection Settings.
From this screen, video motion detection can be
turned on or off for each camera.
"
Event Menu
➤
Motion Detection
➤
Sensitivity.
Adjust the DVR’s sensitivity to motion for Daytime and
Nighttime independently (set from 1, low, to 5, high).
#
Event Menu
➤
Motion Detection
➤
Min. Blocks. Adjust
the minimum number
of detection blocks for
Daytime or Nighttime
independently. Smaller
numbers of Minimum
Blocks provide greater
sensitivity.
$
Event Menu
➤
Motion Detection
➤
Zone screen.
You can define the
area of the image
where you want to
detect motion (a
doorway, for
example).
Highlight the box
under Zone and
press . The
Zone screen is laid
over the video for
the selected
camera. Set up the
motion detection
zones by selecting
and clearing
blocks.
%
Event Menu
➤
Motion Detection
➤
Zone Screen
➤
Zone
Menu. Select a motion
zone block and press
. Use this menu to
activate (Select) or
deactivate (Clear)
blocks for motion
detection.
&
Event Menu
➤
Motion Detection
➤
Actions 1.
From this screen, the DVR can be set to react differently
to each motion detection. You can associate multiple
cameras with the motion detecting camera, recording
video from all the associated cameras when motion is
detected. In the Alarm-Out field you can select which
alarm outputs will be triggered when motion is detected.
You can also select which devices or users will be
notified when motion is detected.
'
Event Menu
➤
Motion Detection
➤
Actions 2.
From this screen, the DVR can be set to react differently
to each motion detection. You can select a PTZ preset
position for each PTZ camera to move to when motion is
detected. In the Spot Monitor field you can associate a
different camera with each spot monitor, so that specific
cameras will be displayed on the spot monitors when
motion is detected.
!
System Menu
➤
User. To set up your
users and user groups, select User in the
System menu. Delete Users or Groups by
selecting the corresponding and
pressing . Highlight a User Name and
press to add or change the password
assigned to that User. You can also change
the User’s group.
"
System Menu
➤
User
➤
New User. Select + User... on
the User setup screen and
press . Use the virtual
keyboard to enter the new
User Name. Assign the User to
a Group and enter a password
with the camera buttons.
#
System Menu
➤
User
➤
New
Group. Select + Group... on the User
setup screen and press . Use the
virtual keyboard to enter the new
Group Name. Assign the Authority
level for the group by selecting the
appropriate Authority boxes.