background image

Changing cartridge

5

Press the button to set the value. There are three settings – 1,000 liters, 1,500 liters and 
2000 liters. Upon completion of setting press the button for 3 seconds to save. If there is 
no action for 10 seconds after pressing the button the display will exit “Setting” mode 
and no value will be saved.

Reset upon replacement of expired cartridge:

Once the cartridge has been replaced, the electronic display for the new cartridge’s 
lifespan would need to be reset. Resetting is as follows: Press the button for 8 seconds 
until the buzzer is sounded. The user should release the button within 3 seconds to 
enter resetting mode (no resetting can be carried out if the button is not released after 3 
seconds). Once the timer has been reset, the system will resume the cartridge’s total 
purified water volume previously set. The time period can also be restored to 180 days.

Things to note for electronic display panel:

1) The display panel and the indicator light will be lit for 3 seconds each time power is 

connected, before entering normal display status;

2) The system will enter flushing mode when the water purifier is used for the first time. 

Flushing will take 180 seconds. During this time the indicator light will not be lit, and 
the system is in "Countdown" display mode. If power is interrupted during flushing the 
water purifier will resume flushing mode after resumption of power. Once it has 
undergone flushing it will not resume flushing until the timer is reset.

3) The touch button is not waterproof. If water is inadvertently splashed on it, immedi-

ately wipe it dry with cloth or paper;

4) During use the water purifier’s display will alternate between flow rate (liter) and time 

(day) every 5 seconds. If it is not in use, the display panel's indicator light and display 
will be turned off after 20 seconds;

5) The factory settings for the cartridge are 1,500 liters (for flow rate) and 180 days (for 

time). It is recommended that default setting be used; changing of setting for the 
cartridge’s lifespan should be carried out by professionals.

It is of crucial importance that the water purifier must not be placed upside-down 
during installation or change of cartridge. This is so as to prevent water from 
flowing onto the circuit board on the upper cover and damaging the electronic 
components.

The cartridge should be changed under any of the following circumstances:

1. When the electronic display indicates that the cartridge's lifespan has expired. It will 

show the numbers “XXXX” (flow rate/time) and “----" in alternate manner, an 
indication that the cartridge has reached the end of its lifespan and should therefore 
be changed.

2. The usage lifespan of the cartridge is dependent on the usage water volume, water 

quality and water pressure, and thus may differ slightly from place to place. However 
if the electronic display panel shows any of the following even if the cartridge has not 
reached the end of its lifespan, it should also be replaced:

1. When the water pressure for discharged tap water is normal but the water discharged 

from the water purifier is reduced and the display panel no longer shows any display, 
while the flow rate is less than 0.5 liter per minute (an indication that the cartridge is 
clogged);

2. When the discharged water emits odors or smell (an indication that the cartridge’s 

filtration capability has deteriorated)

Summary of Contents for HU-30

Page 1: ...Installation Operation Instruction Manual HU 30 Desktop Water Purifier Honeywell Environmental Combustion Controls Tianjin Co Ltd ...

Page 2: ......

Page 3: ...ortant Notes for Users 1 Safety Notices 1 Operation Instruction 2 Technical Parameter 2 Parts 3 Usage Method 4 Electronic device and application 4 Changing cartridge 5 Troubleshooting guide 7 Installation method 7 ...

Page 4: ...under any circumstances install the water purifier on water supply pipelines with a water pressure in excess of 0 6MPa If the water pressure for inlet water exceeds 0 6 Mpa pressure reduction valve to be separately purchased must be installed Temperature of inlet water should be 5 38 C Inlet water temperature exceeding 38 C may damage the sealing parts and cause leakage Inlet water temperature bel...

Page 5: ...nerally the idling period should not exceed 14 days If so change of cartridge is recommended If filtered water is to be obtained and stored pour it into a clean vessel and cover the vessel tightly Place the vessel in the refrigerator Water stored in this manner may be preserved for only two days Immediately cut off the water inlet for the water purifier by turning the water segregator to TAP posit...

Page 6: ... 7 Upper cover 6 Machine 4 Hose 2 Water segregator 10 Water outlet bend 9 Digital panel 1 Water segregator switch 3 Nut 5 Cartridge inside the machine 15 Cartridge Water segregator switch Water segregator Nut Hose Cartridge Machine Upper cover Top cover Digital panel Water outlet bend Bubbler Tightening nut Clip Foot pad ...

Page 7: ...lush the water purifier for about 10 minutes until the water is clear without any air bubbles The water can now be consumed Use the water segregator switch to select PURIFIED purified water or TAP tap water When the water segregator is in the PURIFIED position the water discharged is purified water When it is in the TAP position the water discharged is municipal tap water Time Day Flow rate liter ...

Page 8: ...wipe it dry with cloth or paper 4 During use the water purifier s display will alternate between flow rate liter and time day every 5 seconds If it is not in use the display panel s indicator light and display will be turned off after 20 seconds 5 The factory settings for the cartridge are 1 500 liters for flow rate and 180 days for time It is recommended that default setting be used changing of s...

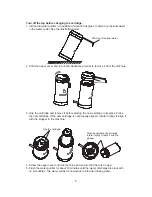
Page 9: ...rtridge and remove it before placing the new cartridge in its place Press the new cartridge If the new cartridge is not properly aligned rotate it lightly to align it with the stopper in the machine Grip the cartridge When assembling the cartridge rotate it lightly to align it with the stopper 4 Screw the upper cover onto the machine and ensure that there is no gap 5 Flush the water purifier for a...

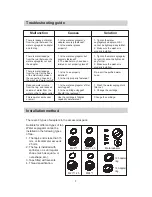
Page 10: ...any further 2 Make sure the washer is properly installed There is water leakage from the joint at the base of the machine between the connecting hose and the machine s water outlet 1 Is the hose properly installed 2 Is the clip properly fastened Re insert the purified water hose Reduced water volume from the tap and reduced volume of water from the water purifier s water outlet 1 Is the water segr...

Page 11: ...irst remove the screw on the metallic adapter using a Philip s head screwdriver cross screwdriver 2 Install the metallic adapter onto the water segregator nut 3 Use the cross screwdriver to lock the screw on the metallic adapter 4 Turn the nut on the water segregator but leave a gap of 3 4 mm 5 Forcefully push the water segregator onto the tap and tighten the screw using the screwdriver The metall...

Page 12: ... clip using the screwdriver If the tap has external groove thread and its diameter is 22 mm and the groove interval is 1 or 1 25 mm internal groove adapter may be used 1 Firstly remove the external groove cover from the tap 2 Install the internal groove adapter on the water segregator nut It is possible to use One Yuan coin to tighten the internal groove adapter onto the tap the adapter also has g...

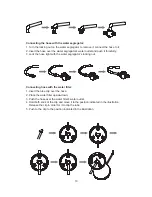
Page 13: ... the hose tight with the water segregator s locking nut Connecting hose with the water filter 1 Insert the tube clip over the hose 2 Place the water filter upside down 3 Push the hose over the water filter s water outlet 4 Hold both ends of the clip and move it to the position indicated in the illustration Release the clip in order for it to clip the tube 5 Push to the clip to the position indicat...

Page 14: ...ttery 1 Shut the tap s inlet switch and remove the upper cover from the machine 2 Use a cross screwdriver to remove the screw on the face of the battery box 3 Remove the battery box cover and the No 7 batteries 2 units inside and replace them with new batteries 4 Re install the battery box s cover and tighten the screw Finally install the upper cover on the machine ...

Page 15: ......

Page 16: ...ll Environmental and Combustion Controls Tianjin Co Ltd Address No 158 Nanhai Road Tianjin Economic and Technological Development Zone Tel 022 66287000 The contents of this manual are subject to change without prior notice 50097009 001 REV A ...

Reviews: