HUVF SERIES DUCT MOUNTED UV SYSTEM
31-00455—01
6
During normal operation the lamps need to be cleaned
once or twice in a month to make sure that there is no dust
accumulation on the lamp surface. This cleaning can be
done by normal wiping cloth or tissue paper. Make sure
that the lamp mounted on the reflector clips is tight
enough so that it remains in the same position before and
after cleaning.
Do not pour / splash / spill water on the system and lamps
during the coil cleaning. In case of accidental spillage of
water on the system make sure that the system is wiped
with a dry cloth to remove the water droplets. Do not switch
ON the UV system immediately, instead run the blower and
the HVAC system for some time (15-20 minutes) and then
switch ON the UV system.
Replace as per lamp life issued in the documentation.
SERVICE
Lamp Replacement
WARNING
Breakable Glass Hazard.
Can cause personal injury.
Be careful when inserting bulb(s) into lamp base.
Wear protective gloves when handling the bulb(s).
MERCURY NOTICE
This device contains mercury in the sealed
ultraviolet bulb(s). Do not place your used bulb(s) in
the trash. Dispose of properly.
The UV lamps are rated for 12,000 hours of germicidal
effectiveness. The visible blue light will continue to
illuminate but does not have any germicidal effectiveness.
Bulbs must be replaced on schedule for the system to
function properly.
IMPORTANT
Use only Honeywell replacement lamps. Use of
replacement lamps from other manufacturers
voids the warranty. See Table 2 for replacement
lamp part numbers.
For replacing the lamp(s) on the HUVF series first
disconnect the power of the system. Remove the 4-pin
holder on top of the lamp by pulling the lamp out of the
fixture clamps. Connect the new lamp in the 4-pin holder
and fix the lamp in the SS clamps. Refer to Fig. 3 in the
INSTALLATION section.
Ballast Replacement
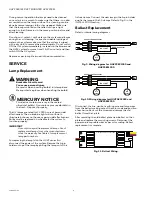
Refer to internal wiring diagrams.
Fig. 9. Wiring diagram for HUVF58C1000 and
HUVF58S1000.
Fig. 10. Wiring diagram for HUVF58C2000 and
HUVF58S2000.
Disconnect the line, neutral, earthing wire and lamp wires
from the ballast making note of the color code and position
of each wire. Back out the screws and remove the old
ballast from the L plate.
After removing the old ballast place new ballast on the L
plate and replace the mounting screws. Reconnect the
power and lamp cable wires as per color coding. Ballast
replacement is complete.
Fig. 11. Ballast Wiring.
Connectwell Connector
F
M
VEGO Connector
M
BALLAST
4
Pin
Holder
Connectwell Connector
F
M
VEGO Connector
M
BALLAST
4
Pin
Holder
4
Pin
Holder
ELECTRONIC BALLAST FOR UV LAMPS

