6
10. IP Flt Time
(60 mins)
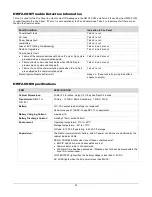
NOTE:
Refer to table above
for correct default values.
This prompt appears only if comm. path includes IP&Cell or IP.
Enter the time delay (1 – 60) in minutes before the communicator notifies the con-
trol panel that there is a communication path failure to AlarmNet over the hard-
wired Ethernet connection. If the panel has an alternate communication path, a
primary path loss message is sent to the central station.
NOTES:
•
Changing the comm. path choice will cause the fault times to default to the values listed in the table in prompt 5
•
The control is notified of the failure after the Cell and/or IP fault times expire
•
Refer to page two for UL864 Compliance programming requirements
11. Use DHCP? Y/N (Y)
If your router is configured for DHCP, press [Shift] then [Y], then press [#].
NOTE:
If DHCP is not selected (your router is set for a static IP), prompts 10 through 13 will appear. Use the
[Space] key to advance to the next address part.
12. NIC IP Address:
255.255.255.255
Enter choice, then press [#]. Follow the prompts.
13. Subnet Mask:
255.255.255.255
Enter choice, then press [#]. Follow the prompts.
14. Gateway IP Address:
255.255.255.255
Enter choice, then press [#]. Follow the prompts.
15. DNS Serv IP Addr:
255.255.255.255
Enter choice, then press [#]. Follow the prompts.
16. Review? Y/N
Enter choice, then press [#]. Follow the prompts.
17. Create Password? Y/N
Enter choice, then press [#]. Follow the prompts.
18. Exit Prog Mode? Y/N
Press [Shift] then [Y], then press [#].
DONE.
NOTE:
If an error in programming occurs, set the factory defaults (see next topic) and reprogram.
To exit the programming mode, press [N] in response to the "Review?" prompt. Then press [Y] to the "Exit Prog Mode?"
prompt. Upon exiting, the root file is updated to log the changes made. A message is displayed telling the user that this step
is being executed. When complete, the message "DONE" is displayed to indicate the file was successfully uploaded.
NOTE:
If critical configuration changes were made, such as the mode of operation, the communicator will
reset to ensure that the programming features are enabled.
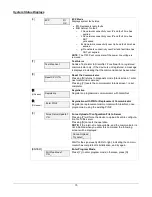
If the file is not successfully uploaded, one of the following prompts will be displayed. Follow the steps shown below until the
upload is successful.
Display
Description
What to do
Cannot Upload
Try Again? Y/N_
Communicator is not yet initialized.
Wait for signal quality indicator LEDs to be lit.
Press [Y].
Failed to Update
Root File!
Network problem, or you answered "N" to
"Cannot Upload Try Again?" prompt.
Initiate the Force Server Update
Command by pressing the [0] key.
Setting Factory Defaults
To reset the programming options to factory-default values, at the "Exit Prog Mode?" prompt press [Shift] plus [ESC].
NOTE
,
setting the factory defaults will also erase any password that may have been entered.
Set Default?
Y/N_
Press [Y] to reset factory default values.
Press [N] to cancel this function.
Press [Shift] then [Y], then [#]. The Create Password prompt appears, follow the prompts then exit.
Summary of Contents for HWF2A-COM
Page 21: ...19 Communicator Information ...
Page 24: ...22 NOTES ...
Page 25: ...23 NOTES ...
Page 26: ...24 NOTES ...


