background image

 -

FONCTIONNEMENT 

NE LAIssEZ jAMAIs UN APPAREIL sANs sURVEILLANCE QUAND IL FONCTIONNE

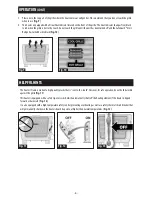
1.  Posez le radiateur sur une surface stable et d’aplomb, à au moins 0,9 m (3 pi) des corps combustibles – meubles, rideaux, etc. (

Fig. 3

).

2.  Le bouton étant à l’ARRÊT, branchez le radiateur sur une prise de courant (

Fig. 4

).

3.  Tournez le thermostat à fond en sens horaire, jusqu’au réglage HAUT (

Fig.5

).

 Fig. 3

ARRÊT

 Fig. 4

HAUT

ARRÊT

 Fig. 5

 Fig. 2

4.  Allumez le radiateur en tournant le sélecteur de puissance en sens horaire, à la position de MARCHE. Veuillez noter que ce 

radiateur fonctionne très silencieusement – vous n’entendrez pas tourner le ventilateur (

Fig. 6

).

5.  Quand la température de la pièce est confortable, tournez lentement le thermostat en sens antihoraire jusqu’à ce que le 

radiateur s’arrête et émette un déclic. C’est le point auquel le réglage du thermostat correspond à la température ambiante. 

Le thermostat allumera et éteindra désormais le radiateur pour maintenir la température choisie (

Fig. 7

).

6.  Ce radiateur utilise une technologie de convection naturelle – la chaleur se dégage au haut de la grille, s’élève naturellement 

et circule dans la pièce pour procurer une température ambiante constante (

Fig. 8

).

HAUT

MARCHE

 Fig. 6

Réglage de  

température 

désiré

 Fig. 7

 Fig. 8

Summary of Contents for HZ-725 Series

Page 1: ...mazón Fresco alTacto Serie de Modelo HZ 725 Fig 1 Fig 1B Assembly Assemblage Ensamblaje OWNERS MANUAL GUIDE D UTILISATION MANUAL DEL PROPIETARIO COMPONENTS Fig 1 1 Handle 2 Grille 3 On Off Knob 4 Thermostat 5 Legs COMPOSANTS fig 1 1 Poignée 2 Grille 3 Bouton marche arrêt 4 Thermostat 5 Pied COMPONENTES Fig 1 1 Manija Asa 2 Parrilla 3 Interruptor Encendido Apagado 4 Termostato 5 Pata ...

Page 2: ... to two slot receptacles The green grounding lug extending from the adapter must be connected to a permanent ground such as a properly grounded outlet box The adapter should not be used if a three slot grounded receptacle is available 11 Do not insert or allow foreign objects to enter any ventilation or exhaust opening as this may cause an electric shock or fire or damage the heater 12 To prevent ...

Page 3: ...Please note this is a silent heater so you will not hear a fan noise when it is on Fig 6 5 When the room reaches a comfortable temperature slowly turn the thermostat control counter clockwise until the heater goes off and you hear a click This is the point which the thermostat setting equals the room temperature At this setting the thermostat will automatically turn the heater on and off to mainta...

Page 4: ...g as well as a safety thermal circuit breaker that will permanently shut down the heater should it operate at higher than normal temperatures Fig 13 Fig 12 Fig 9 Fig 10 7 Please note the top part of the grille where the heat comes out will get hot We recommend that you do not touch the grille when in use Fig 9 8 This heater is equipped with aVisual Heat Indicator located on the front of the grille...

Page 5: ...ause you have reached your desired heat setting Fig 15 Refer to page 3 number 5 Check for and remove any obstructions close to the unit Fig 16A Turn unit OFF unplug Fig 16B and allow to cool completely Wait at least 10 minutes Fig 16C then re plug the heater in and follow the OPERATION instructions Fig 16D Please do not attempt to open or repair the heater Fig 17 Helpful Hints Cont Fig 17 Fig 16A ...

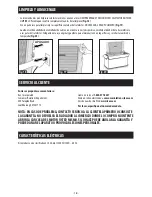
Page 6: ...OPEN THE HOUSING YOURSELF DOING SO MAY VOID YOUR WARRANTY AND CAUSE DAMAGE TO THE PRODUCT OR PERSONAL INJURY Fig 20 Fig 19 Fig 18 We recommend cleaning your heater at least once a month ALWAYSTURNTHE POWER OFF AND UNPLUGTHE HEATER BEFORE CLEANING Let it cool completely before cleaning Fig 18 Use a dry cloth to clean only the external surfaces of the heater DO NOT USEWATER WAX OR POLISH Fig 19 Wrap...

Page 7: ...you also may have other rights which vary from jurisdiction to jurisdiction This warranty applies only to the original purchaser of this product from the original date of purchase B At its option Kaz will repair or replace this product if it is found to be defective in material or workmanship C This warranty does not cover damage resulting from any unauthorized attempts to repair or from any use n...

Page 8: ... non inclus disponibleaudétailpermetdeconnecterles fichesàtroisbrochessurprisesàdeuxtrous L ergotvert ensailliedel adaptateurdoitêtreconnectéàunemise àlaterrepermanente uncoffretdepriseàlaterre par exemple Unadaptateurnedoitjamaisservirquandune prisedecouranttripolaireestdisponible 11 Veillezàcequ aucuncorpsétrangernepénètredansles prisesd airoud évacuation chocélectrique incendieou dégâtspourraie...

Page 9: ...iateur fonctionne très silencieusement vous n entendrez pas tourner le ventilateur Fig 6 5 Quand la température de la pièce est confortable tournez lentement le thermostat en sens antihoraire jusqu à ce que le radiateur s arrête et émette un déclic C est le point auquel le réglage du thermostat correspond à la température ambiante Le thermostat allumera et éteindra désormais le radiateur pour main...

Page 10: ...eur de façon permanente s il fonctionne à des températures plus hautes que les températures normales Fig 13 ARRÊT Fig 13 Fig 11 ARRÊT MARCHE Fig 12 Fig 9 GRILLE FROIDE GRILLE CHAUDE Fig 10 FONCTIONNEMENT suite 7 Veuillez noter que la partie supérieure de la grille d où provient la chaleur sera chaude Nous vous déconseillons de toucher la grille quand le radiateur fonctionne Fig 9 8 L avant de la g...

Page 11: ... arrêté parce que l air ambiant était au degré désiré Fig 15 Référez vous à la page 9 le numéro 5 Assurez vous qu il n y ait pas d obstructions à proximité de l appareil enlevez les s il y a lieu Fig 16A Éteignez le radiateur et débranchez le Fig 16B Laissez le totalement refroidir Attendez au moins 10 minutes Fig 16C avant de rebrancher le radiateur puis observez les instructions de FONCTIONNEMEN...

Page 12: ...az com Ou visitez notre siteWeb à www kaz com Prière de spécifier le numéro de modèle La puissance nominale de cet appareil est de 12 5 ampères 1500 watts à 120 volts 60 hertz NETTOYAGE ET RANGEMENT Fig 20 Fig 19 ARRÊT Fig 18 Nous conseillons de nettoyer le radiateur au moins une fois par mois METTEZTOUJOURS LE RADIATEUR HORSTENSION ET DÉBRANCHEZ LE AVANT D ENTREPRENDRE SON NETTOYAGE Laissez le to...

Page 13: ... l autre et il est possible que vous en ayez d autres Cette garantie s applique uniquement à l acheteur initial de ce produit à compter de la date de l achat initial B À sa discrétion Kaz réparera ou remplacera ce produit si l on constate qu il comporte un vice de matière ou de main d œuvre C Cette garantie ne couvre pas les dommages découlant des tentatives de réparation non autorisées ou de tout...

Page 14: ... noincluído paraconectar enchufespolarizadosdetrespatasauntomacorrientesdedos ranuras Elcableverdedetierraconterminalqueseextiende deladaptadorsedebeconectaraunatierrapermanente talcomounacajaderegistrocorrectamentepuestaa tierra Eladaptadornodebeserusadosihaydisponibleun tomacorrientecontierra 11 Asegúresequenopenetrencuerposextrañosporlasranuras deventilaciónoevacuaciónparaevitardescargaseléctri...

Page 15: ...que este es un calefactor silencioso así que usted no escuchará el ruido de un ventilador cuando se encienda Fig 6 5 Cuandolahabitaciónalcanceunatemperaturaagradable lentamentegireelcontroldeltermostatohacialaizquierdahastaque elcalefactorseapagueyustedescucheunclic Ésteeselpuntoenelcualelajustedeltermostatoigualalatemperaturadela habitación Enesteajuste eltermostatoencenderáoapagaráelcalefactorpa...

Page 16: ...rruptor eléctrico termal el cual apagará permanentemente el calefactor si opera en temperaturas más altas de lo normal Fig 13 Fig 13 APAGADO Fig 11 APAGADO ENCENDIDO Fig 12 Fig 9 PARRILLA FRÍA PARRILLACALIENTE Fig 10 OPERACIÓN Continuación 7 Por favor observe que la parte superior de la parrilla donde el calor es expulsado se calentará Recomendamos que no toque la parrilla cuando esté en uso Fig 9...

Page 17: ...onando Fig 14 Revise su ajuste del termostato La unidad puede simplemente estar apagada porque usted ha alcanzado su ajuste deseado de calor Fig 15 Refiera a la paginación 15 número 5 Revise y quite cualquier obstáculo cerca de la unidad Fig 16A APAGUE la unidad desconéctela Fig 16B y permita que se enfríe completamente Espere al menos 10 minutos Fig 16C después vuelva a conectar el calefactor y s...

Page 18: ...MPRÓ NO INTENTE ABRIR LA CARCASA DEL MOTOR USTED MISMO SI LO HACE PUEDE ANULAR LA GARANTÍAY PUEDE DAÑAR EL APARATO O PROVOCAR LESIONES PERSONALES LIMPIEZA Y ALMACENAJE Fig 20 Fig 19 Le recomendamos que limpie su calefactor al menos una vez al mes SIEMPRE APAGUEY DESCONECTE EL CALEFACTOR ANTES DE LIMPIARLO Permita que se enfríe completamente antes de la limpieza Fig 18 Use un paño seco para limpiar...

Page 19: ...otro y es posible que usted tenga otros La presente garantía sólo será válida con la compra inicial del producto a partir de la fecha de compra inicial B Kaz se reserva todo derecho de reparación o sutstitución del presente producto si se constata que presenta un defecto de fábrica o mano de obra C Esta garantía no cubre los daños ocasionados por tentativas de reparación no autorizadas o por el us...

Page 20: ... 2008 Kaz Incorporated All Rights Reserved Tous droits réservés Reservados todos los derechos P N 31IM0725190 ...

Reviews: