background image

32

IF1C

 Fixed RFID Reader User Guide

 Switching the High Side

Switch the Low Side with Reader Power

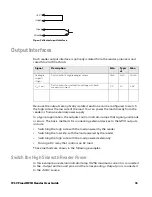
For low side switching applications, the lamp power is routed to all the lamps in 
common and the low side of the load is routed to the switch.

Connect the external indicator lamp to the +Output and +

5

Vdc pins, and short 

the corresponding -Output pin to ground.

 Switching the Low Side of the Output Load

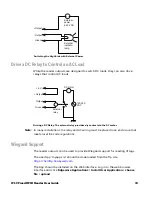
Switch the High Side with External Power

To use external power (5 to 

24

Vdc) to switch the high side, connect the Ground 

pin to the ground system of the external power supply, and connect the positive 
side of the external supply to the +Output pin. The external indicator LED is 
connected to the corresponding -Output and Ground pins. 

External  
indicator lamp


5m

A maximum

+Output

+

V

Ground

- Output

External  
indicator lamp


5m

A maximum

Ground

- Output

+Output

+

5

 V

Summary of Contents for IF1C

Page 1: ...User Guide IF1C Fixed RFID Reader ...

Page 2: ...dware to achieve intended results This document contains proprietary information that is protected by copyright All rights are reserved No part of this doc ument may be photocopied reproduced or translated into another language without the prior written consent of HII Copyright 2017 Honeywell International Inc All rights reserved Web Address www honeywellaidc com Microsoft NET SQL Server Windows W...

Page 3: ...Install the Wall Mount 3 How to Communicate with the RFID reader 5 Assign an IP Address 5 Log In to the Web Browser Interface 7 Set the Date and Time 8 Chapter 2 Configure the Reader 9 Configure Ethernet Settings 9 Ethernet Settings 9 Configure Common Network Settings 10 Common Network Settings 10 Device Configuration Web Service 11 Device Configuration Web Service 11 Download the Device Configura...

Page 4: ...3 Develop and Install RFID Applications 21 RFID Applications 21 RFID Resource Kit 21 Microsoft NET Support 22 Java Support 22 Execute Java Applications 22 Execute JAR Files 22 Enable the Java Just In Time Compiler 22 Specify the Class Path for the Java Virtual Machine 23 Java Support for Microsoft SQL Server and Sybase 23 Create an Installation Package 23 Create a Configuration File 23 Archive the...

Page 5: ... 29 Input Interfaces 29 Powered Input Example 30 Isolated Input Interface Example 30 Open Collector Input Interface Example 30 Output Interfaces 31 Switch the High Side with Reader Power 31 Switch the Low Side with Reader Power 32 Switch the High Side with External Power 32 Drive a DC Relay to Control an AC Load 33 Power Interface 33 Chapter 5 Maintainance and Troubleshooting 35 Upgrade Firmware 3...

Page 6: ...iv IF1C Fixed RFID Reader User Guide Chapter 6 Product Specifications 39 IF1C Specifications 39 Port Pin Assignments 40 GPIO Port 40 Ethernet Port 41 Appendix A 42 ...

Page 7: ...ations Product Service and Repair Honeywell International Inc provides service for all of its products through service centers throughout the world To obtain warranty or non warranty service return your product to Honeywell postage paid with a copy of the dated purchase record To learn more go to www honeywellaidc com and select Service Repair at the bottom of the page Limited Warranty For warrant...

Page 8: ...uency RF platform offering superior read performance Features of the RFID reader include 64 MB of storage space for your RFID applications A web browser interface for easy configuration Support for EPCglobal Gen 2 and Gen 2v2 ISO tag types IP66 seal rating for outdoor installations Support for Power Over Ethernet VESA mount compatibility USB and sealed Power Over Ethernet ports Interfaces Supporte...

Page 9: ...so you can connect either a standard Ethernet cable or a crossover cable The port also supports Power Over Ethernet POE To power the reader you need an 802 3af compliant power supply 2 GPIO General purpose input output GPIO port that connects the reader to industrial controls such as relays or indicators It also supports RS 232 and Wiegand Interface multiplexed with GPOs 3 USB Connects the reader ...

Page 10: ...Icon Name Color Description RFID antenna Solid green RF field is active Blinking green A tag is being interrogated Blinking red The reader cannot output the requested RF power level or an RF fault is detected Off The RFID radio is not powered Ethernet Solid green The reader is powered an Ethernet link is established and the host is connected Flickering green Packets of information are being sent t...

Page 11: ...e the wall mount to the RFID reader with the washers and screws provided 4 Secure three screws not provided to the wall and place the mounting bracket on to the screws 5 Secure three screws not provided to the bottom of the wall mount bracket x4 ...

Page 12: ...s you need to use a serial communications program such as HyperTerminal or Tera Term to assign a static IP address After the reader has been assigned an IP address connect it to your network and then complete the configuration by using the web browser interface Assign an IP Address You need to assign an IP address to the reader before you can connect the reader to your network to use the web brows...

Page 13: ...t to install the drivers 9 If you are using Windows 8 or Windows 10 operating system a warning may be displayed Click on Install this driver to proceed with the installation 10 When the installation is finished click Close 11 Open a serial communications program to connect to the reader 12 Type config and press Enter and then type config again in the Password field and press Enter 13 By default DH...

Page 14: ...he Initial Configuration screen 20 Remove the USB cable from the reader The reader is ready to be configured and connected to your network Log In to the Web Browser Interface After the reader is assigned an IP address you can configure the reader through the web browser interface Before you log in make sure an IP address has been assigned to the reader and the reader is connected to your network 1...

Page 15: ...er interface Set the Date and Time Set the date and time through the web browser interface 1 From the Main Screen of the web browser interface click the date and time in the upper right corner 2 Select your time zone from the drop down list and then click Activate Changes 3 Enter the current year month and day in the entry fields 4 Enter the current hour minutes and seconds in the entry fields 5 C...

Page 16: ... network Setting Description Enable DHCP Select this field if you want the reader to get its IP address from a DHCP server If this field is not selected you need to specify the IP address subnet mask and IP router for your network IP Address The IP address of the reader The IP address has the form x x x x where x is a number from 0 to 255 The default MAC address is on the label on the side of the ...

Page 17: ...lways has a Link Local IP Address even if another address is assigned through DHCP or statically via user configuration IPv6 Autoconfigure Enables IPv6 automatic configuration Auto configuration is enabled by default If you disable auto configuration you need to specify an IPv6 address subnet mask and router IPv6 Address 128 bit IPv6 address for the reader IPv6 Router 128 bit address for the IPv6 ...

Page 18: ...ither secure or insecure connections 3 To disable web services over a secure connection clear the Enable Device Web Services Secure check box and then click Activate Changes 4 To disable web services over an insecure connection clear the Enable Device Web Services Insecure check box and then click Activate Changes Download the Device Configuration WSDL Document Download the device configuration we...

Page 19: ... Secure Shell SSH access to the Linux system console using the same login and password as the web browser interface default is intermec SSH access is disabled by default Enable FTP Server Enables access to the reader through its FTP server Enable Telnet Server Enables access to the Linux system console via standard Telnet using the same login and password as the web browser interface The default l...

Page 20: ... RFID module 1 Log in to the web browser interface and click RFID Services BRI BRI Server 2 Configure the BRI Server settings 3 Click Activate Changes to save your changes BRI Server Settings BRI Server settings handle communications between your application and the RFID module View the BRI Server Log If you enable logging you can see a list of BRI server events and save the logfile as a txt file ...

Page 21: ...ce Programmer Reference Manual avail able on the Honeywell website Event Name Description Time Date Time and date of the event Connection Session ID of the client communicating with the BRI server Type Message type of the event generally indicating which system sent the message 1 Command received by BRI server 2 Response sent by BRI server 3 BRI server connection message Message Text of the messag...

Page 22: ...t Enables a NOTAG message which is sent when no tags are found during execution of a Read Write or Lock command Default is enabled This setting is equivalent to the NOTAGRPT BRI attribute Report Timeout The timeout in ms for delays in tag reporting when the RFID reader is in continuous read mode Valid range is 0 to 65534 Default is 0 This setting is equivalent to the RPTTIMEOUT BRI attribute Timeo...

Page 23: ... equivalent to the IDTRIES BRI attribute Antenna Tries The number of times the antenna is used for a Read or Write command Valid range is 1 to 254 Default is 1 This setting is equivalent to the ANTTRIES BRI attribute EPCC1G2 Advance Medium Access Mode Dense Reader Mode settings used with EPCC1G2 parameters This setting is equivalent to EPCC1G2PARAMETERS BRI attribute Dense Reader Mode Allows the r...

Page 24: ...he secure LLRP server on port 5085 Unsecure Server Enable Allows connections to the unsecure LLRP sever on port 5084 Download Intermec Extensions Definition Downloads an XML file that describes Honeywell specific extensions for the LLRP protocol Reader Initiated Connections For reader initiated TCP IP connections to a remote LLRP client Client address The IP address of the remote LLRP client TCP p...

Page 25: ...hanges to save your changes Read only password The password to log in to the reader This password gives a user read only access The user can view the configuration of the reader and execute diagnostics but cannot perform any tasks that affect the reader operation Default is read only The read only password cannot be deleted To disable read only access you need to enable the RADIUS server Setting D...

Page 26: ...nhance security import a certificate to the reader 1 Log in to the web browser interface and click Security Import Certificate 2 Select the type of certificate 3 Click Browse and select the certificate 4 If you selected a server certificate to import enter the passphrase for the certificate 5 Click Import Certificate The certificate is imported View Certificates Use the web browser interface to vi...

Page 27: ...nd its controlling software The RFID reader supports version 1 0 1 of the EPCglobal LLRP For information on LLRP see go to https www gs1 org standards epc rfid llrp 1 1 0 An open source LLRP Toolkit can be downloaded at http sourceforge net projects llrp toolkit RFID Resource Kit To create an application use the RFID Resource Kit The Honeywell Developer Library RFID Resource Kit includes Java and ...

Page 28: ...em services also known as bundles without having to reboot the reader each time To use OSGI download packages from osgi org Execute Java Applications To execute a Java application on the reader use this command JAVA_HOME bin java myJAVAClass Execute JAR Files To execute jar files use this command JAVA_HOME bin java myApplication jar When you create a jar file you need to include manifest files The...

Page 29: ...t for Microsoft SQL Server and Sybase The reader jTDS driver version 1 2 provides JDBC capabilities to Java applications running on the reader You need to include the location of the JDBC drivers in the class path with the environmental variable JDBC_HOME The JDBC drivers support JDBC 1 0 and Microsoft SQL Server versions 6 5 7 2000 and 2005 Sybase versions 10 11 12 and 15 For more information go ...

Page 30: ...their installation directories so the userapp conf file does not need to include path information Archive the Installation Files To install an RFID application on the reader you need to package the configuration file and application 1 Create a configuration file named userapp conf 2 Package the userapp conf file and your application into one of these formats zip tar bz2 or tar gz file Your applica...

Page 31: ...ations on the reader Start an Application By default an application is stopped You can start the application from the web browser interface 1 Log in to the web browser interface and click Edgeware Applications Appli cation Control The Application Control screen appears 2 Click to start an application Stop an Application Stop an application from running to reduce the amount of resources that the re...

Page 32: ...ile When you package an application for installation on the reader you need to include a configuration file You can specify Auto Start in the configuration file 1 With a text editor open the userapp conf configuration file packaged with your application 2 In the command syntax make sure AUTOSTART true 3 Save the userapp conf file 4 Repackage the updated configuration file with your application 5 U...

Page 33: ...rough the demo application Send BRI commands Run BRI scripts Read RFID Tags through the Demo Application Use the demo application to verify that your reader can read RFID tags 1 Log in to the web browser interface and click Edgeware Applications Appli cation Control The Application Control screen appears 2 If the Developer Tools are not enabled click 3 Click Developer Tools Reader Demo 4 Place a t...

Page 34: ...nterface and click Edgeware Applications Appli cation Control The Application Control screen appears 2 If the Developer Tools are not enabled click 3 Click Developer Tools BRI Commands 4 Click Browse and browse to the location of the BRI script 5 Double click the BRI script file 6 Click Load The script is loaded and run and values are returned ...

Page 35: ...sed in the system You need to coordinate input and output control wiring with the software developer Input Interfaces Each of the two inputs is compatible with input signals of 4 5 to 28Vdc Both the high and low signal contacts are exposed and isolated to 1500V Input impedance is 1 8K ohms minimum In a typical application the reader senses input from an external control like a switch and then star...

Page 36: ...d noise by referencing a remote input to chassis return of the reader Isolated Input Interface Open Collector Input Interface Example The input can be connected to an open collector interface of an external device This open collector input interface typically implies that the grounds are tied together for the two systems The common ground can be a source of input noise so you should follow good gr...

Page 37: ...PIO outputs include Switching the high side with the load powered by the reader Switching the low side with the load powered by the reader Switching the high side with the load powered externally Driving a DC relay that controls an AC load These methods are shown in the following examples Switch the High Side with Reader Power In this example an external indicator lamp 0 25A maximum current is con...

Page 38: ...rresponding Output pin to ground Switching the Low Side of the Output Load Switch the High Side with External Power To use external power 5 to 24Vdc to switch the high side connect the Ground pin to the ground system of the external power supply and connect the positive side of the external supply to the Output pin The external indicator LED is connected to the corresponding Output and Ground pins...

Page 39: ...iring must be placed in an enclosure that meets local fire code regulations External indicator lamp External power 5 24 VDC Ground Output Output AC motor 120 230 VAC External relay Output 5 V Ground Output Wiegand Support The reader outputs can be used to provide Wiegand support for reading of tags The user App myapp zip should be downloaded from the ftp site https hsmftp honeywell com The App sho...

Page 40: ...the excessive load is removed The total load on the GPIO interface power must stay within the 5mA limit When you design a system that uses the GPIO interface power make sure to complete a power budget assessment to ensure that the supply is adequate for the system If your system needs more than 5Vdc at 5mA you can connect an external power supply to the 5V and Ground pins The external supply power...

Page 41: ...5 Click Browse to browse to the location of the firmware file then double click the file 6 Click Upgrade IF1 RFID Reader The upgrade process begins and the firmware is transferred to the reader Once the upgrade is complete the login screen appears During the upgrade the web browser interface screen does not auto refresh To see Firmware Upgrade progress status Go to Maintenance System Log Click Ref...

Page 42: ...ts and then click OK The reader reboots and restores the default configuration Reboot the Reader If the reader or an application locks up or if the reader does not respond you may need to restart the reader 1 Log in to the web browser interface and click Maintenance Reboot 2 Click Reboot and follow the prompts to reboot the reader The reader reboots and restores the default configuration View Devi...

Page 43: ... does not respond to your RFID application Your application may not be communicating with the reader BRI server You may need to change BRI server settings to communicate with your application For example if your application is running on a desktop PC you need to enable external BRI connections to the reader Problem Solution You cannot connect to the reader through the USB port Make sure you downlo...

Page 44: ...IP66 with Ethernet cable housing kit and IP66 compliant DB15 connector cable when in use OPERATING TEMPERATURE STORAGE TEMPERATURE HUMIDITY 20 C to 65 C 13 F to 149 F 30 C to 75 C 22 F to 167 F 10 to 95 relative humidity non condensing RF CHARACTERISTICS FREQUENCY RANGE READ RANGE TRANSMIT POWER 865 867 MHz factory configured Around 10m Up to 30 dBm 1 W INTERNAL ANTENNA 7 dBiL integrated linear an...

Page 45: ... 6 NC 7 NC 8 NC 9 ISO_V Isolated common return for GPIO input and outputs 10 ISO_V Isolated common return for GPIO input and outputs 11 GP output 0 Isolated GP output open collector 5 28V max 5mA maximum continuous 12 GP output 1 Isolated GP output open collector 5 28V max 5mA maximum continuous 13 GP input 0 Isolated GP input Vin low 1V to 0 8V max Vin high 4 5V to 28V max 14 GP input 1 Isolated ...

Page 46: ...munications and Power Over Ethernet Use the illustration to understand the port pin assignments Pin Description 1 Ethernet TX Spare POE return 2 Ethernet TX Spare POE return 3 Ethernet RX Spare POE 48Vdc 4 POE 48Vdc 5 POE 48Vdc 6 Ethernet RX Spare POE 48Vdc 7 POE return 8 POE return Pin 1 ...

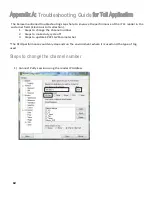
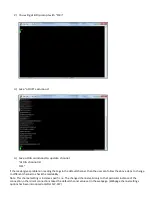
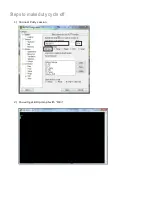
Page 47: ... in the customer field Electronic toll collection 1 Steps to change the channel number 2 Steps to make duty cycle off 3 Steps to update EPCC1G2 Parameter Set The RFID performance could vary depends on the environment where it is used and the type of tag used Steps to change the channel number 1 Connect Putty session using the reader IP Address 42 ...

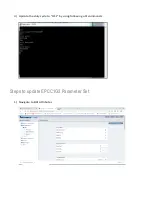
Page 48: ... the above steps to change to different channel to check the readability Note This channel setting is instance specific i e The changed channel valid only to that particular instance of the connection other client connections takes the default channel value set in the webpage Webpage channel settings options has been introduced on after FW 247 2 You will get BRI prompt with OK ...

Page 49: ...Steps to make duty cycle off 1 Connect Putty session 2 You will get BRI prompt with OK ...

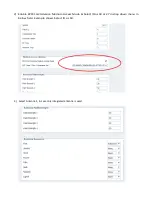
Page 50: ...Steps to update EPCC1G2 Parameter Set 1 Navigate to BRI Attributes 3 Update the duty cycle to OFF by using following util commands ...

Page 51: ...3 Select Antenna 1 in case only integrated antenna is used 2 Enable EPCC1G2 Advance Medium Access Mode Select ID as 18 or 27 in drop down menu in below field Example shows Select ID as 18 ...

Page 52: ...4 Navigate to maintenance press reboot to reboot the reader ...

Page 53: ...Honeywell 9680 Old Bailes Road Fort Mill SC 29707 www honeywellaidc com IF1C EN UG Rev a 05 18 ...

Reviews: