ENGLISH
6
INSTRUCTIONS FOR USE
1.
Place the Air Cleaner on a firm, even surface as descri-
bed in
“
First time of use
”
.
2.
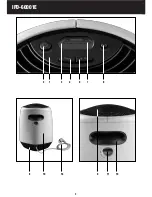
Insert the power plug (18) into the socket.
3.
To start using the Air Cleaner, press the power/speed
key (2).
LOW appears on the display (3). When you switch the Air
Cleaner on you will hear a speed change. This is normal.
This function enables the Air Cleaner to start operating
correctly. The Air Cleaner is now operating at the LOW
operating speed.
4.
By pressing the power/speed key (2), you can choose
between the following positions:
LOW = low air flow rate
MED = medium air flow rate
HIGH = high air flow rate.
The chosen operating speed appears on the display (3).
For the highest air cleaning speed, operate the Air Cleaner
in the HIGH position. For quieter operating, e.g. overnight,
choose the MED or LOW position.
5.
To switch the Air Cleaner off, press the power/speed key
(2) until the display (3) goes off.
Timer function
When the Air Cleaner is in use, you can preset the time span
after which the Air Cleaner is to switch off automatically.
1.
Press the timer key (4). The numeral 10 flashes on the
display (3).
2.
Press the timer-set key (5) to the desired number of
hours. You can choose between 1 and 10 hours. The cho-
sen numeral flashes for a few seconds. As soon as it stops
flashing, the timer function is programmed. (e.g. if the Air
Cleaner is to switch off after 6 hours, press the timer key
(4), then the timer-set key (5) until the numeral 6 appears
on the display).
3.
To cancel the timer programming, press the timer key
(4) again.
CLEANING THE FILTERS
Electronic filter change indicator
The IFD Air Cleaner is equipped with an electronic filter
indicator, which serves as a practical guideline for cleaning
the IFD filter and pre-filter. This is based on the operating
duration and operating speed. This is a big advantage,
because the life-span of the filter depends on the amount
of air and dirt particles that pass through it.
During operation, the stripes of the filter indicator on the
display fill up gradually from
“
IFD
”
to
“
Dirty
”
. As soon as
the indicator is completely full, it is time to clean the filter.
Depending on individual use (surroundings, hours of use
and air flow rate), you should check the condition of the
filter regularly and clean it if necessary.
Resetting the filter indicator
Every time you clean the filter, you should reset the filter
indicator (7). While the Air Cleaner is running, press the
filter reset key (6) until the filter stripes empty (about 5
seconds).
Removing and cleaning the IFD filter
1.
Switch the Air Cleaner off and always disconnect the
power cord from the socket.
2.
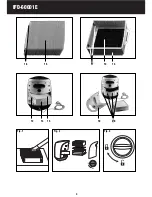
Turn the rotary lock (11) at the rear in an
anticlockwise
direction. Take hold of the filter cover (10) above the carry-
ing handle (19) and take it forwards/upwards out of the Air
Cleaner.
3.
Pull the filter cartridge (13) carefully by the handle
towards you. It slides out of the Air Cleaner. Pull the filter
cartridge (13) carefully out of its track (12). Take the IFD
filter out of the cartridge.
4. Do not use water or any other liquids to clean the
IFD filter.
5.
Tap the IFD filter lightly onto a firm surface e.g. into a
trash can, to remove the particles of dirt.
6.
To clean the IFD filter with a vacuum cleaner, fit the
brush attachment onto the vacuum cleaner, hold the IFD
filter in one hand and remove the dirt particles by vacuu-
ming with the brush over both sides of the filter. Repeat
this on both sides of the filter. (Fig. 1)
7.
If the IFD filter is blocked or if you have difficulty
in cleaning the IFD filter, please follow the instructions in
the warranty conditions.
Removing and cleaning the pre-filter.
The pre-filter separates the large particles of dirt in the air.
1.
Remove the pre-filter (14) carefully from the filter car-
tridge (13) and clean it by hand in lukewarm water. Allow
the pre-filter (14) to
dry thoroughly
before you replace it in
the filter cartridge.
Mounting the filter
1.
Switch the Air Cleaner off and always disconnect the
power cord from the socket.
2.
First mount the pre-filter (14) in the filter cartridge (13).


