background image

LYNX Touch Installation and Setup Guide


- 8 -


Wiring Connections 

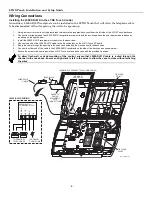
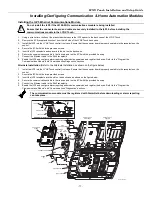
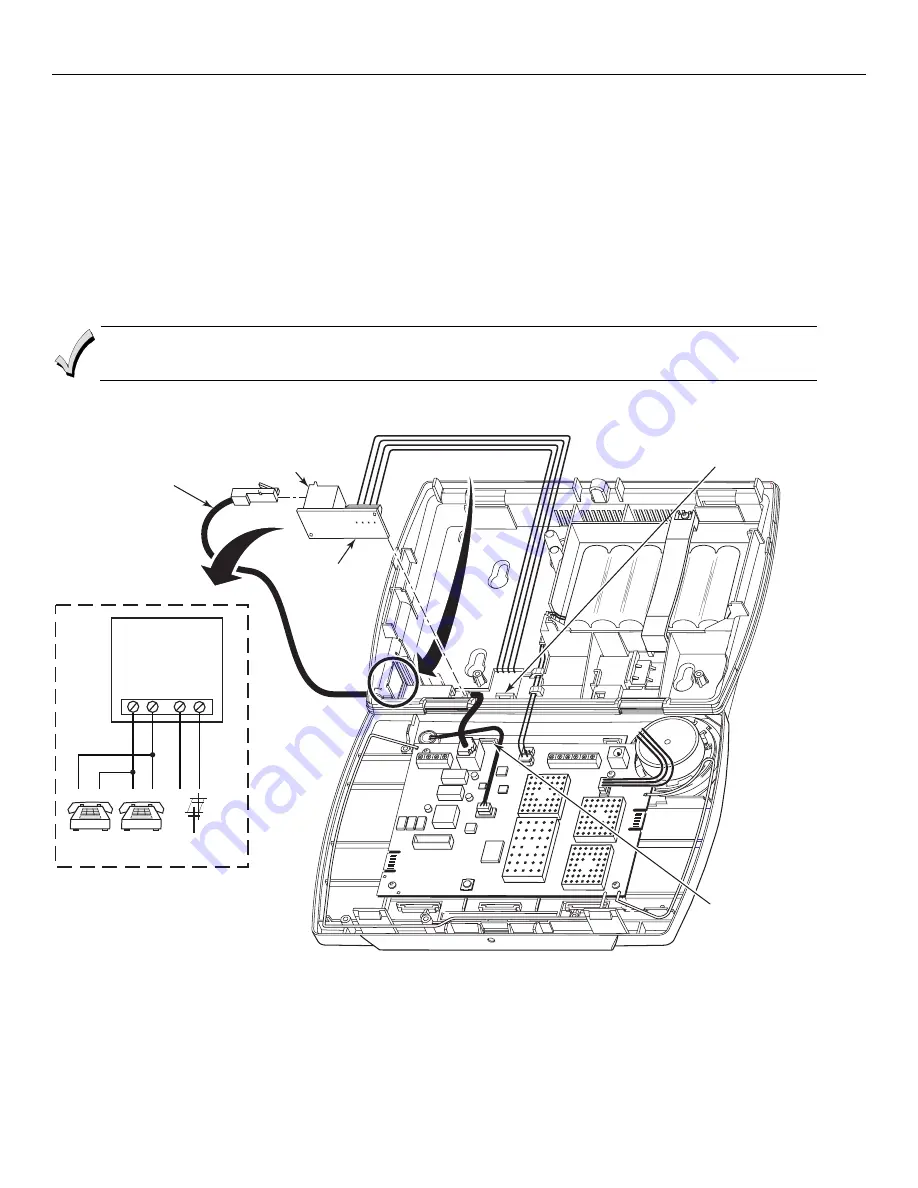
Installing the L5000-RJ31X in the LYNX Touch Control 

An auxiliary L5000-RJ31X receptacle can be installed in the LYNX Touch that will allow the telephone cable 
to be disconnected without requiring the unit to be opened up.  


1. 

Using a wire cutter or knife cut the plastic tabs that secure the receptacle knockout from the left side of the LYNX Touch back case. 

2. 

Connect four wires between the L5000-RJ31X receptacle terminal strip and the incoming phone line and the premises telephones 
as shown on the figure below.  

3. 

Install the L5000-RJ31X receptacle into the slot on the back case. 

4. 

Connect one end of the L5000-RJ31X cable to the 8-position jack on the LYNX Touch PC board. 

5. 

Route the cable through the opening in the back case and along the wire channel in the back case. 

6. 

Connect the other end of the cable to the L5000-RJ31X receptacle on the side of the back case as shown below.  

7. 

Secure the wires to the tie wrap points on LYNX Touch front and back case with the provided tie wraps. 


To allow flush wall or desk mounting of the control, ensure that L5000-RJ31X cable is routed through the 
channel in the case back. Ensure enough slack is left in the wires to allow the case to close without pinching
the wires.


5100-100-063-V0

INCOMING / PREMISES TELEPHONE WIRING

REMOVE

KNOCKOUT

TIE WRAP

POINT

TIE WRAP
POINT

L5000-RJ31X

CABLE

L5000-RJ31X

REFER TO

WIRING

SCHEMATIC

FOR

CONNECTIONS

L5000-RJ31X
TERMINAL STRIP

RING

TIP

HS TIP

HS RING

INCOMING
PHONE LINE

TO PREMISES

TELEPHONES

L5000-RJ31X WIRING


Summary of Contents for LYNX Touch Series

Page 1: ...LYNX Touch Series Security Systems Installation and Setup Guide 800 10614V1 12 12 Rev A ...

Page 2: ...d door Also an alarm in the hallway outside may not wake up the sleeper if the door is closed Install a smoke detector inside bedrooms where electrical appliances such as portable heaters air conditioners or humidifiers are used Install a smoke detector at both ends of a hallway if the hallway is more than 40 feet 12 meters long Install smoke detectors in any room where an alarm control is located...

Page 3: ... Battery Life 13 RF Sniffer Mode Test 14 Go No Go Test 14 5800 Series Transmitter Loop Numbers 15 Mechanics of Programming 16 Navigating Menus 16 Touch screen Display 16 Navigation Keys 16 Dashboard Screen 16 Security Screen Menus 17 Installer Tools Menu 17 User Tools Menu 17 General Programming Information 18 Programming 18 Enter Installer Programming Mode 18 Loading Factory Defaults 18 Select a ...

Page 4: ...52 Master Code 52 Enter Change the Master Code by Installer 52 Secondary User Codes 53 Reset Master User Code 53 Security Code Notes 53 Follow Me System Announcement Feature 54 Follow Me Reminder Feature 55 Remote Phone Control Feature 55 System Displays 56 Zone Status Displays 56 Audio Alarm Verification Two Way Voice Feature 57 Activation 57 Operator Commands 57 Event Log 58 Contact ID SIA Event...

Page 5: ...ire EOLR N C N O zone and up to 63 wireless zones 5800 Series transmitters 2 Resident Monitor Zone Types Supports wireless keypads Built in Case tamper Communication ADEMCO Contact ID SIA DC 03 Internet central station communication GSM cellular central station communication WiFi Central station communication Two way voice communication Supports AlarmNet remote services System Power Primary Power ...

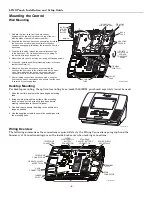
Page 6: ... back case Once attached the hooks will support the front case and allow you to make the wiring connections After all wiring connections have been made snap the front case and back case closed and ensure that the case is secured by the locking tabs 1 2 3 4 5 6 7 Desktop Mounting For desktop mounting the optional mounting base model L5000DM purchased separately must be used 5100 500 004 V0 Slide th...

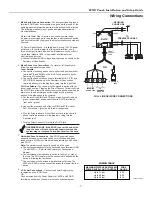
Page 7: ...t devices and has a response time of 350msec Maximum zone resistance 300 ohms plus EOLR Note The hardwire zone cannot be used as a fire zone HARDWIRED ZONE If the EOLR is not at the end of the loop the zone will not be properly supervised and the system may not respond to an open circuit on the zone Cut the incoming RING and TIP phone lines typically red and green respectively and connect them to ...

Page 8: ...1X cable to the 8 position jack on the LYNX Touch PC board 5 Route the cable through the opening in the back case and along the wire channel in the back case 6 Connect the other end of the cable to the L5000 RJ31X receptacle on the side of the back case as shown below 7 Secure the wires to the tie wrap points on LYNX Touch front and back case with the provided tie wraps To allow flush wall or desk...

Page 9: ...em Integrity When battery replacement is required unplug the transformer from the wall outlet and open the control panel cover Disconnect the battery pack connector from the receptacle on the PC Board Remove the screw that secures the battery retainer and remove the battery retainer Remove the battery pack from the back case Install a replacement battery pack P N 300 03864 1 LYNXRCHKIT SC or P N 3...

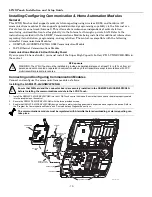
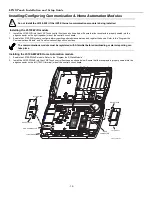
Page 10: ...must be installed to provide a separation distance of at least 7 8 in 20 cm from all persons and not co located or operated in conjunction with any other transmitter except in accordance with FCC multi transmitter product procedures Connecting and Configuring Communication Modules Connect and configure the communications module as follows Installing the GSMVLP5 4G GSMVLP5CN4G Ensure that SIM card ...

Page 11: ...alarm reporting and module supervision and register the device Refer to the Program the Communications Module and Communications Diagnostics sections Alternate Installation Refer to the Alternate Installation as shown on the figure below 1 Install the ILP5 into the LYNX Touch control front case Ensure that the connector board is properly seated into the receptacle on the control 2 Secure the ILP5 ...

Page 12: ...rting and module supervision and register the device Refer to the Program the Communications Module and Communications Diagnostics sections The communications module must be registered with AlarmNet before downloading or alarm reporting can take place Installing the L5100 ZWAVE Home Automation module 1 Enable the L5100 ZWAVE module Refer to the Program the Z Wave Module 2 Install the L5100 ZWAVE i...

Page 13: ...sed by a check in signal that is sent to the receiver at 70 90 minute intervals If at least one check in is not received from each supervised transmitter within a 12 hour period the missing transmitter zone number s and Supervision will be displayed The supervision for a particular transmitter in the system that may also be carried off the premises 5802 5802MN2 5802MN may be turned off by entering...

Page 14: ...ponse wireless keys which have two button panic pairs available e g 5804BDV on which only the two button panic pairs may be programmed for any 24 hour alarm response wireless keypads e g 5828 5828V keypads that have a two second delay on the special function keys or two button panic pairs built in keypad panic key Go No Go Test Mode Conducting this test with your hand wrapped around the transmitte...

Page 15: ...NSITIVITY LOOP 3 TEMP LOOP 4 TAMPER 5834 4 ENROLL AS BR 5894PI ENROLL AS RF 5802MN2 ENROLL AS UR OR RF LOOP 1 LOOP 1 LOOP 1 LOOP 1 5878 ENROLL AS BR 5870API ENROLL AS RF 5853 ENROLL AS RF AR ME D RE AD Y ME SSA GE MIC LOOP 1 LOW SENSITIVITY LOOP 2 HIGH SENSITIVITY 5898 ENROLL AS RF LOOP 4 LOOP 1 LOOP 2 LOOP 3 SERIAL 1 LOOP 3 SERIAL 1 LOOP 4 SERIAL 2 LOOP 3 SERIAL 1 LOOP 2 SERIAL 1 LOOP 1 SERIAL 2 ...

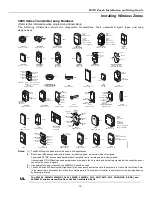
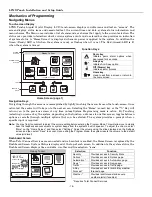
Page 16: ...een at any time unless System Programming mode is active By Touching selecting an icon or key the system depending on the function advances to another screen toggles between options or scrolls through multiple options that can be selected The system provides a prompt when a specific input is required Note You may find it convenient to adjust the volume setting before entering the Program Mode This...

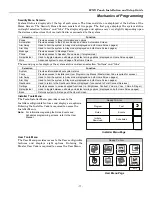
Page 17: ...ovides information about system status Tools Provides access to Installer and User Programming Menus Master User Code required for access Arm Away Used to Arm the system in Away mode displayed on both Home Screen pages Arm Stay Used to Arm the system in Stay mode displayed on both Home Screen pages Dashboard Used to return to the Dashboard Screen displayed if connected to Total Connect Services Se...

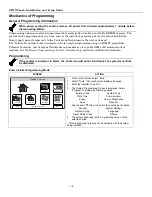
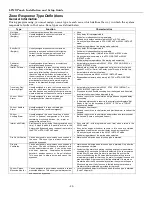
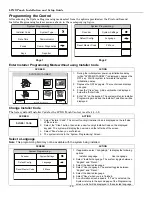
Page 18: ...ramming Control Downloading section for additional information Programming If the system is Armed or in Alarm the Tools icon will not be functional The system must first be disarmed Enter Installer Programming Mode SCREEN ACTION Ready To Arm 5000 100 006 V1 Arm Away Delay Phone More Automation Message Zones Arm Stay 72 10 18 AM June 8 2010 1 At the Home Screen select More 2 Select Tools The touchs...

Page 19: ...e Z Wave Default Config 1 Select Default Configuration to display the following options Default Config 1 Default Config 3 Default Downloader Default Config 2 Default Config 4 Note For a list of the pre programmed defaults refer to the Default Values section 2 Select the desired Default Configuration 3 A Confirmation screen is displayed 4 If Yes is selected the System beeps three times and returns ...

Page 20: ...y button silent emergency Sends a report to the central station but provides no keypad display or sounding In disarmed state sends a report to the central station displays Not Ready to Arm on the keypad and AWAY STAY and TOOLS buttons are disabled 24 hour Audible Alarm Usually assigned to a zone containing an Emergency button audible emergency Follows sounder timeout Sends a report to the central ...

Page 21: ...a unique chime sound and zone announcement when faulted Activity Zone No and Zone Descriptor displayed on LCD System re triggers audible sounding every ten seconds until acknowledged Off sequence or wireless key button Resident Monitor Used to monitor a resident in an area deemed to be dangerous by a caregiver No reports to the central station Monitors entry into a monitored area Activates a uniqu...

Page 22: ...u will be displayed Change Installer Code The factory default Installer Code for the LYNX Touch Control is set to 4 1 1 2 SCREEN ACTION 5000 100 129 V0 Installer Code 1 Select Installer Code The current four digit Installer Code is displayed on the left side of the screen 2 Select the Clear button then enter a new four digit Installer Code on the displayed keypad The system will display the new co...

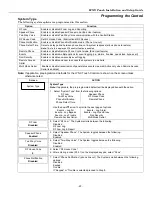
Page 23: ...ve only when Remote Access Serial is enabled Note If applicable preprogrammed defaults for the LYNX Touch Control are shown on the screen unless otherwise noted Screen ACTION 5000 100 130 V0 System Type System Type Note If applicable the pre programmed default will be displayed beneath the option 1 Select System Type from the following options RF Jam Speaker Phone Two Way Voice RF House Code Phone...

Page 24: ...bled Events Log Alarm Events Log Bypass Events Log Open Close Events Log Trouble Non Security OR Proceed to step 11 and select the options individually Events Log Alarm Enabled 11 Select Events Log Alarm The System toggles between Enabled and Disabled 12 Select Events Log Bypass The System toggles between Enabled and Disabled 13 Select Events Log Open Close The System toggles between Enabled and D...

Page 25: ...een or select Save to return to the System Programming Screen Time Zone Eastern EST 5 Select Time Zone The system scrolls between the following options Eastern EST Mountain MST Atlantic AST Central CST Pacific PST Newfoundland NT Hawaii HAST Alaska AKST Day Light Savings Time Yes 6 Select Day Light Savings Time The system toggles between Yes and No If Yes is selected the following options will bec...

Page 26: ...re the Communications Module notifies the control panel of a loss of contact with the network GSM Rollover Allows messages to be sent over GSM in the event that contact with the internet is lost Appears only if WiFi GSM is selected as the Communications Path GSM 24 Hour Test Enables daily test of GSM module operation Appears only if WiFi GSM is selected as the Communications Path Note If applicabl...

Page 27: ...to step 12 If GSM was selected in step 2 proceed to step 19 IP Fault Time min 00 12 Select IP Fault Time min Enter the time delay in minutes on the keypad Options 00 99 Use DHCP Yes 13 Select Use DHCP The system toggles between Yes and No If No is selected the system displays four additional options If Yes is selected skip to step 18 NIC IP Address 255 255 255 255 14 Select NIC IP Address Enter th...

Page 28: ...been defaulted or updated 1 Enter Program Mode and default the panel Refer to Loading Factory Defaults 2 Select Z Wave The System displays the following options Z Wave Temperature Display Z Wave Enabled Installed Telephone 3 Select Z Wave The system scrolls between the following options Enabled Installed Telephone Side Disabled Select Enabled Installed Telephone Side Temperature Display Fahrenheit...

Page 29: ...ription 2 Device Type Response Type Alarm Report Chime Supervision 4 Select an option to display the next programming field Serial Number Serial Number This field does not apply to Temperature Zones 80 85 When Serial Number has been selected Enter Serial Number or Activate is displayed The transmitter serial number and loop number can be enrolled via RF transmission OR manually Enroll via RF Learn...

Page 30: ...erification Day Night Garage Monitor 2 Select the desired Response Type and select Save The system will return to the Zone screen Note For threshold monitoring to be configurable on the LYNX Touch Z wave thermostat screen the respective zones will first need to be assigned with a response type in zone programming The recommended response type is Trouble Alarm Report Yes Alarm Report Note This fiel...

Page 31: ...f Users that have been programmed Master Babysitter Duress User 3 User 4 User 5 User 6 User 7 Use the down T arrow to scroll to the next page The system displays options for User 8 through 14 Note The Key must be associated with a specific User User Code in order for it to operate Refer to the LYNX Touch User Guide for additional Information regarding User Codes Serial Number 0 Serial Number When ...

Page 32: ...ton Key Zn Select the desired Button Key and enter a function for each button key The system displays the following options Disarm Arm Away Arm Stay No Response 24 Hour Silent 24 Hour Audible 24 Hour Auxiliary Silent Burglary Fire No Verification Options are the same for each Button Zone combination ...

Page 33: ...hone Type Enter Number for Follow Me Phone 1 or Phone 2 as applicable Phone Number Enter Primary and or Secondary telephone numbers for Follow Me Announcements and or Reminders Report All Enable All Reports to be sent to the Follow Me Phone 1 or Phone 2 as applicable Report Alarms Enable Alarm Reporting to the Follow Me Phone 1 or Phone 2 as applicable Report Troubles Enable Trouble Reporting to t...

Page 34: ...played keypad Up to 20 digits Account Number FFFF If any option other than None is selected in Phone Type The Account Number option will be displayed Select Account Number Enter the Primary Central Station Account Number on the displayed keypad Dynamic Priority Redundant Reports If any option other than None is selected in Communicator Type The Dynamic Priority option will be displayed Select Dyna...

Page 35: ...y option will be displayed Select Dynamic Delay The system scrolls between 15 Seconds 30 Seconds 60 Seconds and 90 Seconds Note If GSM is selected as the primary reporting channel Dynamic Delay should be set to minimum of 60 seconds Report All Press to Report All Select Report All The System toggles between Press to Report All and Report All Set If Report All is selected all reporting options will...

Page 36: ...stem toggles between Disabled and Enabled Report Tests Enabled Select Report Tests The System toggles between Disabled and Enabled Report Selection Select Report Selection The System displays the following options Arm Away Arm Stay Disarm Exit Error Recent Closing Event Log Full Trouble Trouble Restore Use the down T arrow to scroll to the next page of options Alarm Restore Alarm Cancel Test Test ...

Page 37: ... Enabled Bypass Restore Enabled Select Bypass Restore The System toggles between Disabled and Enabled AC Loss Enabled Select AC Loss The System toggles between Disabled and Enabled AC Loss Restore Enabled Select AC Loss Restore The System toggles between Disabled and Enabled Low Battery Enabled Select Low Battery The System toggles between Disabled and Enabled Low Battery Restore Enabled Select Lo...

Page 38: ...set 6 Hrs Select First Report Offset for the Test Report The System scrolls between the following options 6 Hrs 12 Hrs 18 Hrs 24 Hrs Report Frequency Never Select Report Frequency for the Test Report The System scrolls between the following options Never Every Day Every 7 Days Every 30 Days Downloader Select Downloader The System displays the following options Phone Answer Modem Speed Ans Machine ...

Page 39: ...n the screen unless otherwise noted SCREEN ACTION Sounder Select Sounder The System displays the following options Burglary Alarm Sound Burglary Bell Timeout Fire Bell Timeout Arm Confirm Alarm Options Burglary Alarm Sound Yes Select Burglary Alarm Sound The System toggles between Yes and No Burglary Bell Timeout 4 Minutes Select Burglary Bell Timeout The System scrolls between the following optio...

Page 40: ...s Force Bypass Mode All zones bypassed by this function will be displayed after the bypass is initiated The Fire and CO Zones are not bypassed in the LYNX Touch Exit Warning Enables or disables Exit Warning sound Audible Exit Warning sound consists of slow continuous beeps until last 10 seconds when it changes to fast beeps The warning sound will end at the termination of exit delay Note This fiel...

Page 41: ...delay must be set to a minimum of 30 seconds The sum of entry delay 1 and the burglary abort window should not exceed 1 minute None is only allowed for use in Commercial High Security applications Entry Delay 2 30 Seconds Select Entry Delay 2 The System scrolls between the following options LYNX Touch LYNX Touch L5100CN Canada None None 15 Seconds 15 Seconds 30 Seconds 30 Seconds 45 Seconds 45 Sec...

Page 42: ... If the previous state was Armed Away or Stay the system will not respond to sensor changes for 1 minute This allows time for sensors such as PIRs to stabilize UL installations must be Yes power up in previous state SIA The LYNX Touch default is Yes and is not selectable Display Alarm Cancel Yes Select Display Alarm Cancel The System toggles between Yes and No Display Exit Time Yes Select Display ...

Page 43: ...he IP address assigned to the DNS Domain Name System server Message Meaning Physical Link 10 Mbps or 100 Mbps Link speed of physical connection Bad No physical connection DHCP OK DHCP address resolved Bad DHCP address not resolved Off DHCP disabled GSM Information Displays GSM information if GSM communication path is enabled Status Message Meaning GSM Registered Cell Registration Home 2G Registere...

Page 44: ...on points or Redirectors were successful If an error occurred at any point the summary will display Failed next to the faulty Redirector Redirector 1 Service OK Redirector 2 Service OK Redirector 3 Service OK If no physical link is detected the test is aborted and one of the following is displayed No Physical Link No physical link is detected Link Not Ready There is a link but it is not ready addr...

Page 45: ...module by calling the AlarmNet Technical Assistance Center TAC at 1 800 222 6525 You will need the following information MAC number found on the label Subscriber information provided by the central station including a city code CSID and a subscriber ID When instructed to do so select Register Device in the LYNX Touch Diagnostics to complete the registration Register through LYNX Touch Diagnostics ...

Page 46: ...ice with PIN This procedure is used to replace one LYNX Touch module with another SCREEN ACTION Comm Diagnostics 1 Select Comm Diagnostics The System displays the following options depending upon the communication device that is installed Communication Status Ethernet Information GSM Information Communication ID Numbers Test Communication Setup Communication Setup Communication 2 Select Setup Comm...

Page 47: ...g No will cancel the operation Refer to the table below for applicable registration messages During the upload process the following messages may be displayed Message Meaning Updating Root File The root file is being uploaded Programming Done Indicates the root file has been successfully uploaded Updating Configuration Try Later Error message indicates the module is busy Cannot Upload Try Later Er...

Page 48: ...the Join button A confirmation screen will be displayed 3 Select OK then select Save to confirm the selection 4 Select the 2 button two times The Ethernet information will be displayed Signal strength will be indicated by a series of colored bars along with the RSSI level in dBM Bars Meaning RSSI range dBM 4 White No connection 255 used internally 1 Yellow 3 White Weak 81 or higher 2 Yellow 2 Whit...

Page 49: ...displays Device has been successfully added to the network Select OK 3 If the operation is unsuccessful the system displays Failed Operation Device not added to the network Select OK Factory Defaults This procedure resets the programming options to factory default values SCREEN ACTION Comm Diagnostics 1 Select Comm Diagnostics The System displays the following options depending upon the communicat...

Page 50: ...ws at revision level supporting LYNX Touch Flexible Callback If enabled in Installer Programming the download operator can temporarily change the last 1 2 or 3 digits depending on selection of the call back number This allows the control to call back a computer other than the one programmed which may be helpful at times of high computer traffic Remote Programming Information If using Remote Progra...

Page 51: ... may be printed using the IBM PC compatible computer s internal report generator when an optional printer is connected consult your PC manual for proper printer and connections The approximate time for program upload or download for a complete program is shown below Communication Method Approximate Time PSTN 380 secs GSM 75 secs IP or WiFi 30 secs ...

Page 52: ...ch can be individually programmed for 24 hour silent audible personal or fire emergency responses The panic function is activated when the respective keys is pressed The panic functions are identified by the system as follows Zone Function 95 Fire Emergency 96 Medical Emergency 99 Police Emergency Important For the silent panic functions to be of practical value the system must be connected to a c...

Page 53: ...age of the Installer Programming Tools menu OR If the reset failed the system will display Command Failed Unable to Reset Master Code Security Code Notes The Master and Secondary security codes permit access to the system for arming disarming etc The Installer Code can disarm the system only if it was used to arm it In addition the Installer Code cannot disarm the system if it was armed by pressin...

Page 54: ...The announcements will include End of Message at the end of the Follow Me announcements If a key is pressed again during playback or within 15 seconds following the end of the playback the control will repeat the sequence Otherwise the system will hang up successfully ending the System Follow Me session Because the key was pressed LYNX Touch will not redial the number again The next call will be t...

Page 55: ...other event requires the system to dial out however delivery of the local schedule reminder message will continue 3 If a Central Station report must be sent the Follow Me Reminder message will be suspended Once the PSTN line is available the session will be resumed and the control will again make up to 8 delivery attempts Remote Phone Control Feature The remote phone control feature which must be ...

Page 56: ... Active No WiFi source Armed Stay Fire OR Heat Sensor Battery Low Flood Check Zones Glass Break CO Alarm Medical Alarm Disarmed Not Ready to Arm Motion Disarmed Ready to Arm Temperature 90 RF Jam Cover Tamper 94 Phone Line Cut Reporter Failure 103 Comm Trouble 72 Automation Z Wave Node Failure Zone Status Displays The following icons will be displayed on the Zone Status screen along with specific ...

Page 57: ...Central Station operator begins the session which last 5 minutes by entering one of the valid AAV commands shown in the table below The session may be extended 5 minutes without changing the operating mode by pressing the 7 key on the touch tone phone Selecting another operating mode also resets the session an additional 5 minutes During the last minute of the 5 minute session the LYNX Touch gener...

Page 58: ...ouble System Reset FT FJ Fire Trouble Fire Trouble Restore 316 System Tamper LT LR Phone Line Trouble Phone Line Restoral 341 Trouble Case Tamper OA Automatic Opening 344 Trouble RF Receiver Jam Detect OC Cancel Report 351 Trouble Telco 1 Fault OP Opening Report 353 Trouble Long Range Radio Transmitter Fault OQ Remote Opening 373 Trouble Fire Trouble PA Panic Alarm 374 Trouble Exit Error Alarm RP ...

Page 59: ...ditions listed below Alarm Condition Alarm Code Restore Code Power On Reset E339 C0803 Primary Communication Path Supervision E350 C0951 R350 C0951 Secondary Communication Path Supervision E350 C0952 R350 C0952 Test 5555 5555 9 The control panel sends its own general code E353 for a trouble condition The Control panel sends tamper trouble E341 tamper alarm E145 power loss E301 and low battery E302...

Page 60: ...to assure that it is being monitored by the system Armed System Test Alarm messages will be sent to the central station during the following tests 1 and 2 Notify the Central Station in advance that tests will be in progress 1 Arm the system and fault one or more zones After 15 seconds if optional dialer delay is selected silence alarm sounder s by pressing OFF and entering the security code Check ...

Page 61: ...rammed except for duress will be displayed Enter Zone Discovery 1 With the System in the Installer Programming mode select the Test button and then select the Zone Discovery button The Zone Discovery button will be highlighted indicating that the mode is active Exit Zone Discovery 1 Enter an Off sequence If you do not exit zone discovery mode manually the system will automatically exit zone discov...

Page 62: ...nth November November November November End Week First First First First Communicator Communications Path None None None None APL Disabled Disabled Disabled Disabled City ID None None None None CS ID None None None None Sub ID None None None None Supervision 24 Hours 24 Hours 24 Hours 24 Hours Old Alarm Time 10 Minutes 10 Minutes 10 Minutes 10 Minutes Remote Acc Comm Disabled Disabled Disabled Dis...

Page 63: ...ess To Report All Report Alarms Disabled Disabled Disabled Disabled Report Troubles Disabled Disabled Disabled Disabled Report Open Close Disabled Disabled Disabled Disabled Report Tests Disabled Disabled Disabled Disabled Report Selection Arm Away Enabled Enabled Enabled Enabled Arm Stay Enabled Enabled Enabled Enabled Disarm Enabled Enabled Enabled Enabled Exit Error Enabled Enabled Enabled Enab...

Page 64: ...lay 1 30 Seconds 30 Seconds 30 Seconds 30 Seconds Entry Delay 2 30 Seconds 30 Seconds 30 Seconds 30 Seconds Exit Delay 60 Seconds 60 Seconds 60 Seconds 60 Seconds Backlight Timeout No No No No Quick Arm Yes Yes Yes Yes Quick Exit Yes Yes Yes Yes Restart Exit Time Yes Yes Yes Yes Force Bypass No No No No Exit Warning Yes Yes Yes Yes Auto Stay Arming Yes Yes Yes Yes Lack Of Usage Notify Disabled Dis...

Page 65: ... End Month November November November November End Week First First First First Communicator Communications Path None None None None APL Disabled Disabled Disabled Disabled City ID None None None None CS ID None None None None Sub ID None None None None Supervision 24 Hours 24 Hours 24 Hours 24 Hours Old Alarm Time 10 Minutes 10 Minutes 10 Minutes 10 Minutes Remote Acc Comm Disabled Disabled Disab...

Page 66: ...ort All Press To Report All Report Alarms Disabled Disabled Disabled Disabled Report Troubles Disabled Disabled Disabled Disabled Report Open Close Disabled Disabled Disabled Disabled Report Tests Disabled Disabled Disabled Disabled Report Selection Arm Away Enabled Enabled Enabled Enabled Arm Stay Enabled Enabled Enabled Enabled Disarm Enabled Enabled Enabled Enabled Exit Error Enabled Disabled E...

Page 67: ...stem Settings Entry Delay 1 30 Seconds 45 Seconds 30 Seconds 30 Seconds Entry Delay 2 60 Seconds 60 Seconds 60 Seconds 60 Seconds Exit Delay 60 Seconds 60 Seconds 60 Seconds 60 Seconds Backlight Timeout No No No No Quick Arm Yes Yes Yes Yes Quick Exit Yes Yes Yes Yes Restart Exit Time No Yes Yes Yes Force Bypass No No No No Exit Warning No Yes Yes Yes Auto Stay Arming No Yes Yes Yes Lack Of Usage ...

Page 68: ...zones Zones 46 to 48 are reserved for Garage Door Zones Zone 92 is Duress Zone 99 is keypad panic Zone Assignment Alarm Response Types for Configuration 2 Zone Number Loop Number Device Type Response Type Report Chime Supervision Input Type Zone Descriptor 1 New n a Yes No EOLR n a 2 2 Door Entry Exit 1 Yes Yes Supervised Front 3 2 Door Entry Exit 1 Yes Yes Supervised Back 4 2 Door Entry Exit 1 Ye...

Page 69: ...Temperature Not Used Yes No High Temp n a 81 n a Temperature Not Used Yes No Low Temp n a 82 n a Temperature Not Used Yes No High Temp n a 83 n a Temperature Not Used Yes No Low Temp n a 84 n a Temperature Not Used Yes No High Temp n a 85 n a Temperature Not Used Yes No Low Temp n a 95 Fire Fire No Verification Yes No Panic Trigger n a 96 Medical n a Yes No Panic Trigger n a 97 Yes No Cover Tamper...

Page 70: ...g an acceptable method of connection The customer should be aware that compliance with the above conditions may not prevent degradation of service in some situations Repairs to certified equipment should be coordinated by a representative designated by the supplier Any repairs or alterations made by the user to this equipment or equipment malfunctions may give the telecommunications company to req...

Page 71: ...d by those beams They cannot detect motion or intrusion that takes place behind walls ceilings floors closed doors glass partitions glass doors or windows Mechanical tampering masking painting or spraying of any material on the mirrors windows or any part of the optical system can reduce their detection ability Passive Infrared Detectors sense changes in temperature however as the ambient temperat...

Page 72: ...r delay of alarm reporting and sounding can exceed UL limits for commercial and residential applications the following UL requirements per UL681 are provided The maximum time that a control unit shall be programmed to delay the transmission of a signal to a remote monitoring location or to delay the energizing of a local alarm sounding device to permit the alarm system user to enter and disarm the...

Page 73: ...and 2 minutes 60 Seconds 45 seconds minimum Restart Exit Time Enabled or Disabled Yes Enabled Enabled Exit Warning Not selectable Always enabled Enabled Auto Stay Arming Enabled or Disabled Yes Enabled Enabled Cross Zone Delay 30 seconds and 2 minutes in 30 second increments 3 minutes and 4 minutes None Disabled Enabled and two zones programmed Zones Fire Alarms Zone Type Fire with Verification mu...

Page 74: ...k rated at 7 2 Vdc Communication Formats Supported ADEMCO Contact ID Reporting 10 characters sec DTMF TouchTone Data Tones 1400 2300Hz Handshake 1400Hz Kissoff SIA DCS Format 2225Hz Handshake Data Tones 2025 2235Hz baud Line Seize Double Pole Ringer Equivalence 0 5B ACTA Registration No US AC3AL05BL5000 Hardwire Zone 2K ohms End of Line Resistor EOLR 200 ohms max wire resistance dry contacts only ...

Page 75: ...ages Verify your programming information where applicable Note the proper model number of this product and the version level if known along with any documentation that came with the product Note your Honeywell customer number and or company name Having this information handy will make it easier for us to serve you quickly and effectively Technical Support 1 800 645 7492 8 a m 10 p m E S T MyWebTec...

Page 76: ...communications which is an international standard for digital mobile phone systems used for cellular communication IMEI International Mobile Equipment Identity number IP Internet Protocol IP Address A unique number consisting of four parts separated by periods sometimes called a dotted quad for example 204 17 29 11 assigned to every computer workstation connected to the Internet IP numbers can be ...

Page 77: ...arm 16 Display Alarm Cancel 40 Display Exit Time 40 Duress Code 53 E Enroll The WiFi Module 47 Enter Installer Programming Mode 18 Enter Change The Master Code 52 Entry Delay1 Entry Delay 2 40 Entry Exit Burglary 20 Ethernet Information 43 Exit Delay 5 17 20 40 59 70 Exit Door 40 Exit Warning 40 Exiting Program Mode 19 F Factory Defaults 49 Features 5 Flexible Callback 50 Follow Me Reminder Featur...

Page 78: ...r Code 53 Resident Monitor Zone Types 5 RF Sniffer Test Mode 14 S Secondary User Codes 53 Security Code 40 Security Code Handshake 50 Security Codes 52 Setup Communication 44 SIA DC 03 5 SIA Event Log Codes 58 Silent Burglary 21 Site Initiated Remote Programming 50 Sniffer Mode 59 Sounder 39 Specifications 72 Station Initiated Remote Programming 50 Super High Capacity Battery 10 Supervised RF 13 S...

Page 79: ...T 68 FCC REGISTRATION No AC3AL05BL5000 RINGER EQUIVALENCE 0 5B RING TIP RING TIP TAMPER SWITCH TELCO JACK EDGE CONNECTOR L5100 WiFi EDGE CONNECTOR L5100 ZWAVE GSMVLP5 4G GSMVLP5CN4G ILP5 RECEPTACLE NOTE THE HARDWIRE ZONE CANNOT BEUSED AS A FIRE ZONE UL INSTALLATIONS THE MINIMUM WIRE SIZE USED FOR TELEPHONE INSTALLATIONS MUST BE 26 GAGE WARNING TO PREVENT RISK OF SHOCK DISCONNECT TELEPHONE LINE AT ...

Page 80: ...y information please visit www honeywell com security hsc resources wa 2 Corporate Center Drive Suite 100 P O Box 9040 Melville NY 11747 Copyright 2012 Honeywell International Inc www honeywell com security Ê800 10614V1 Š 800 10614V1 12 12 Rev A ...

Reviews: