background image

|

14

3 Installation

3.1 Unpacking

After you receive the MIWI350 package:

1. Remove the contents from the box and the mounting kit bag.

2. Check the shipment against the order to ensure that the components ordered are installed in

MIWI350.

3. Report any shortage or shipping damages to your Honeywell Account Manager immediately.

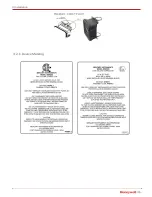
3.2 Mounting Options

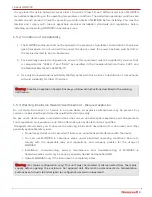
The MIWI350 device can be installed in the field using the following mounting options:

Meter or UMB Mount

Wall Mount

Note:

Recommended Brick Wall Fasteners - Stainless Steel Thread Forming ¼" dia-2.0" length, Screw

size 0.25" Min Torque 56 lb-in.

3 Installation

Summary of Contents for MIWI350

Page 1: ...610 Version 4 0 May 2022 Honeywell Process Solutions Mercury Instruments 2101 Citywest Boulevard Houston Tx 77042 USA 855 251 7065 United States Canada 302 669 4253 Outside the United States MI TAC Support Honeywell com https process honeywell com ...

Page 2: ...nt or non disclosure agreement The software may be used or copied only in accordance with the terms of those agreements No part of this publication may be reproduced stored in a retrieval system or transmitted in any form or any means electronic or mechanical including photocopying and recording for any purpose other than the purchaser s personal use without the written permission of Honeywell Pro...

Page 3: ... 600 Initial Draft 1 00 Feb 2018 MIWI350 Operating and Installation Guide FD 610 R100 release 2 00 Mar 2019 MIWI350 Operating and Installation Guide FD 610 R110 1 release 2 50 Sep 2020 MIWI350 Operating and Installation Guide FD 610 R110 release 3 00 Nov 2020 MIWI350 Operating and Installation Guide FD 610 R120 0 release 4 00 Jan 2022 ...

Page 4: ...oting 9 2 Security Control Measures 11 3 Installation 14 3 1 Unpacking 14 3 2 Mounting Options 14 3 2 1 Device Marking 15 3 3 Zone2 installation 16 4 Mechanical Assembly and User Interface 18 4 1 Device Dimensions Weights 19 4 2 Display Options 21 4 2 1 HMI User Interface 22 4 3 Gland Entries 25 4 3 1 Power Input 25 4 3 2 Temperature Input 26 5 Electrical Assembly 28 5 1 Input or output board 28 5...
Page 5: ...ry for MIWIPCB 56 10 2 2 Wiring Solar or External DC 13 5 to 15V DC Power for MIWIPCB 58 10 2 3 Wiring AC DC Power for MIWIPCB 59 10 2 4 Wiring External DC Power for MIWIPCB 60 10 3 MIWI350 as Power or Communication Box 61 10 3 1 Barrier Connections 61 10 3 1 1 With CloudLink MODEM 61 10 3 1 2 With CloudLink 4G M1 MODEM 62 10 3 1 3 With RV50 RV50X RV55 MODEM 64 10 3 2 Terminal Block Connections 67...

Page 6: ...ision 2 Group C D certification Compatible with MasterLink and PowerSpring software Available in UMB Universal Mounting Bracket Wall Pipe and Portable mounting options Internal or External Mounted Display MODEM Power Control through Power Distribution Board Optional Backup Battery for Uninterrupted EVC Functionality Pressure Expansion PE Board for Third Pressure P3 1 2 Power Supply Options AC DC o...

Page 7: ...l MSG Model Selection Guide PD Board Power Distribution Board RF Radio Frequency SLA Sealed Lead Acid UMB Universal Mounting Bracket PE Pressure Expansion PWA Printed Wiring assembly SELV Safety Extra Low Voltage TAC Tower Area Code TCP Transmission Control Protocol UDP User Datagram Protocol UL Underwriters Laboratories VPN Virtual Private Network 1 4 Specifications 1 4 1 Power Input Sources and ...

Page 8: ... pack with Supercap power source is not supported for MIWI350 Zone 2 variant Warning Ensure that Alkaline battery type is selected while configuring SLA External Supply input through MasterLink software 1 4 2 Audit Trail 2MB memory is reserved for AT logs The device supports five AT logs A maximum of 20 items can be configured in one AT log 1 4 3 Certifications Metrology Measurement Canada approva...

Page 9: ...of the FCC Rules These limits are designed to provide reasonable protection against harmful interference in a residential installation This device generates uses and radiates radio frequency energy If this device is not installed and used in accordance with the instructions it can cause harmful interference to radio communications However there is no guarantee that interference will not occur in i...

Page 10: ...escription indicates the max configuration supported for each assembly code 3 Indicates the part which constraints the temperature range for each code Humidity 0 95 Non Condensing Type of Installation Out Door Unit Altitude Less than 2000m Zone 2 Ambient Temperature vs Assembly Code Table Assembly code ExACXX 1 Ambient Temperature Range F Ambient Temperature Range C Assembly Description2 ExAC01 4 ...

Page 11: ...ding linearity repeatability and hysteresis Pressure 0 1 of full scale Maximum error at reference conditions Pressure 0 04 of full scale Long term drift Pressure 0 4 of full scale over 10 years Maximum pressures per pressure transducer type and range 6 to 1500psig 30 1500psia Note For more specification details please refer EC350 Datasheet Type Pmax Units Gauge 6 psig Gauge 30 psig Gauge 60 psig G...

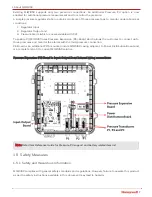
Page 12: ...onnect up to three pressures and monitor the alarms with the third pressure connection PE Board is an additional PWA mounted inside MIWI350 casing adjacent to Power Distribution Board and is a complete retro fit to current MIWI350 solution Pressure Expansion PE Board to Input Output Board internal wiring connections Note Refer Item Reference Guide for Pressure P3 support and battery related item l...

Page 13: ...ructions described in the warning notification 1 5 3 Warning Explosion Hazard Avertissement Risque d explosion Do not Open Disconnect or Service in an area where an explosive atmosphere may be present Any service or repair shall be performed by qualified technicians only Ne pas ouvrir déconnecter ou entretenir dans une zone où une atmosphère explosive peut être présente Toute réparation ou réparat...

Page 14: ... sure to perform the below steps 1 Ensure the equipment shall install as per IEC 60079 14 standard 2 At the equipment s supply terminals transient protection shall be provided at a level not exceeding 140 of the peak rated voltage value 1 5 4 4 Service Maintenance and Troubleshooting The service maintenance and troubleshooting of MIWI350 device operating in hazardous areas must be performed only b...

Page 15: ... 10 Caution Alkaline dual and quad packs are not approved for zone 2 installations DO NOT USE THIS ALKALINE KITS FOR ZONE 2 LOCATIONS 1 About MIWI350 ...

Page 16: ...a Secure the communication through private VPN IPsec tunnel from the device cellular network to the remote MDM host Use physical security for process control network systems Take steps to implement and enforce physical security of devices in network Do not allow the use of unauthorized removable media near to the device installation Use strong passwords on network equipment Prevent the use of unau...

Page 17: ... CloudLink R100 R110 The user is recommended to deploy the device and Remote MDM server application under secured VPN network Restrict physical access to the device and other network devices in the network Secure the connection between the Cellular carrier network and end gateway by VPN tunnel Secure the LAN connecting Customer User VPN gateway and the MDM server running the MDM application Use a ...

Page 18: ...mote hosts that will be allowed to communicate with the device in case of call outs from remote host to the device The user is advised to use passkey entry mechanism for BLE communication Ensure that your virus protection and Microsoft security hot fixes are up to date on all systems 2 Security Control Measures ...

Page 19: ...ents ordered are installed in MIWI350 3 Report any shortage or shipping damages to your Honeywell Account Manager immediately 3 2 Mounting Options The MIWI350 device can be installed in the field using the following mounting options Meter or UMB Mount Wall Mount Note Recommended Brick Wall Fasteners Stainless Steel Thread Forming dia 2 0 length Screw size 0 25 Min Torque 56 lb in 3 Installation ...
Page 20: ... 15 3 2 1 Device Marking 3 Installation ...
Page 21: ...ng the following steps Step 1 Engage the door latches of the device one at a time and then close the device door Step 2 Install EX Protection top 22 3188 EX Protection bottom 22 3189 brackets on MIWI350 device with two M4 screws 60 5074 for each bracket 3 Installation ...

Page 22: ...rque to M4 screw 60 5074 Step 4 Make sure that door is compressed properly with the gasket across the borderline by checking the Case Door mating surfaces Warning Ensure to install in a Non Hazardous environment only 3 Installation ...

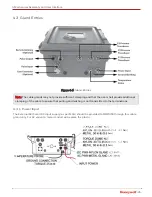
Page 23: ...PCB Case that holds Batteries Power Supply Antenna Power Distribution Board Pressure Transducers Solar Charge Controller Temperature Probe Assembly Barriers Terminal Blocks Cable glands super capacitor and a MODEM Figure 4 1 MIWI350 Mechanical Assembly Note Based on MSG configuration these sub assemblies may vary 4 Mechanical Assembly and User Interface ...

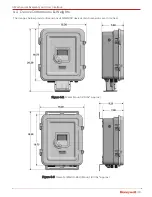
Page 24: ...ons Weights The images below provide dimensions of MIWI350 devices all dimensions are in inches Figure 4 2 Meter Mount 20 lbs approx Figure 4 3 Remote Wall U Bolt Mount 23 lbs approx 4 Mechanical Assembly and User Interface ...

Page 25: ... 20 Figure 4 4 Remote Portable Mount 25 lbs approx Note Device weights may vary depending on the configuration selected 4 Mechanical Assembly and User Interface ...

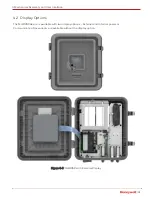
Page 26: ...WI350 device is available with two display options External and Internal power or Communication Box variants are available without the display option Figure 4 5 MIWI350 with External Display 4 Mechanical Assembly and User Interface ...

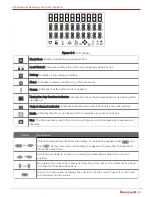
Page 27: ...IWI350 device includes 3 rows of ten characters configurable alphanumeric LCD display with a row of icons to display system and alarm status The LCD display can be configured to ON or OFF at different times of day Following is an LCD display illustration showing all segments ON 4 Mechanical Assembly and User Interface ...

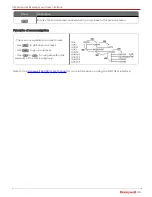
Page 28: ...I is unlocked and the navigation keys are functional Star The Star indicates real time occurrence of pressure and temperature measurement samples Option Description and Unlock the keypad and activate the display To unlock the keypad press and hold at the same time until display test appears Display Test all segments ON at the same time or Scroll up and down in a menu or increase and decrease a val...

Page 29: ... of menu navigation The menu is organized in a tree format Use to drill down one level Use to go up one level Use or to navigate within the elements of the same subgroup Refer to the Honeywell EC350 User s Manual for more information on using the HMI User Interface 4 Mechanical Assembly and User Interface ...

Page 30: ...ide additional clamping of the cable to ensure that pulling and twisting is not transmitted to the terminations 4 3 1 Power Input The External AC Solar DC input supply as per MSG should be provided to MIWI350 through this cable gland only For AC variant a metal conduit will replace the plastic 4 Mechanical Assembly and User Interface ...

Page 31: ...6 Figure 4 10 Power Input 4 3 2 Temperature Input The Honeywell approved Temperature probes as per MSG should be provided to MIWI350 through this cable gland only 4 Mechanical Assembly and User Interface ...

Page 32: ...onal The MIWI350 Power communication variants has support for case connector to provide the modem serial communication interface MIWI350 will come with case connector when this option is selected in MSG Instruction for Grounding The ground terminal shall be connected to an earth ground using 12AWG or higher wire gauge and the insulation shall have flammability rating of UL94 V 2 or better The colo...

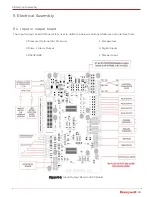
Page 33: ...put board IO board lets user to utilize the below mentioned features and interface them 2 Pressure Optional 3rd Pressure 1 Temperature 3 Pulse 1 Alarm Output 4 Digital Inputs 1 RS232 485 1 Tamper Input Figure 5 1 Input Output Board or EVC Board 5 Electrical Assembly ...

Page 34: ...CloudLink RV50 or RV50X or RV55 cellular MODEM The gas measurement products will be the 350 series products configured as either EC350 electronic volume corrector or ER350 pressure recorder or legacy products such as Mini Max Mini AT ERX etc The secondary purpose of the PD board is to switch MODEM power On or Off based on a time schedule or on demard call in activity Refer Figure 5 2 for more info...

Page 35: ... on each push button switch S3 An LED located to the right of connector P6 glows bright Red when the Power Distribution board is providing MODEM power but only when the S3 momentary push button is held closed S4 An LED located to the left of connector P1 glows bright Green when input power to the Power Distribution board is present but only when the S4 momentary push button is held closed 5 Electr...

Page 36: ... 31 5 2 1 Power Distribution Board connections for Solar Input AC DC input with lead acid battery back up Figure 5 3 Power Distribution Board 5 Electrical Assembly ...

Page 37: ...stribution Board jumper settings for Alkaline Battery or DC input Figure 5 4 Power Distribution Board Caution Never exceed 9V for Alkaline battery input The supercap connected cannot work beyond 9V 5 Electrical Assembly ...

Page 38: ...1 2 PULSE ALKALINE 18V Mini Max 6 5V AS PER MSG 2 3 2 3 PULSE AC DC 15V Mini Max 6 5V AS PER MSG 1 2 1 2 PULSE DC 12V Mini Max 6 5V AS PER MSG 2 3 2 3 PULSE SOLAR 15V Mini AT 9V AS PER MSG 1 2 1 2 PULSE ALKALINE 18V Mini AT 9V AS PER MSG 2 3 2 3 PULSE AC DC 15V Mini AT 9V AS PER MSG 1 2 1 2 PULSE DC 12V Mini AT 9V AS PER MSG 2 3 2 3 PULSE 5 3 MODEM The currently supported modems which can be used ...

Page 39: ... Instruments is an adaptable solution for transmitting uncorrected volume pulses to a remote EVC Refer the below pulse input wiring for the interface drawing connections from 206 Pulsar to MIWI350 Figure 6 1 Electrical Wiring Remote Pulsar to MIWI350 6 Remote Pulser ...

Page 40: ...o interface the Pulsar and MIWI350 Step 1 Insert the interfacing cable 40 6189 from the Pulsar through the Pulse Input Gland on MIWI350 device Step 2 Plug the interfacing cable 40 6189 to the 4 pin connector of the IO Board TB2 Refer Detail L in the Figure here 6 Remote Pulser ...

Page 41: ... 36 Step 3 The other end of the interfacing cable 40 6189 runs to the Pulsar Output gland 6 Remote Pulser ...

Page 42: ...trical Wiring diagram Refer Detail H shown here Step 5 The final wiring arrangement will be as below Cross check each connection with the Remote Pulsar Electrical wiring explained in detail here Figure 6 2 Cable wiring connections from Remote Pulsar 206 to MIWI350 6 Remote Pulser ...

Page 43: ... 38 7 Internal Wiring 7 1 Power Distribution Board and IO Board Figure 7 1 Electrical Wiring between Power Distribution Board and IO Board 7 2 Power Distribution Board and Modem 7 Internal Wiring ...

Page 44: ...n Power Distribution Board and CloudLink 4G MODEM Figure 7 3 Electrical Wiring between Power Distribution Board and CloudLink 4G MODEM Figure 7 4 Electrical Wiring between Power Distribution Board and RV50 RV50X RV55 Modem 7 Internal Wiring ...

Page 45: ... 40 7 3 IO Board and MODEM Figure 7 5 Electrical Wiring between IO Board and CloudLink 4G MODEM Figure 7 6 Electrical Wiring between IO Board and CloudLink 4G M1 Modem 7 Internal Wiring ...

Page 46: ... 41 Figure 7 7 Electrical Wiring between IO Board and RV50 RV50X RV55 Modem 7 Internal Wiring ...

Page 47: ...ry cable to battery charge controller cable 4 Close the battery mount bracket flip cover by quarter turning the screw 40 6169 2 If you are connecting a 12V 21Ah lead acid battery for divison 2 40 6169 3 If you are connecting a 12V 7Ah lead acid battery for divison 2 40 6169 5 If you are connecting a 12V 21Ah lead acid battery for zone 2 40 6169 6 If you are connecting a 12V 7Ah lead acid battery f...

Page 48: ...l Quad Alkaline Battery To install a Dual Quad alkaline battery pack 1 Quarter turn the screw 2 Carefully insert the battery packs into the mount bracket Dual battery pack Quad Battery pack 8 Battery Installation ...
Page 49: ... 6 0 7 3 Dual Alkaline Battery pack 12Ah derated 6 9 8 3 Quad Alkaline Battery Pack 24Ah derated 13 7 16 6 MIWI350 with Sierra RV50 RV50X RV55 1 call day Battery Type Months RV50 RV50X RV55 7Ah 12V DC SLA 2 0 21Ah 12V DC SLA 6 0 Dual Alkaline Battery pack 12Ah derated 6 8 Quad Alkaline Battery Pack 24Ah derated 13 7 RV50 RV50X RV55 MODEM power controlled Note Please note that the Battery life valu...

Page 50: ...m T2 user has to reset the alarm i1608 so as to restart the battery monitoring from T3 Then the device auto resets the alarm counter i1614 value 0 At T4 alarm raises if SLA battery is not charging after 10 days i1607 configured value Scenario 2 REGULAR MAINTENANCE OR WHEN SOLAR PANEL LOST STOLEN Example At T1 i1607 is configured as 10 days Within 10 days at T2 if the solar panel is replaced then t...

Page 51: ...nd i1607 is changed to 4 days then no alarm will be generated b Alarm is Active At T1 i1607 is configured as 10 days and i1614 as 15 days After 10 days an alarm will be generated at T2 As the alarm is active and changing i1607 or the actual counter value i1614 will not have an impact on the alarm status User should clear the alarm once it is raises so as to allow the battery voltage monitoring fro...

Page 52: ... 47 10 Reference Drawings 10 1 MIWI350 with EC350 or ERX350 10 1 1 Wiring Dual or Quad Battery Figure 10 1 Electrical Wiring DUAL QUAD 18VDC ALKALINE RECEPTACLE PACK 10 Reference Drawings ...

Page 53: ...le Part Connects To 40 6045 Optional External DC Power Source Super Capacitor IO Board TB1 1 TB1 3 22 2770 3 Connector from Dual Alkaline Receptacle pack 1 2 Power Distribution Board P2 BAT1 Connector from Dual Alkaline Receptacle pack 3 4 Power Distribution Board P2 BAT2 10 Reference Drawings ...

Page 54: ...ernal power input terminal block Connector from Solar Charge controller Power Distribution Board P1 DC IN 40 6169 2 Connector from Solar Charge controller 12V 21Ah lead acid battery 40 6169 3 Connector from Solar Charge controller 12V 7Ah lead acid battery Caution For Zone2 installations While using Ready for Solar variants The customer needs to use an IECEx Zone2 certified solar Panels only 10 Re...

Page 55: ...roller 12V 7Ah lead acid battery 40 6169 2 Connector from Solar Charge controller 12V 21Ah lead acid battery 40 6169 1 Connector from Solar Charge controller Power Supply source 120VAC 12 15VDC Din Rail Mount Connector from Solar Charge controller Power Distribution Board P1 DC IN 40 6186 External power input junction box Power Supply source 120VAC 12 15VDC Din Rail Mount 40 2342 1 Device Ground E...

Page 56: ... 51 10 1 4 Wiring AC DC Power for DIV2 120VAC 12 15V ADJ POWER SUPPLY WITH 7Ah BATTERY Figure 10 5 Electrical Wiring 120V AC TO 12 15V DC ADJUSTABLE POWER SUPPLY WITH 7Ah BATTERY 10 Reference Drawings ...

Page 57: ...pply source 120VAC 15V DC Din Rail Mount 40 6186 External power input terminal block Power Supply source 120VAC 15V DC Din Rail Mount 40 6169 2 Connector from Solar Charge controller 12V 21Ah lead acid battery 40 6169 3 Connector from Solar Charge controller 12V 7Ah lead acid battery 40 2342 1 Device Ground Earthing External Power Input Terminal Block Note Refer Section 4 3 1 for Power input cable...

Page 58: ... 53 10 1 5 Wiring AC DC Power for Zone2 230V AC 12 15V ADJ POWER SUPPLY WITH 7Ah BATTERY Figure 10 7 Electrical Wiring 230V AC TO 12 15V DC ADJUSTABLE POWER SUPPLY WITH 7Ah BATTERY 10 Reference Drawings ...

Page 59: ...tribution Board P1 DC IN Power Supply source 120VAC 15V DC Din Rail Mount 40 6186 External power input terminal block Power Supply source 120VAC 15V DC Din Rail Mount 40 6169 5 Connector from Solar Charge controller 12V 21Ah lead acid battery Zone 2 40 6169 6 Connector from Solar Charge controller 12V 7Ah lead acid battery Zone 2 40 2342 1 Device Ground Earthing External Power Input Terminal Block...

Page 60: ...e 10 9 Electrical Wiring External 12V DC Cable Part Connects To 40 6045 External Optional alkaline back up battery pack IO Board TB1 1 TB1 3 40 6163 2 External power input terminal block Power Distribution Board P1 DC IN 10 Reference Drawings ...

Page 61: ... 56 10 2 MIWI350 as Power Box 10 2 1 Wiring Dual or Quad Battery for MIWIPCB Figure 10 10 Electrical Wiring DUAL QUAD 18VDC ALKALINE RECEPTACLE PACK 10 Reference Drawings ...

Page 62: ...E RECEPTACLE PACK WITH SUPERCAP Cable Part Connects To 22 2770 3 Connector from Dual Alkaline Receptacle pack 1 2 Power Distribution Board P2 BAT1 22 2770 3 Connector from Dual Alkaline Receptacle pack 3 4 Power Distribution Board P2 BAT2 10 Reference Drawings ...

Page 63: ... Part Connects To 40 6169 1 Connector from Solar Charge controller External power input terminal block Connector from Solar Charge controller Power Distribution Board P1 DC IN 40 6169 2 Connector from Solar Charge controller 12V 21Ah lead acid battery 40 6169 3 Connector from Solar Charge controller 12V 7Ah lead acid battery 10 Reference Drawings ...

Page 64: ...source 120VAC 15V DC Din Rail Mount 40 6186 External power input terminal block Power Supply source 120VAC 15V DC Din Rail Mount 40 6169 2 Connector from Solar Charge controller 12V 21Ah lead acid battery 40 6169 3 Connector from Solar Charge controller 12V 7Ah lead acid battery 40 2342 1 Device Ground Earthing External Power Input Terminal Block Note Refer Section 4 3 1 for Power input cable glan...

Page 65: ...4 Wiring External DC Power for MIWIPCB Figure 10 14 Electrical Wiring External 12V DC Cable Part Connects To 40 6163 2 External power input terminal block Power Distribution Board P1 DC IN 10 Reference Drawings ...

Page 66: ... 61 10 3 MIWI350 as Power or Communication Box 10 3 1 Barrier Connections 10 3 1 1 With CloudLink MODEM Figure 10 15 Internal Wiring CloudLink R100 Connections 10 Reference Drawings ...

Page 67: ... Cable Part Connects To 40 6167 EXT POWER CloudLink MODEM Power Distribution Board P6 40 6167 1 Power Distribution Board P4 Power Barrier 40 6182 Power Distribution Board P11 Pulse Barrier 40 6184 CloudLink MODEM Serial Barrier 40 2342 1 Device Ground Earthing Serial Barrier 10 Reference Drawings ...

Page 68: ...any configuration the modem is always connected to the P6 connector on the PD board 2 When the modem type is set to CloudLink the EC350 will not control the modem power and the modem is always powered on 3 If we want to use CloudLink as on demand power on when call in and call out we must configure i1458 as others Note Modem type CloudLink is applicable for CloudLink modem and CloudLink 4GM1 modem...

Page 69: ...s Cable Part Connects To 40 2947 9 RV50 RV50X RV55 MODEM Serial Barrier 40 6167 1 Power Distribution Board P4 Power Barrier 40 6181 RV50 RV50X RV55 MODEM Power Distribution Board P6 40 6182 Power Distribution Board P11 Pulse Barrier 40 2342 1 Device Ground Earthing Serial Barrier 10 Reference Drawings ...

Page 70: ...5 Figure 10 19 INTERNAL ANTENNA CONNECTION RV50 RV50X RV55 Note For Ready for RV50 RV50X RV55 option all necessary cables and fasteners will be provided except RV50 RV50X RV55 MODEM 10 Reference Drawings ...

Page 71: ...cted to the P6 connector on the PD board 2 When the modem type is set to Others the EC350 will control the modem power as listed below Modem power on Call In start Call Out start Modem forced on Modem power off Call In Keep alive end Call Out end Modem forced off 10 Reference Drawings ...

Page 72: ... 67 10 3 2 Terminal Block Connections 10 3 2 1 With CloudLink MODEM Figure 10 20 Internal Wiring CloudLink R100 Connections 10 Reference Drawings ...

Page 73: ...ons Cable Part Connects To 40 6167 EXT POWER CloudLink MODEM Power Distribution Board P6 40 6167 1 Power Distribution Board P4 Power Barrier 40 6182 Power Distribution Board P11 Pulse Barrier 40 6184 CloudLink MODEM Serial Barrier 40 2342 1 Device Ground Earthing Serial Barrier 10 Reference Drawings ...

Page 74: ... 69 Figure 10 22 Internal Antenna connection cloud link R100 Note For Ready for CloudLink MODEM option all necessary cables and fasteners will be provided except CloudLink MODEM 10 Reference Drawings ...

Page 75: ...s Cable Part Connects To 40 2947 9 RV50 RV50X RV55 MODEM Serial Barrier 40 6167 1 Power Distribution Board P4 Power Barrier 40 6181 RV50 RV50X RV55 MODEM Power Distribution Board P6 40 6182 Power Distribution Board P11 Pulse Barrier 40 2342 1 Device Ground Earthing Serial Barrier 10 Reference Drawings ...

Page 76: ...71 Figure 10 24 INTERNAL ANTENNA CONNECTION RV50 RV50X RV55 Note For Ready for RV50 RV50X RV55 option all necessary cables and fasteners will be provided except RV50 RV50X RV55modem 10 Reference Drawings ...

Page 77: ...ular MODEM as an Integrated Device To learn more about MasterLink EC350 ERX350 or CloudLink refer to their respective user guides available on the Honeywell Process Website Product Name Documentation Link Honeywell MasterLink Software MasterLink User Guide Honeywell EC350 EC350 User s Guide Honeywell ERX350 ERX350 Guide CloudLink 4G MODEM CloudLink 4G MODEM User Guide CloudLink 4G M1 MODEM CloudLi...

Page 78: ...Callin IPv4 format Last two blocks as float 3039 Alternate IP Address for Alarm Magnet Callin IPv4 format Last two blocks as float 3042 CloudLink Ping Server IP DNS IPv4 format Last two blocks as float 3045 3054 CloudLink White List IP Address 1 10 String Last two blocks as float 3059 CloudLink IP Address IPv4 format Last two blocks as float 3095 CloudLink RUID1 String Last 8 characters 3110 Cloud...

Page 79: ...han an hour the CL items will be refreshed on per hour basis only Whereas if the log frequency is configured to an interval more than an hour daily or monthly then the log items will be observed with the same frequency daily or monthly For example If log frequency is configured as five minutes then CloudLink item values in the Logging configuration will be refreshed ONLY at the end of the hourly t...

Page 80: ... 8 12 2020 10 00 00 Unsupported Unsupported 09 59 34 08 12 20 8 12 2020 11 00 00 Unsupported Unsupported 10 59 34 08 12 20 8 12 2020 12 00 00 Unsupported Unsupported 11 59 34 08 12 20 In the above example CL Cellular Service Technology and Low Battery Capacity Event items are not available on the connected MODEM so Unsupported error code is displayed Note There is a limitation with these error cod...

Page 81: ...is a backup available and the user can proceed with the As Shipped configuration with the available back up But if the value is not equal to 2121488 then the device will give an unknown error User has to then initiate the configuration reload procedure as explained in the next step below User should have Modify and Change privileges to perform the As Shipped Configuration reload procedure If not t...

Page 82: ...very item will be defaulted to As Shipped configuration but run time dynamic items may get loaded with current values of the device Also the new items on Firmware upgrade which are part of the new Firmware will go back to the Firmware default values when user performs As Shipped Configuration restoration 13 As Shipped Configuration Reload Procedure ...

Page 83: ...IT BATT BRACKET ALKALINE MIWI350 22 3118 2 KIT POWER DISTRIBUTION BOARD MIWI350 22 3119 KIT LATCH MIWI350 22 3125 KIT EXT DISPLAY COVER MIWI350 22 3126 1 KIT INTERNAL DISPLAY COVER MIWI350 22 3126 2 KIT CORRECTED VOL I P SWITCH MIWI350 22 3127 1 KIT CORR VOL I P SWITCH REV FLOW MIWI350 22 3127 2 KIT UNCORRECTED VOL I P SWITCH MIWI350 22 3127 3 KIT UNCORR VOL I P SW REV FLOW MIWI350 22 3127 4 KIT C...

Page 84: ...OARD 40 6163 2 KIT POWER SUPPLY CABLE POWER DISTRIBUTION BOARD I O BOARD 40 6164 KIT POWER SUPPLY CABLE POWER DISTRIBUTION BOARD CL4G MODEM 40 6167 KIT PWR SUPPLY CABLE POWER DISTRIBUTION BOARD TO PWR BARRIER 40 6167 1 KIT PWR SUPPLY CABLE POWER DISTRIBUTION BOARD TO EXT POWER 40 6167 2 KIT SOLAR CHARGE CONTROLLER LOAD O P CABLE 40 6169 1 KIT 21Ah LEAD ACID BATTERY CABLE 40 6169 2 KIT 7Ah LEAD ACI...

Page 85: ...ER ASSY FOR PE MIWI350 22 3078 KIT KIT METAL GLAND 3 8 NPT 22 3079 KIT KIT METAL GLAND 1 2 NPT 22 3080 KIT KIT GASKET RUBBER AMP LOW TEMP 22 3081 KIT KIT POWER SUPPLY WIRING 21 AH 40 6169 5 KIT KIT POWER SUPPLY WIRING 7AH 40 6169 6 KIT KIT REMOTE CASE DOOR INT DISP ASSY EX 22 3116 5 KIT Note Suitable for IECEx ZONE2 certified MIWI350 offerings installations 14 Orderable Kits ...

Page 86: ...o learn more about Honeywell s Smart Gas Metering Solutions visit https process honeywell com or contact your Honeywell Process Solutions representative Honeywell Process Solutions 2101 Citywest Boulevard Houston Tx 77042 USA 855 251 7065 United States Canada 302 669 4253 Outside the United States ...

Reviews: