background image

ML7295 SPRING RETURN DIRECT COUPLED ACTUATORS

63-2539—1

7

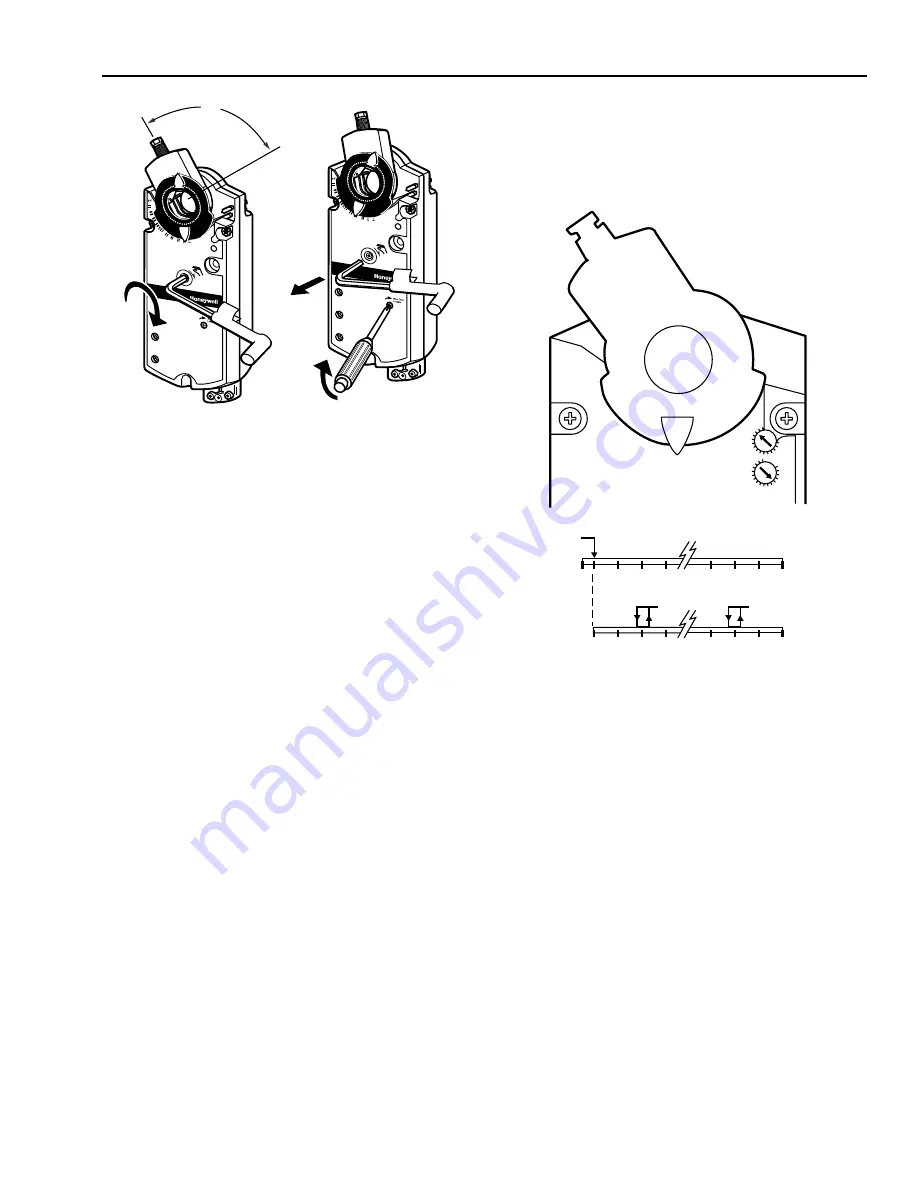
Fig. 8. Manual override of ML7295 Spring

Return Direct Coupled Actuators.

Auxiliary Switches (ML7295C,H only)

The ML7295C,H models have line voltage, fully adjustable
auxiliary switches. The switch setting interval (or differential)
is 5

°

.

The switches are set as follows:

1. If the power is on, turn it off; the actuator will spring

return to the 0

°

 position.

IMPORTANT

If the shaft coupling has been adjusted according to
the Range Stop Adjustment instructions, the position
indicator must also be adjusted to indicate 0  at the
fail-safe position. If this is not done, the position
indicator will not correspond to the auxiliary switch
adjustment settings, as shown on the label.

2. Use a flat blade screwdriver to turn the switch

adjustment dials to the desired settings.

NOTE:

The numerical indication on the dials corresonds to
the location of the shaft coupling at which a signal
will be given by the switch (see Fig. 9).

Once power is restored, the actuator will return to normal
automated control.

20

30

30

10

20

40

40

50 60

70

70

80

90

A

B

AUX

SWITCH

ADD

0

°

-5

°

10

°

20

°

30

°

60

°

70

°

80

°

90

°

0

°

10

°

20

°

30

°

60

°

70

°

80

°

90

°

M11699

Fig. 9. Actuator rotary range and auxiliiary switch

signal locations.

CHECKOUT

To perform a checkout of the ML7295 DCA, proceed as
follows:

1. Check the damper or valve position and make sure that

24 Vac is present on the red and black leadwires.

2. Apply the control signal to the appropriate leadwires to

move the damper or valve away from the fail-safe
position. The ML7295 should drive the damper or valve.

3. If the actuator does not run, remove power and

manually operate the actuator, see Manual Override
section. If the shaft coupling moves, rotate it reaches
the mechanical stop. Turn the lock pin 1/4 turn to lock
the actuator in place. Reapply power and apply the
control signal to the appropriate leadwires to drive the
actuator in a cw direction.

4. If the actuator is correctly installed and still does not

run, replace the actuator.

M12447A

ROTATING

LOCKING IN PLACE

95

°

"CLICK"

Summary of Contents for ML7295 Series

Page 1: ... FEATURES Brushless DC motor achieves sophisticated control of speed torque and braking Provides 142 lb in 16 N m torque Mounts directly on 3 8 in to 1 in 9 to 25 mm round and 1 4 in to 3 4 in 6 to 18 mm square shafts Self centering shaft coupling minimizes installation time Spring return direction is field selectable to simplify installation Manual override permits unpowered positioning to simpli...

Page 2: ...onsumption Running 9 VA Holding 5 VA Feedback Signal Voltage output 0 10 Vdc Maximum current output 0 5 mA Cable Ratings Control Standard models include non plenum UL CSA rated 30V 140 F 60 C 18 gauge cable Auxiliary Switch UL CSA rated 300V 194 F 90 C 18 gauge cable Controller Type 0 to 10 Vdc or 4 to 20 mA All models have a feedback signal Torque Rating at rated voltage Lift and Hold 142 lb in 1...

Page 3: ...ation as provided in these instructions WARNING Installing the actuator near explosive vapors could result in serious injury or death A spark from the actuator or attached accessories could ignite escaping gas or explosive vapors Install actuator in areas free of escaping gas and other explosive vapors CAUTION Failure to disconnect power before installation can result in electrical shock or equipm...

Page 4: ...on and wiring connections The ML7295 can be mounted to provide clockwise or counterclockwise spring return Determine appropriate mounting orientation See Fig 2 for mounting orientation Measure shaft length If the shaft is less than three inches in length the shaft coupling must be located between the damper valve and actuator housing If the shaft length is more than three inches the shaft coupling...

Page 5: ...7 If necessary replace the holder and position indicator on the shaft coupling Installation Installing Actuator and Mounting Bracket Single Point Damper Mounting NOTE For valve mounting see the literature accompanying the mounting equipment or bracket With the direction of the damper shaft rotation determined either cw or ccw proceed as follows 1 Place the ML7295 DCA over the damper shaft 2 Positi...

Page 6: ...ignal that will drive the motor closed It is factory set to 0 Vdc and can be adjusted as high as 5 Vdc U Span is factory calibrated and adjusts the motor response to travel full stroke through the selected input span It is factory set to 10 Vdc and is adjustable from 2 to 30 Vdc L1 HOT L2 1 1 24 VAC METER 8 GREY 9 PINK 1 RED S1 GREEN RED S2 GREEN BLUE S3 GREEN PINK S4 BLACK RED S5 BLACK BLUE S6 BL...

Page 7: ...ch a signal will be given by the switch see Fig 9 Once power is restored the actuator will return to normal automated control 20 30 30 10 20 40 40 50 60 70 70 80 90 A B AUX SWITCH ADD 0 5 10 20 30 60 70 80 90 0 10 20 30 60 70 80 90 M11699 Fig 9 Actuator rotary range and auxiliiary switch signal locations CHECKOUT To perform a checkout of the ML7295 DCA proceed as follows 1 Check the damper or valv...

Page 8: ... Limited Honeywell Limitée 155 Gordon Baker Road North York Ontario M2H 3N7 Honeywell Latin American Division Miami Lakes Headquarters 14505 Commerce Way Suite 500 Miami Lakes FL 33016 Helping You Control Your World 63 2539 1 B B Rev 10 97 Home and Building Control Honeywell Inc Honeywell Plaza P O Box 524 Minneapolis MN 55408 0524 Printed in U S A on recycled paper containing at least 10 post con...

Reviews: