background image

MSXX10, MSXX20 SERIES

9

63-2607—26

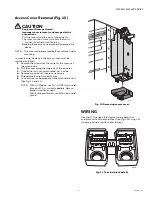
Access Cover Removal (Fig. 10)

CAUTION

Equipment Damage Hazard.
Improper cover removal can damage electric 
connections.

Pull the cover along the axis of the actuator.
The cover contains contact sockets that must 

connect to actuator contact pins.

Bending these pins can permanently damage the 

device.

NOTE:

This cover can be removed before or after actuator 
mounting.

In order to wire the device, the access cover must be 
removed as follows:

1.

Remove the screw from the center of the cover, set 
the screw aside.

2.

Pull the cover along the long axis of the actuator.

3.

If the actuator is not yet mounted, set it aside.

4.

Remove conduit dust covers as necessary.

5.

Thread wire through conduit holes.

6.

Connect wires as appropriate to the terminal block(s). 
(See Fig. 11 and 12.)

NOTE:

With US Models, use 1/2 in. NPS strain relief 
gland or 1/2 in. conduit adapters. Recom-
mend using flex conduit.
With European Models, use M16 strain relief 
gland.

Fig. 10. Removing access cover.

WIRING

See Fig. 11 through 28 for typical wiring details for 
actuators without cables (whips). See Fig. 29 through 31 
for wiring actuators with cables (whips).

Fig. 11. Terminal block details.

M20957

1

2

3

4

5

1

2

3

4

5

S1

S2 S3 S4 S5 S6

M20958

Summary of Contents for MS 10 Series

Page 1: ...age valves mounted with linkages to provide linear actuation FEATURES Brushless DC submotor with electronic stall protection for floating modulating models Floating Modulating models can provide two position SPST control Brush DC submotor with electronic stall protection for two position models Self centering shaft adapter shaft coupling for wide range of shaft sizes Access cover to facilitate con...

Page 2: ...r greater shaft diameter recommended Minimum Damper Shaft Length 1 in 25 mm 3 in 76 mm recommended Cable Specification 300 V 75 C Plenum Rated 3 ft length from end of access cover 18 AWG Table 1 Features Model Number Model Number including 3 ft whip Torque Power Supply Drive2 sec Control Input Output Description SPDT Aux Switch Voltage VA Driving1 MS7510A2008 MS7510W2008 88 lb in 10 Nm 24 Vac dc 1...

Page 3: ... available on 75 and 81 Series only M Electrical Motor S Fail Safe Function Spring Return 31 24 Vac communicating Sylk Enabled 41 120 Vac Two Position Control Reversible Mount 71 24 Vac Modulating Control Reversible Mount 75 24 Vac Modulating and Floating Control Reversible Mount 81 24 Vac Two Position Control Reversible Mount 10 88 lb in 10 Nm 20 175 lb in 20 Nm Aa Standard U S Model Bb Standard ...

Page 4: ...ctuator 50001194 001 Foot Mount Kit 50005859 001 NEMA4 4X Enclosure 50006427 001 Anti Rotation Bracket supplied with actu ator SW2 US Auxiliary Switch Package See also Form 63 2620 Sylk Bus Sylk is a two wire polarity insensitive bus that provides communications between a Sylk enabled actuator and a Sylk enabled controller For wiring the Sylk enabled actuator may be mounted up to 200 ft 61m from t...

Page 5: ...can damage actuator Mount actuator to allow it to float along its vertical axis Preparation Before mounting the actuator onto the damper shaft determine the Damper valve opening direction for correct spring return rotation The actuator can be mounted to provide clockwise or counterclockwise spring return Damper shaft size see the Specifications section Determine Appropriate Mounting Orientation Th...

Page 6: ... the control signal Non Standard Stroke Mechanical Stroke Limit Reduction For applications requiring a span less than 95 degrees a simple adjustment can be made When the rotational mounting of the shaft coupling is changed the actuator drives less than the full 95 degrees stroke The stroke is adjustable in 5 degree increments Once adjusted the actuator drives until the shaft coupling reaches the m...

Page 7: ... end point signal 7 Allow the actuator to open fully 8 Slowly adjust span toward the maximum setting until the actuator hub moves slightly from fully open 9 Carefully adjust span knob toward minimum until the actuator hub returns to fully open Auto Adapt When using these actuators for standard stroke applications this function can be ignored When it is desirable to use a mechanically limited strok...

Page 8: ...elf tapping sheet metal screws 5 Turn damper blades to desired normal closed posi tion 6 Place actuator and mounting bracket back into posi tion and secure bracket to damper box with sheet metal screws 7 Using 10 mm wrench tighten shaft coupling securely onto damper shaft using minimum 120 lb in 13 6 Nm maximum 180 lb in 20 3 Nm torque NOTE See Fig 8 for proper mounting to a square damper shaft Fi...

Page 9: ...e cover set the screw aside 2 Pull the cover along the long axis of the actuator 3 If the actuator is not yet mounted set it aside 4 Remove conduit dust covers as necessary 5 Thread wire through conduit holes 6 Connect wires as appropriate to the terminal block s See Fig 11 and 12 NOTE With US Models use 1 2 in NPS strain relief gland or 1 2 in conduit adapters Recom mend using flex conduit With E...

Page 10: ...oating Modulating Two Position Colora 24 Vac 120 Vac 240 Vac Sylk enabled 1 power power power power power Red 2 common common common neutral common Black 3 cw input s bus White 4 ccw s bus 5 feedback feedback Brown ACTUATOR SPST 24 VAC 1 1 2 2 LINE VOLTAGE POWER SUPPLY PROVIDE DISCONNECT MEANS AND OVERLOAD PROTECTION AS REQUIRED 24 VDC SUPPLY ACCEPTABLE ENSURE PROPER GROUNDING OF ACTUATOR CASE V 1...

Page 11: ...Fltg fwd Fltg rev 3 4 ENSURE PROPER GROUNDING OF ACTUATOR CASE 4 NOTES AFTER TRANSFORMER SELV SAFETY EXTRA LOW VOLTAGE FOR INTERNAL CIRCUIT AND MOTOR 5 A JUMPER WIRE IS NOT REQUIRED BETWEEN PIN 1 AND PIN 3 IF SWITCH IS SET TO 10 2 VDC 5 24 VAC 1 1 2 3 2 LINE VOLTAGE POWER SUPPLY PROVIDE DISCONNECT MEANS AND OVERLOAD PROTECTION AS REQUIRED 24 VDC SUPPLY ACCEPTABLE SET SWITCH TO FLOATING M35125 ACTU...

Page 12: ...2 VDC 0 10 VDC 10 0 VDC Fltg fwd Fltg rev 2 3 ENSURE PROPER GROUNDING OF ACTUATOR CASE 3 NOTES AFTER TRANSFORMER SELV SAFETY EXTRA LOW VOLTAGE FOR INTERNAL CIRCUIT AND MOTOR ACTUATOR CONTROLLER 24 VAC 1 1 2 LINE VOLTAGE POWER SUPPLY PROVIDE DISCONNECT MEANS AND OVERLOAD PROTECTION AS REQUIRED SET SWITCH TO FLOATING V OR OR N A FEEDBACK HOT COM 5 4 3 1 2 M35128 24 VAC 1 2 10 VDC 10 2 VDC 0 10 VDC 1...

Page 13: ...ITCH TO MODULATING LOCATE RESISTOR AT THE LAST ACTUATOR V OR OR N A FEEDBACK FEEDBACK 5 4 3 1 2 M35098 2 10 VDC 10 2 VDC 0 10 VDC 10 0 VDC Fltg fwd Fltg rev 3 ACTUATOR V OR OR N A FEEDBACK 5 4 3 1 2 2 10 VDC 10 2 VDC 0 10 VDC 10 0 VDC Fltg fwd Fltg rev 3 500 OHMS 5 ENSURE PROPER GROUNDING OF ACTUATOR CASE 5 NOTES AFTER TRANSFORMER SELV SAFETY EXTRA LOW VOLTAGE FOR INTERNAL CIRCUIT AND MOTOR ACTUAT...

Page 14: ... POWER SUPPLY PROVIDE DISCONNECT MEANS AND OVERLOAD PROTECTION AS REQUIRED 24 VDC SUPPLY ACCEPTABLE SET SWITCH TO MODULATING V OR OR N A FEEDBACK 5 4 3 1 2 M35100 2 10 VDC 10 2 VDC 0 10 VDC 10 0 VDC Fltg fwd Fltg rev 3 ACTUATOR V OR OR N A FEEDBACK 5 4 3 1 2 2 10 VDC 10 2 VDC 0 10 VDC 10 0 VDC Fltg fwd Fltg rev 3 24 VAC 1 24 VAC 1 2 24 VAC 1 HOT COM 4 ENSURE PROPER GROUNDING OF ACTUATOR CASE NOTES...

Page 15: ...lications 1 Override to full open a Disconnect the input signal from terminal 3 b Apply 24 Vac to terminal 3 c See Fig 32 2 Override to full closed a Disconnect the input signal from terminal 3 b See Fig 33 Fig 32 Override to full open Fig 33 Override to full close End Switches Some models include end switches see Table 2 For wiring details see Fig 12 SPDT Switches Fig 34 For SPDT end switch wirin...

Page 16: ...ves towards 100 position Feedback Operation 1 Connect a multi meter set for Vdc to terminals 2 and 5 2 Apply the same signal as in step 4 of Modulating Operation 3 The multi meter reading increases to match the input signal as actuator drives towards 100 position 4 Apply the same signal as in step 6 of Modulating Operation 5 The multi meter reading decreases to match the input signal as actuator d...

Reviews: