background image

NetAXS™ Standalone Operation

Standalone Commands

NetAXS Access Control Unit NX4L1 Installation Guide

7-901099, Revision A

53

A.3  Standalone Commands

Use the following commands, in the order they are listed, to configure the NetAXS™ 
panel.

1. T command: Sets the panel’s Time

2. D command: Sets the panel’s Date

3. L command: Creates Time zones for use by the cards

4. C command: Adds or Deletes cards from the panel

5. W command: Program each input for either NO/NC and Supervised or NON 

Supervised operation

6. P command: Sets interlocks between input points and/or output points

Note:  

In all examples, the underbar “_” indicates a “space” character and <CR> 

indicates a carriage return.

A.3.1  T (Time) Command

_T=pn_hh:mm<CR>

Variables:

pn = panel number (1-31)
hh = hours (0-23) (Military time)
mm = minutes (00-59)

Example #1:

_T=1_08:30<CR>

This command would set panel 1 to a time of 8:30 AM.

Example #2

_T=6_18:15<CR>

This command would set panel 6 to a time of 6:15 PM.

Summary of Contents for NetAXS NX4S1

Page 1: ...May 2007 2007 Honeywell All rights reserved 800 00008 Revision A NetAXS NX4S1 Access Control Unit Installation Guide ...

Page 2: ...es of America Honeywell reserves the right to change any information in this document at any time without prior notice Ordering Information Please contact your local Honeywell representative or visit us on the web at www honeywellaccess com for information about ordering Feedback Honeywell appreciates your comments about this manual Please visit us on the web at www honeywellaccess com to post you...

Page 3: ...s Control Overview 5 2 2 NetAXS Access Overview 5 3 0 Panel Components and Descriptions 6 3 1 NetAXS Access Control Unit 7 Real Time Clock Protection 7 Memory Protection 7 Reader and AUX Power 7 3 2 Power Supply 8 3 3 Battery 8 3 4 Enclosure 8 3 5 Suppressors 8 4 0 Installation 9 4 1 Cabinet Mounting 10 4 2 Reader Wiring 14 4 3 Supervised Input Wiring 14 4 4 NX4S1 Control Output Wiring 16 4 5 Comm...

Page 4: ...5 Connection via NetAXS 37 5 12 Fiber Converter to RS 485 Connection via PCI 2 38 5 13 Fiber Converter to RS 485 Connection via NetAXS 39 5 14 N 485 PCI 2 NetAXS Access Controller Panel Connection Detail 40 5 15 NetAXS NetAXS Access Controller Panel Connection Detail 41 6 0 NetAXS Startup 42 6 1 LED Operation 42 7 0 Hardware Specifications 44 7 1 Relay Contacts 44 7 2 Reader Interface 44 7 3 NX4S1...

Page 5: ...ulation Settings 52 A 2 4 Verifying Communications 52 A 3 Standalone Commands 53 A 3 1 T Time Command 53 A 3 2 D Date Command 54 A 3 3 L Time Zone Command 55 A 3 4 C Card Add Command 56 A 3 5 C Card Delete Command 56 A 3 6 W Input Command 57 A 3 7 P Interlock Command 57 A 3 8 Flow Control Disable Enable 58 A 4 NetAXS Panel Defaults 59 A 4 1 Reader Ports 59 A 4 2 Reader LED Outputs 59 A 4 3 Reader ...

Page 6: ...vi www honeywell com ...

Page 7: ...on with Wiring 25 Figure 16 RS 485 Connection via PCI 2 26 Figure 17 RS 485 Connection via NetAXS 27 Figure 18 RS 485 Connection via NetAXS with Multidrop Panels at Both Ends 28 Figure 19 RS 485 Connection via PCI 2 with Multidrop Panels at Both Ends 29 Figure 20 RS 232 Connection 30 Figure 21 Ethernet Connection 31 Figure 22 LANSRLU1 Connection 32 Figure 23 RS 485 Short Haul Modem Connection via ...

Page 8: ...viii www honeywell com ...

Page 9: ...ABLES Table 1 Reader Wiring 14 Table 2 Default Supervised Input Assignments 14 Table 3 DIP Switch Settings 22 Table 4 MIRO 32 0 DIP Switch and Jumper Settings 23 Table 5 LED Status 43 Table 6 Communications and Wiring 46 Table 7 Reader Wiring 46 Table 8 Troubleshooting Problems and Solutions 48 ...

Page 10: ...x www honeywell com ...

Page 11: ...monitoring systems should always meet local fire and safety code requirements The installer must also test the system on a regular basis by instructing the end user in appropriate daily testing procedures Failure to test a system regularly could make installer liable for damages to the end user if a problem occurs Warning Earth ground all enclosures for proper installation Warning Use suppressors ...

Page 12: ...employees and from and against all claims demands losses and liability for costs of fees including reasonable attorneys fees in connection therewith 1 3 Limited Warranty All Products sold or licensed by Honeywell Access Systems HAS include a warranty registration card which must be completed and returned to Honeywell by or on behalf of the end user in order for Honeywell to provide warranty servic...

Page 13: ...rference to radio communications However there is no guarantee that interference will not occur in a particular installation If this equipment does cause harmful interference to radio or television reception which can be determined by turning the equipment off and on the user is encouraged to try to correct the interference by one or more of the following measures Re orient or re locate the receiv...

Page 14: ...d OmniProx TM OP30 and OP40 Notes All field wiring except the battery backup charger wiring is Class 2 power limited UL has not evaluated communication with panels that are not NetAXS panels Underwriters Laboratories UL has reviewed only the configurations shown in RS 485 Connection via PCI 2 on page 26 RS 485 Connection via NetAXS on page 27 and RS 232 Connection on page 30 of this guide Because ...

Page 15: ...red in a network environment over a standard network protocol Access control units readers door strikes and video and other devices for example are configured to control and monitor the access to a company site 2 2 NetAXS Access Overview A NetAXS access control system consists of a host system and NetAXS access control units that meet existing N 1000 III IV specifications and that communicate with...

Page 16: ...y Basler Electric Model BE156250CAA0004 M G Electronics Model MGT1650 or Honeywell Access Systems part number X 4 provides power for the panel control board which is a four reader panel providing access control for up to four doors The following figure shows the NX4S1 panel components Figure 1 NX4S1 Panel Components Pb Pb B B NetAXS Access Control Panel Battery AC Power LED Enclosure Tamper Switch...

Page 17: ...puts for Tamper External Power Fail and four Reader Tampers are supplied as well and they can be used as additional inputs when not required for their default purpose Caution The NetAXS board must not be used to power locks Only through the relay board can the common power supply be used for the NetAXS and locking devices Real Time Clock Protection The panel RTC is backed up using a super capacito...

Page 18: ... is not illuminated the input voltage is either off or too low to operate the system Caution De energize the unit before servicing it 3 3 Battery One CASIL CA1270 12 VDC 7 A Hr sealed lead acid battery HAS part number 3 000066 provides standby backup power When the primary power is off the NetAXS panel automatically switches to the battery for continuous operation The battery provides three hours ...

Page 19: ...ables See the wiring diagram Figure 33 on page 47 Leave enough shield drain length to secure to the grounding stud Also maintain a distance of at least 25 inches between the non power limited wiring battery backup charger wiring and all other wiring which is power limited Class 2 wiring Caution Do not plug in the wall transformer at this time 7 Connect the shield and the green earth ground to the ...

Page 20: ...ures show the back top bottom right and left views of the NetAXS panel cabinet Each view includes the dimensions and knockout placement that you will need to mount the cabinet All dimensions are given in inches See Table 1 on page 14 for dimensions of the conduit entries into the cabinet Figure 2 NetAXS NX4S1 Panel Cabinet Front View 1 4 6 25 mm 1 23 32 43 75 mm diameter knockout 3 8 9 375 mm diam...

Page 21: ...tom View 0 3 4 18 75 mm 0 31 32 25 mm 13 9 32 337 5 mm 14 9 32 362 5 mm 0 1 11 32 34 375 mm 4 7 32 107 5 mm Back 14 16 21 875 mm diameter knockout 1 1 4 31 875 mm diameter knockout 14 16 21 875 mm diameter knockout 1 3 32 28 125 mm diameter knockout All knockouts punched through for easy removal without damage to cabinet 1 16 32 38 275 mm 0 0 31 32 25 mm 14 9 32 362 5 mm 13 9 32 337 5 mm Back 0 3 ...

Page 22: ...12 www honeywell com NetAXS NX4S1 Installation Installation Figure 5 NetAXS Panel Cabinet Left View 3 4 18 75 mm 1 15 32 37 5 mm 0 4 11 32 110 mm Back 7 8 21 875 mm diameter knockout ...

Page 23: ...Installation NetAXS Access Control Unit NX4S1 Installation Guide Document 800 00008 Revision A 13 Figure 6 NetAXS NX4S1Panel Cabinet Right View 0 4 11 32 110 mm 0 3 4 18 75 mm 4 7 32 107 5 mm Back 7 8 21 875 mm diameter knockout ...

Page 24: ...pervised Input Wiring The supervised inputs are located on TB4 and TB13 Figure 7 on page 15 Input 1 through Input 8 may be configured for normally open or normally closed contacts as supervised or non supervised Inputs 13 and 14 are on TB8 All eight inputs have default functions but they can be configured for general purpose inputs The following table identifies the default function for each termi...

Page 25: ...e supervised and capable of being used as additional inputs if the default functionality is not needed They also share a single common The wire used for the inputs should be shielded and cannot exceed 30 ohms over the entire length of the cable Remember that the distance from the panel to the door must be doubled to determine the total resistance TB4 6 Door 2 Status TB8 1 External Power Supply AC ...

Page 26: ...should be shielded The cable shield should be grounded at the panel only Grounding at both ends can cause ground loops which can be disruptive Do not bundle these wires with communication reader or supervised input wiring To minimize premature contract failure and increase system reliability a contact protection circuit HAS part number S 4 is highly recommended Locate the protection circuit as clo...

Page 27: ...nections for an RS 232 DB9 9 pin connector to the panel s RJ 45 serial port Replacement cables can be obtained by contacting your Honeywell Access System Representative Figure 8 RJ 45 Serial Port Figure 9 RS 232 Configuration NetAXS Panel NetAXS Panel Reader 1 Reader 4 Reader 1 Reader 4 COM1 COM2 CBL50 One NetAXS panel per COM port Two COM ports possible Terminal ...

Page 28: ...positions 1 5 are used to select the panel s address on the network Refer to Table 3 for DIP switch setting information Connectors J36 and J37 are provided for supplying biasing and end of line termination for the RS 485 network The board ships with all jumpers open For a Multidrop RS 485 line you must close both J36 and J37 terminated and biased at the two end point panels At all other panels lea...

Page 29: ...ach panel Up to 31 panels can be configured on each TCP IP connection NetAXS NetAXS Gateway NS2 Reader 1 Reader 4 Reader 1 Reader 4 Reader 1 Reader 4 Reader 2 Reader 1 COM1 NetAXS RS 485 Multidrop Line A combination of NetAXS and NS2 panels supporting a total of 31 panels per multi drop line Terminal NetAXS NetAXS Gateway NS2 Reader 1 Reader 4 Reader 1 Reader 4 Reader 1 Reader 4 Reader 2 Reader 1 ...

Page 30: ...20 www honeywell com NetAXS NX4S1 Installation Installation Figure 13 on page 20 shows the location of the panel s unique MAC ID Figure 13 Ethernet MAC Address Location Label with Ethernet MAC Address ...

Page 31: ...ol Unit NX4S1 Installation Guide Document 800 00008 Revision A 21 4 6 DIP Switch Settings Figure 14 on page 21 locates the NX4S1 DIP switch panel and the J36 and J37 termination and biasing jumpers Figure 14 DIP Switch and Jumper Locations J36 J37 DIP Switches ...

Page 32: ...on off off on off Address 9 off on off on off Address 10 on on off on off Address 11 off off on on off Address 12 on off on on off Address 13 off on on on off Address 14 on on on on off Address 15 off off off off on Address 16 on off off off on Address 17 off on off off on Address 18 on on off off on Address 19 off off on off on Address 20 on off on off on Address 21 off on on off on Address 22 on...

Page 33: ...sure on a dedicated RS 485 Downstream Input Output I O bus A maximum of two MIRO 32 0 and a maximum of four MIRO 2 16 for a total of six MIRO modules can be added to the downstream bus A MIRO 32 0 module has 32 supervised four state inputs that are limited to 1 000 ohms resistance The MIRO 2 16 has two supervised inputs and 16 SPDT relay outputs each input is limited to 1 000 ohms resistance Refer...

Page 34: ...stallations the noise immunity improves if the NetAXS common is connected to the 24 VDC Return wiring for the downstream modules This connection is not needed for most installations Jumper settings JP1 CLOSED if the module is the last module on the downstream bus OPEN if the module is not the last module on the downstream bus JP2 any setting JP3 any setting JP4 NORMAL Positions 1 and 2 MIRO 2 16 D...

Page 35: ...S1 Installation Guide Document 800 00008 Revision A 25 The following figure shows the default downstream I O system configuration with communication and power wiring This configuration has not been reviewed by UL Figure 15 Default Downstream I O Configuration with Wiring ...

Page 36: ...9 Because UL has reviewed the NetAXS panel only as a standalone system the computer terminal NetAXS gateway panel and N 485_PCI 2 adapter appear in this section only to illustrate the installation and programming of the NetAXS panel Figure 16 RS 485 Connection via PCI 2 COM Port It is recommended to Ear NetAXS enclosure RS 485 Cable RS485 NetAXS Panels Red White Black Green RS 485 COM TB7 1 RS485 ...

Page 37: ...ystem the computer terminal and NetAXS gateway panel appear in this section only to illustrate the installation and programming of the NetAXS panel Figure 17 RS 485 Connection via NetAXS COM Port E EG EG s It is recommended to Earth Ground EG each NetAXS enclosure individually RS 485 Cable NetAXS Panel TB7 1 RS485 TB7 2 RS485 TB7 3 RS485 COM 4 000 ft 1 200 m max 24 AWG 2 twisted pairs 120 ohm 23 p...

Page 38: ... 485 Connection via NetAXS with Multidrop Panels at Both Ends COM Port EG s It is recommended to Earth Ground EG each NetAXS enclosure individual EG 485 Note Only Earth Ground EG one side of cable EG NetAXS Panel EG EG DIP Switch Settings S1 S5 Panel Address S6 OFF J36 CLOSED J37 CLOSED Only Earth Ground EG one side of cable RS 485 4 000 Ft RS 485 Cable NetAXS Panels TB7 1 RS485 TB7 2 RS485 TB7 3 ...

Page 39: ...9 RS 485 Connection via PCI 2 with Multidrop Panels at Both Ends COM Port It is recommended to Earth Ground EG each NetAXS enclosure individually 4 485 ote EG EG one side of cable RS 485 4 000 Ft RS 232 50 Ft Max EG EG EG n y ar roun one side of cable NetAXS Panel EG DIP Switch Settings S1 S5 Panel Address S6 OFF J36 OPEN J37 OPEN Terminal ...

Page 40: ...ear in this section only to illustrate the installation and programming of the NetAXS panel Figure 20 RS 232 Connection COM 1 COM 2 CBL50 RS 232 50 Ft Max CBL50 RS 232 50 Ft Max DIP Switch Settings S1 S5 Panel Address S6 OFF NetAXS Panel NetAXS Panel It is recommended to Earth Ground EG each NetAXS enclosure individually Request To Send RTS Signal Ground GND Receive Data RXD Transmit Data TXD Clea...

Page 41: ...008 Revision A 31 5 5 Ethernet Connection This connection supports a maximum of 255 IP connections per server It has not been reviewed by UL Figure 21 Ethernet Connection NIC 100BaseT CAT 5 328 Ft Max EG EG EG NetAXS Panel EG DIP Switch Settings S1 S5 Panel Address S6 OFF RS 485 Multidrop RS 485 Multidrop Terminal ...

Page 42: ... along the drop line See Figure 18 on page 28 and Figure 19 on page 29 Figure 22 LANSRLU1 Connection NIC EG EG EG each NetAXS enclosure individually Only Earth Ground EG one side of cable LANSRLU1 RJ 45 RS 232 50 Ft EG See RS 485 Cable note HUB SWITCH RS 485 Cable RS485 NetAXS Panels Red White Black Green RS 485 COM TB7 1 RS485 TB7 2 RS485 TB7 3 RS485 COM 4 000 ft 1 200 m max 24 AWG 2 twisted pair...

Page 43: ...RS232 Cable MODEM PC DTE DCE DB 9 Straight Null 2 TX 2 TX 2 RX 3 RX 3 RX or 3 TX 5 Comm 7 GND 7 GND SHM B ASYNCH Short Haul Modem DCE DTE Jumper DN DIS RTSIDTR CONTROL RX RX TX TX GROUND Jumper DN DIS RTSIDTR CONTROL S2 Loopback S2 Loopback J1 RS 232 Connector SHM B ASYNCH Short Haul Modem 5279 9 Feet EG RS 232 50 Ft Max Male 9 Pin Male 25 Pin J1 RS 232 Connector EG See RS 485 cable note DIP Switc...

Page 44: ...X RX TX TX GROUND Jumper DN DIS RTSIDTR CONTROL S2 Loopback S2 Loopback J1 RS 232 Connector SHM B ASYNCH Short Haul Modem 5279 9 Foot NetAXS Panel EG NetAXS Panel EG NetAXS Panel It is recommended to Earth Ground EG each NetAXS enclosure individually RS 232 50 Ft Max Male 9 Pin Male 25 Pin J1 RS 232 Connector EG EG Only Earth Ground EG one side of cable See RS 485 cable note DIP Switch Settings S1...

Page 45: ... 2 TX 2 TX 2 RX 3 RX 3 RX or 3 TX 5 Comm 7 GND 7 GND RS232 Cable MODEM PC DTE DCE DB 9 Straight Null 2 TX 2 TX 2 RX 3 RX 3 RX or 3 TX 5 Comm 7 GND 7 GND SHM B ASYNCH Short Haul Modem DCE DTE DEC DTE Jumper DN DIS RTSIDTR CONTROL RX RX TX TX GROUND Jumper DN DIS RTSIDTR CONTROL S2 Loopback S2 Loopback J1 RS 232 Connector DEC DTE SHM B ASYNCH Short Haul Modem 5279 9 Foot NetAXS Panel EG DIP Switch S...

Page 46: ...ch Settings S1 S5 Panel Address S6 OFF J36 OPEN J37 OPEN It is recommended to Earth Ground EG each NetAXS enclosure Individually Analog Phone Line Dedicated analog phone line recommended Remote DIP Switch Settings 1 3 8 ON 2 4 5 6 7 OFF Remote DIP Switch Settings 1 3 8 ON 2 4 5 6 7 OFF RS 232 50 ft RS 485 4 000 ft See RS 485 Cable Note DB 9 DB 25 Connectors Female Male 1 13 14 25 1 13 14 25 1 5 6 ...

Page 47: ... Settings S1 S5 Panel Address S6 OFF J36 CLOSED J37 CLOSED DIP Switch Settings S1 S5 Panel Address S6 OFF J36 OPEN J37 OPEN It is recommended to Earth Ground EG each NetAXS enclosure Individually Analog Phone Line Dedicated analog phone line recommended Remote DIP Switch Settings 1 3 8 ON 2 4 5 6 7 OFF Remote DIP Switch Settings 1 3 8 ON 2 4 5 6 7 OFF RS 232 50 ft RS 485 4 000 ft See RS 485 Cable ...

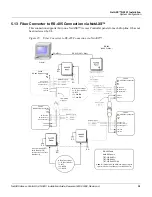
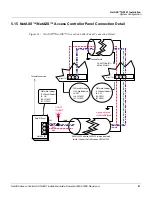
Page 48: ...XD RXD PWR TXD RS 485 Comm RS 485 Positive RS 485 Negative RS 485 Comm RS 485 Positive RS 485 Negative Fiber RXD Fiber TXD Fiber RXD Fiber TXD h ground NetAXS Panel RXD PWR TXD RS 485 Comm RS 485 Positive RS 485 Negative Fiber RXD Fiber TXD RXD PWR TXD RS 485 Comm RS 485 Positive RS 485 Negative Fiber RXD Fiber TXD EG EG EG EG EG EG DIP Switch Settings S1 S5 Panel Address S6 OFF J36 CLOSED J37 CLO...

Page 49: ...485 Negative RS 485 Comm RS 485 Positive RS 485 Negative Fiber RXD Fiber TXD Fiber RXD Fiber TXD h ground NetAXS Panel RXD PWR TXD RS 485 Comm RS 485 Positive RS 485 Negative Fiber RXD Fiber TXD RXD PWR TXD RS 485 Comm RS 485 Positive RS 485 Negative Fiber RXD Fiber TXD EG EG EG EG EG EG DIP Switch Settings S1 S5 Panel Address S6 OFF J36 CLOSED J37 CLOSED DIP Switch Settings S1 S5 Panel Address S6...

Page 50: ...ee485interface connectionnote ToSerialConnection DIPSwitchSettings S1 ON S2 ON S3 ON S4 ON S5 ON S6 ON S7 ON S8 OFF DIPSwitchSettings S1 S5 PanelAddress S6 OFF J36 CLOSED J37 CLOSED DIPSwitchSettings S1 S5 PanelAddress S6 OFF J36 OPEN J37 OPEN 485InterfaceConnectionTypes RS 485 N 485 PCI 2 N 485 HUB 2 N 485 PCI 2L NetAXSPanel COMPort M 56KModem LANSRL100orLANSRLU1 NetAXS TB7 NetAXS TB7 B L A C K G...

Page 51: ...NOTCONNECTor GROUNDSHIELD ToSerialConnection DIPSwitchSettings S1 S5 PanelAddress S6 OFF J36 CLOSED J37 CLOSED DIPSwitchSettings S1 S5 PanelAddress S6 OFF J36 OPEN J37 OPEN DIPSwitchSettings S1 S5 PanelAddress S6 ON J36 CLOSED J37 CLOSED NetAXS TB7 NetAXS TB7 Groundonlyone sideofcableshield X Shield GroundShield 485 485 485 Common 4 000ft 1 200m max 24AWG 2twistedpairswith shield 120ohm 23pf NCIpa...

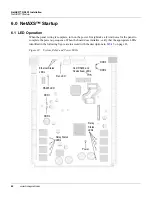
Page 52: ... for the panel to complete the power up sequence When the board does initialize verify that the appropriate LEDs identified in the following figure are in accord with the descriptions in Table 5 on page 43 Figure 32 System Relay and Power LEDs Ethernet Status LEDs Host RS232 and Downstream LEDs RS485 LED RDR 1 RDR 2 Relay Status LEDs Relay Status LEDs Power Run LED RDR 3 RDR 4 ...

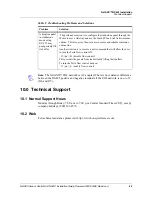
Page 53: ...is attached Table 5 LED Status LED PWR RUN H485 H232 DS COM LINK RLY RDR GREEN Power OK Blink normal Steady malfunc tion Multi drop Receive Data RS232 Receive Data Down stream Receive Data 100Mbit Link OK Relay Active Flash at read RED N A N A Trans m it Data Trans m it Data Trans m it Data N A N A N A N A AMBER N A N A TX RX Data TX RX Data TX RX Data N A TX RX Data N A N A OFF Power Off Mal func...

Page 54: ...supplied with installation kit HAS part number CBL50 Maximum distance per COM port is 50 ft Supervised Inputs One twisted pair per input shielded 30 ohms maximum Outputs As required by load Readers 7 conductors 18 AWG shielded 500 ft 150 m max 7 4 Maximum Output Loading Maximum current for any of the four reader outputs is 600 mA Maximum current for each of the two auxiliary outputs on the NetAXS ...

Page 55: ...onnected to the panel chassis 7 6 Mechanical Panel Dimensions Width 8 inches 203 2 mm Length 9 75 inches 247 65 mm Height 1 5 inches 38 1 mm Panel Weight 1 1 pounds 0 5 kg Enclosure Dimension Width 14 5 inches 368 3 mm Length 18 0 inches 457 2 mm Height 4 4 inches 111 8 mm Enclosure Weight including 7 A Hr battery 22 1 pounds 10 kg 7 7 Environment Temperature 0C to 49C operating 55C to 85C storage...

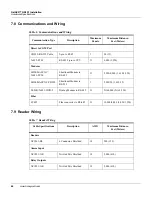
Page 56: ...20 Modems SHM B ASYNC N 485 PCI 2 Short haul Modem to RS 485 31 5 280 4 000 1 610 1 220 SHM B ASYNC CBL50 Short haul Modem to RS 232 1 5 280 50 1 610 15 M 56K N 485 HUB 2 Dial up Modem to RS 485 31 NA 4 000 NA 1 220 Fiber FC485 Fiber converter to RS 485 31 10 000 4 000 3 050 1 220 Table 7 Reader Wiring Cable Specifications Description AWG Maximum Distance Feet Meters Readers NC1861 BL 6 Conductor ...

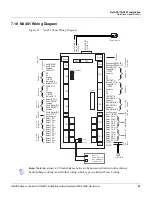
Page 57: ...VDC Aux Common Relay 1 N O Relay 1 Com Relay 1 N C Relay 2 N O Relay 2 Com Relay 2 N C Relay 3 N O Relay 3 Com Relay 3 N C Relay 4 N O Relay 4 Com Relay 4 N C Expansion RS485 B Expansion RS485 A Buzzer OUT 17 Tamper IN 11 12VDC Common D1 D0 LED OUT 13 Buzzer OUT 16 Tamper IN 12 12VDC Common D1 D0 LED OUT 14 DR3 REX IN 5 Common DR3 Status IN 6 DR4 REX IN 7 Common DR4 Status IN 8 Aux Common Aux 12VD...

Page 58: ...ess the panel turn off the power including the battery change the switch setting and reapply the power Note that if the panel is normally not a Gateway on a Multidrop communication bus then the Host RS 485 connection TB7 should also be disconnected while DIP switch 6 is ON After completion of the Ethernet session turn off the power including the battery change the switch setting re connect the Hos...

Page 59: ...istance please visit http www honeywellaccess com A dropline panel in standalone mode using RS 232 may unexpectedly fill its buffer The preferred solution is to configure the standalone panel through the Web server as a Gateway and use the board PCI and AckNak communi cations This also gives the user a more secure and reliable communi cations line Another solution is to execute a new command that ...

Page 60: ...50 www honeywell com NetAXS NX4S1 Installation Technical Support ...

Page 61: ...the particular reader input The card is valid when it is in the card database on the panel and the current time and date conforms to the time zone associated with the card If it is not a valid card the door relay remains locked A 1 2 Door Egress Door Lock Door Status Operation 1 Activate the door egress input 2 The panel energizes the door relay associated with the particular door egress input for...

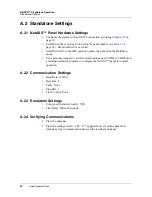
Page 62: ... place the panel into the Multidrop mode Use a personal computer s serial communications port COM1 or COM2 and a terminal emulation program to configure the NetAXS panel for normal operation A 2 2 Communication Settings Baud Rate 115200 Data Bits 8 Parity None Stop Bits 1 Flow Control None A 2 3 Emulation Settings Echo typed characters locally YES Line Delay 500 milliseconds A 2 4 Verifying Commun...

Page 63: ...nd Adds or Deletes cards from the panel 5 W command Program each input for either NO NC and Supervised or NON Supervised operation 6 P command Sets interlocks between input points and or output points Note In all examples the underbar _ indicates a space character and CR indicates a carriage return A 3 1 T Time Command _T pn_hh mm CR Variables pn panel number 1 31 hh hours 0 23 Military time mm mi...

Page 64: ...of week setting is a hold over from an old command The panel using the mm dd yyyy information will automatically configure panel to the correct day of the week regardless of the setting selected in day of week But the command still requires a value to be entered in its place of 1 7 Example 1 _D 1_01 09 2007_5 CR This command would set panel 1 to a date of 1 9 2007 and to Tuesday as the day of the ...

Page 65: ... Holiday 2 9 Holiday 3 Note 00 00 is the earliest time possible and 23 59 is the latest time possible A single time zone cannot be made to span mid night through the use of extended commands we can simulate this For more information please seek the guidance of technical support Example 1 _L 5_10_08 00 17 00_1_2_3_4_5 CR This command would configure panel 5 to add a time zone entry to time zone num...

Page 66: ...anel 6 to add a card entry of 12345 to the panels database that will be valid on reader 1 2 3 and 4 during the times and days specified by time zone 10 Example 2 _C 18_52989_120_1_3 CR This command would configure panel 18 to add a card entry of 52989 to the panels database that will be valid on reader 1 and 3 during the times and days specified by time zone 120 A 3 5 C Card Delete Command _C pn_c...

Page 67: ...n NC Non supervised normally closed default Example _W 1_9_SO CR Input 9 has been programmed as supervised normally open on panel 1 A 3 7 P Interlock Command _P pn_I O_ number _I O number _ D E F N P _ D E F N P CR Parameters number for an input number the range is 1 96 for output 0 78 D De energize E Energize F Follow N No action P Pulse Example _P 1_I_5_O_3_E_D When Input 5 is triggered Output 3...

Page 68: ...nable Use this command only for a dropline panel using RS 232 in standalone mode _U panel name _ D E Parameters D Disable E Enable Example _U 30_D This disables the flow control on panel 30 and prevents the panel s buffers from filling After a hard re set of the panel the flow control is re enabled ...

Page 69: ...the default reader port to relay associations A 4 2 Reader LED Outputs The Reader LED output defaults to toggle the card reader LED from Red to Green for two seconds when a valid card is presented No LED color change other then a possible momentary change depending on reader used occurs if the card is not in the database The following are the default reader LED port to output associations Reader N...

Page 70: ...s A 4 4 Door Egress Inputs The panel has a Request To Exit Egress input for each door The default condition is a two state input configured as Normally Closed contact When the egress input is active the associated output relay will be active The following are the default egress input associations Tamper LED Reports as Tamper 1 Input 9 Tamper 2 Input 10 Tamper 3 Input 11 Tamper 4 Input 12 Egress in...

Page 71: ... Tamper inputs The default condition is a two state input configured as Normally Closed Input 14 is a special case since it reports in as two inputs inputs 14 and 20 Input 14 can be used as a generic input but input 20 is used for the Enclosure Tamper alarm An active External Power Fail input indicates that the system is operating from the battery current not from the primary input power An inacti...

Page 72: ...ration NetAXS Panel Defaults A 4 7 Additional Generic Outputs The panel has the following four additional generic form C relay outputs that can be programmed using the P command Relay output Controls 5 Output 5 6 Output 6 7 Output 7 8 Output 8 ...

Page 73: ...ems 135 W Forest Hill Avenue Oak Creek WI 53154 United States 800 323 4576 414 766 1798 Fax www honeywellaccess com Specifications subject to change without notice Honeywell All rights reserved Document 800 00008 Revision A ...

Reviews: