R7195A,B MOTOR POSITIONER
3
63-2582
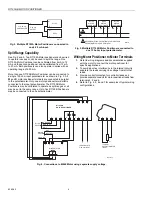
Fig. 1. R7195A,B Motor Positioner approximate dimensions in in. (mm).
INSTALLATION
When Installing this Product…
1.
Read these instructions carefully. Failure to follow them
could damage the product or cause a hazardous
condition.
2.
Check the ratings given in the instructions and on the
product to make sure the product is suitable for your
application.
3.
The installer must be a trained, experienced technician.
4.
After installation is complete, check out product
operation as provided in these instructions.
WARNING
Electrical Shock Hazard.
Can cause serious injury or death.
Disconnect power supply before beginning installation.
More than one disconnect may be needed.
Equipment Required
To install the R7195A,B Motor Positioner, you will need:
1.
Electric drill.
2.
Drill bits (No. 23, No. 37).
3.
Four No. 6 machine screws or four No. 6 self-tapping
screws.
4.
Standard screwdriver.
5.
Small adjustable wrench.
6.
Center punch and hammer.
Procedure
Refer to Fig. 1 and layout of the centers of the mounting hole
locations on the mounting surface.
1.
Use a center punch and hammer to mark the locations
for drilling.
2.
Depending on the characteristics of the mounting
surface, drill clearance holes (No. 23 bit) for No. 6
machine screws or starting holes (No. 37 bit) for No. 6
self-tapping screws.
3.
Place the positioner on the surface so that the mounting
holes are aligned with those drilled in the surface and
secure with the machine screws and nuts or self-tapping
screws, as applicable.
4.
Install separate conduit for controller leads and
operating voltage leads.
WIRING
General
All wiring must comply with all applicable local electrical
codes, regulations and ordinances. When wiring more than
one motor positioner to a controller, make sure that the total
impedance of positioners and wiring is less than the output
impedance of the controller.For example, the R7355
DialTrol™ Controller can be wired to a maximum of eight
R7195A Motor Positioners. The R7355 Controller is capable
of driving a load of up to 650 ohms. See Fig. 2.
3-3/4 (95)
6-9/16
(167)
3/4 (14) NPSM (2)
7-3/8
(187)
3-1/2 (89)
3/16 (5)
M20786
4-29/32 (124)
7-25/32
(198)
Summary of Contents for R7195A
Page 11: ...11 63 2582 ...


