46
SWIFT® Smart Wireless Integrated Fire Technology Manual —
P/N LS10036-000SK-E:G 4/13/2020
Appendix B: Site Survey
A site survey is recommended to assess and qualify the site prior to installing a SWIFT network. The site survey consists of a link quality
test and RF scan test. After both tests are completed, the results of the site survey can be obtained using SWIFT Tools. The information
provided by SWIFT Tools is used for site qualification, maximum device spacing identification, and configuring the network. This helps
to improve the reliability and performance of the wireless network in the wireless fire alarm system.
B.1 Conduct a Site Survey
B.1.1 Link Quality Test
A link quality test is a quick and repeatable test that provides immediate feedback on device connectivity. The link quality test sends data
from one device to another to test for data loss and measure the signal strength. In a link test, the device addresses are set in the range of
001 to 150. A minimum of two devices are needed to conduct a link quality test.
A link test is conducted between two or more devices. The link test starts when a device that is in the “pending site survey” state has its
tamper condition cleared. The device will send a burst of data to the next address lower than its own address. The lower addressed device
will automatically return the link quality test results for display using the device LEDs. For example, clearing the tamper condition on a
detector set to address 2 (D002) will make the detector enter the link quality test. D002 will send a burst of data to a device at address
001 (either detector or module). The device at address 001 will measure the signal strength and count the data received in the burst and
return the information to D002. The results of the test will be displayed at D002. The test can be repeated by tampering D002 to return it
to the “pending site survey” mode and then clearing the tamper.
Basic Requirements of a Link Quality Test
To conduct a link test:
two or more devices (detectors) are required.
devices must be in factory default state.
The LEDs on the device will blink single or double red to confirm it is in the factory
default state. Refer to Section 3.5.3 on page 33 for more information on setting the device to factory default state.
device addresses can bet set in the range of 1 to 150.
Conduct a Link Quality Test
To conduct a link quality test:
1.
Remove the batteries from the devices that will be used for the site survey and set the SLC address. To set an SLC address, use a
flathead screwdriver to adjust the rotary switches on the device.
1.
For the first device used in a site survey, set the SLC address to 001.
2.
For each subsequent device, use the next highest SLC address (up to address 150). For example, the first device was set to 001,
set the second device to 002, and the third device to 003, etc.
2.
Bring the first device (001) to the first location to conduct the test.
3.
Insert
one
battery into the device. Inserting more than one battery deters the device from entering the site survey mode. The device
is ready for site survey mode if the LED blinks yellow every 5 seconds.
4.
Clear the tamper condition to proceed with the test. To clear the tamper condition on a detector, insert the detector into the base and
twist to lock the detector completely into the base. To clear the tamper condition on a module, attach the faceplate to the module.
When the tamper is cleared, the LEDs on the device starts blinking yellow every ½ second for approximately 20 seconds. The
results appear in approximately 20 seconds and the LEDs on the first device change to solid red. This is due to the absence of a
lower-addressed device with which to form a pair. This result is expected from the 1st device when a link quality test is performed.
5.
Bring the second device (002) to the second location and insert
one
battery into the device. The device is ready for site survey mode
if the LED blinks yellow every 5 seconds.
6.
Clear the tamper condition to proceed with the test. To clear the tamper condition on a detector, insert the detector into the base and
twist to lock the detector completely into the base. To clear the tamper condition on a module, attach the faceplate to the module.
When the tamper is cleared, the LEDs on the device starts blinking yellow every 1/2 second for approximately 20 seconds. The
results appear in approximately 20 seconds.
7.
Repeat for subsequence devices.
8.
The device will conduct a link test to the next lowest address; in this case device 001. The result of the link test from 002 to 001 is
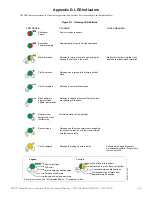
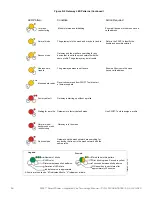
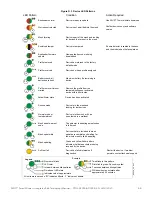
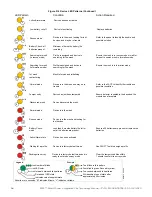
displayed by the LEDs on device 002. Refer to Table B.1 below.
9.
Once the link test is complete between 002 and 001, continue for address 003, 004, etc. for all devices that will be used in the site
survey. This test may be repeated any number of times. For devices addressed to 101 or higher, the test must be repeated, if desired,
within five minutes of the last concluded test or the devices will start an RF scan test.


