background image

CT87N/CT87K • Owner's Manual

69-1959EFS—02 

2

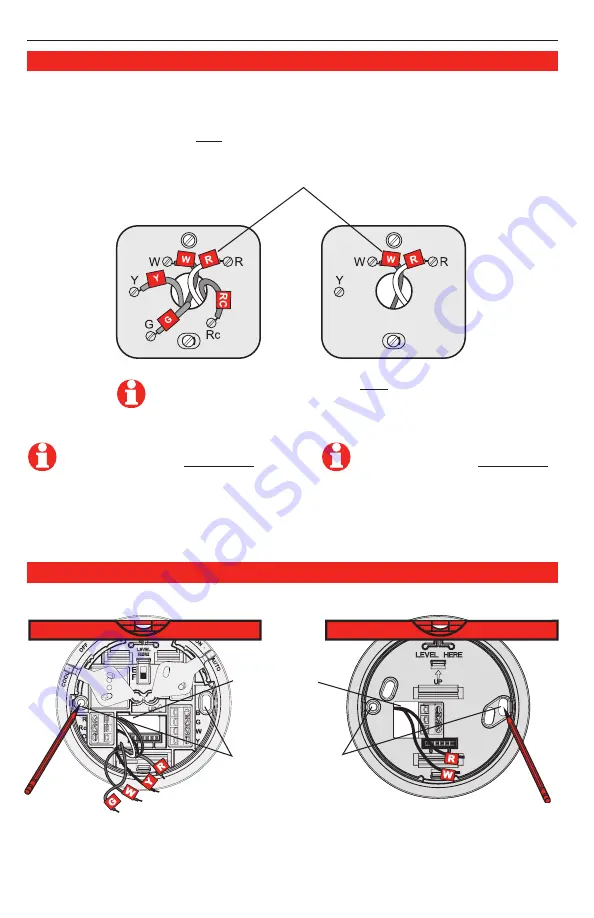
Wrap supplied labels securely around each wire.  

Do not

 let wires fall into wall opening!

IGNORE WIRE COLORS:

 Use only letter designations 

to identify wire types.

For 

CT87N

: If your old thermostat 

has 7 or more wires (

not counting 

terminals 

C

 or 

C1

), you may have 

purchased the wrong replacement 

thermostat. Stop now and call 

1-800-468-1502 for advice.

CT87N

1.  Pull wires 

through base.

2.  Level base if 

desired.

3.  Mark positions 

of both screw 

holes.

R

W

Y

CT87K

For 

CT87K

: If your old thermostat 

has 4 or more wires (

not counting 

terminals 

C

 or 

C1

), you may have 

purchased the wrong replacement 

thermostat. Stop now and call 

1-800-468-1502 for advice.

Use a screwdriver to disconnect wires one by one. As you disconnect each wire, wrap it with 

the label matching the letter on your old thermostat. (Adhesive labels are supplied in your 

thermostat package.)

Remove the old wallplate only after all wires are labeled. Be careful not to let loose wires fall 

into the wall opening.

Label wires and remove old wallplate

Mark mounting position

CT87N

CT87K

Summary of Contents for The Round CT87K

Page 1: ...contact your local waste management authority for proper disposal instructions Is there a sealed tube containing mercury If so see mercury notice below Leave wallplate in place Old thermostat Cover Check package contents Thermostat Coverplate Wall anchors screws 2 each Wire labels Before you begin make sure you have No 2 Phillips small pocket screwdrivers Hammer Level optional Pencil Drill and bit...

Page 2: ...f desired 3 Mark positions of both screw holes R W Y CT87K For CT87K If your old thermostat has 4 or more wires not counting terminals C or C1 you may have purchased the wrong replacement thermostat Stop now and call 1 800 468 1502 for advice Use a screwdriver to disconnect wires one by one As you disconnect each wire wrap it with the label matching the letter on your old thermostat Adhesive label...

Page 3: ...ions 3 16 for drywall 7 32 for plaster 2 Use hammer to tap anchors into holes until flush with wall 3 Optional Pull wires through cover plate if needed to cover marks left by the old thermostat 4 Pull wires through thermostat base position over anchors then insert mounting screws Check level if desired then tighten screws Mount thermostat base 1 Match each labeled wire with same letter on the term...

Page 4: ...n in a call for heat E Change the switch to this setting for heat pump or electric heat systems This setting is for systems that allow the thermostat to control the fan in a call for heat if a fan wire is connected to the G terminal E F Set fan operation switch CT87N Finish installation Base Heating System Switch 1 Switch 2 Steam or gravity On On High efficiency warm air Off On 90 plus efficiency ...

Page 5: ... costs This warranty shall not apply if it is shown by Honeywell that the defect or malfunction was caused by damage which occurred while the product was in the possession of a consumer Honeywell s sole responsibility shall be to repair or replace the product within the terms stated above HONEYWELL SHALL NOT BE LIABLE FOR ANY LOSS OR DAMAGE OF ANY KIND INCLUDING ANY INCIDENTAL OR CONSEQUENTIAL DAM...

Page 6: ...place Le thermostat comporte t il un tube scellé contenant du mercure Si c est le cas se reporter à l avis concernant le mercure ci dessous Couvercle 1 MISE EN GARDE Couper l alimentation du système à l appareil de chauffage ou au panneau de disjoncteurs ou de fusibles avant de commencer 2 Retirer le boîtier et le thermostat Laisser la plaque murale et les fils qui y sont fixés Retrait de l ancien...

Page 7: ...e qu après avoir étiqueté tous les fils Veiller à ne pas laisser des fils détachés tomber dans l ouverture du mur CT87N CT87K NE PAS TENIR COMPTE DE LA COULEUR DES FILS Tenir compte seulement de la lettre qui identifie le type de fil CT87N Si l ancien thermostat a 7 fils ou plus sans compter C ou C1 le thermostat de rechange ne convient peu être pas à l application Arrêter l installation et demand...

Page 8: ...rder à la fois les bornes O et B à une pompe à chaleur Raccorder le fil O seulement Enrouler le bout du fil B de ruban isolant 3 Ne pas utiliser les fils C X ou B Enrouler les bouts de fil de ruban isolant CT87N Câblage CT87K Système de chauffage à 2 fils Raccorder un fil à la borne R un fil à la borne W Système de chauffage à eau chaude à 3 fils Raccorder les bornes R à R W à W et Y à Y R W Y CT8...

Page 9: ...ordé à la borne G E F Réglages du ventilateur CT87N Réglages du nombre de cycles Déplacer les interrupteurs de réglage du nombre de cycles en fonction de du système consulter le tableau ci dessous Système de chauffage 1 2 Vapeur ou gravité On On Système à air chaud à haut rendement Off On 90 d efficacité et plus eau chaude ou thermopompe Air chaud au gaz ou au mazout Off Off réglages de l usine Ai...

Page 10: ... ne permettent pas l exclusion ou la restriction des dommages indirects et par conséquent la présente restriction peut ne pas s appliquer LA PRÉSENTE GARANTIE TIENT LIEU DE TOUTES LES AUTRES GARANTIES EXPRESSES ACCORDÉES PAR HONEYWELL POUR CE PRODUIT LA DURÉE DE TOUTE GARANTIE TACITE Y COMPRIS LES GARANTIES DE VALEUR MARCHANDE ET DE CONFORMITÉ À UNE FIN PARTICULIÈRE SONT PAR LES PRÉSENTES LIMITÉES...

Page 11: ...e Uso Español Página 11 Termostato viejo Deje la placa de montaje en su lugar Existe algún tubo sellado que contenga mercurio Si es así consulte el aviso sobre mercurio que figura abajo Cubierta Remueva su viejo termostato 1 PRECAUCIóN APAGUE LA ENERGÍA del sistema en el calentador o en el panel de fusibles interruptor térmico del circuito antes de iniciar 2 Retire la cubierta y el termostato pero...

Page 12: ...a que los cables caigan en el hueco de la pared IGNORE LOS COLORES DE LOS CABLES Use sólo letras para identificar los tipos de cable Para el modelo CT87N Si su viejo termóstato tiene 7 o más cables no contando los terminales C o C1 usted pudo haber comprado el termóstato incorrecto del reemplazo Interrumpa la instalación y llame al 1 800 468 1502 para pedir consejo Repérez la position de montage C...

Page 13: ...lor Conecte solamente el cable de O Envuelva el cable de B con la cinta eléctrica 3 No utilice los cables de C de X o de B Envuelva el extremo de cables con la cinta eléctrica CT87N Cableado CT87K Sistema de calefacción de dos cables Conecte un cable con el terminal de R un cable al terminal de W Sistema de calefacción de tres cables de agua caliente Conecte los cables de R a de R de W a de W y de...

Page 14: ... con trolan el ventilador cuando hay demanda de calefacción E Cambie el interruptor a esta posición para los sistemas de calefacción eléctricos o de bombeo de calor Esta posición es para los sistemas que permiten que el termostato controle el ventilador cuando hay demanda de calefacción si hay conectado un cable del ventilador al terminal G Fije los interruptores de la tarifa del ciclo Fije los in...

Page 15: ...ÍA EXPRESA O IMPLÍCITA O DE NINGUNA OTRA FALLA DE ESTE PRODUCTO Algunos estados no admiten la exclusión o limitación de los daños incidentales o consecuen tes de manera que tal vez esta limitación no se aplique en su caso ÉSTA ES LA ÚNICA GARANTÍA EXPRESA DE HONEYWELL RESPECTO DE ESTE PRODUCTO LA DURACIÓN DE LAS GARANTÍAS IMPLÍCITAS INCLUSO LA DE COMERCIABILIDAD Y DE APTITUD PARA UN USO PARTICULAR...

Page 16: ...g at least 10 post consumer paper fibers Need Help For assistance with this product please visit http yourhome honeywell com or call Honeywell Customer Care toll free at 1 800 468 1502 Besoin d aide Pour obtenir de l aide et apprendre à faire fonctionner votre produit Honeywell veuillez consulter le site Web http yourhome honeywell com ou vous adresser aux Services à la clientèle de Honeywell en c...

Reviews: