background image

69-0896—1

4

C7089 OUTDOOR SENSOR

Home and Building Control
Honeywell Limited-Honeywell Limitée
740 Ellesmere Road
Scarborough, Ontario
M1P 2V9

69-0896—1 J.H.  Rev. 6-95  Printed in Mexico

CHECKOUT

Allow the C7089 Outdoor Sensor to soak in the outdoor air
for a minimum of five minutes before taking a reading.

With an accurate thermometer (

±

1

°

F [0.5

°

C]), measure the

temperature at the sensor location, allowing time for the
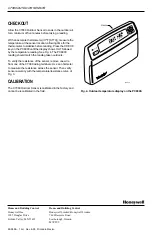
thermometer to stabilize before reading. Press the CHECK
key on the PC8900 until the display shows OUT followed
by the temperature reading. See Fig. 4. The PC8900
reading should match the reading taken outdoors.

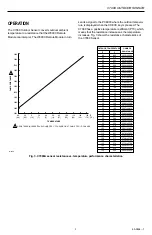
To verify the resistance of the sensor, remove one wire
from one of the C7089 wiring terminals. Use an ohmmeter
to measure the resistance across the sensor. Then verify
sensor accuracy with the temperature/resistance curve of
Fig. 3.

CALIBRATION

The C7089 Outdoor Sensor is calibrated in the factory and
cannot be recalibrated in the field.

CHECK

SYSTEM

PC8900

M7515

Fig. 4. Outdoor temperature display on the PC8900.

Home and Building Control
Honeywell Inc.
1985 Douglas Drive
Golden Valley, MN 55422

Summary of Contents for Tradeline C7089A

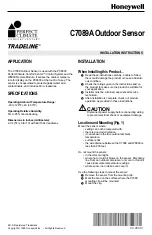
Page 1: ...in the instructions and on the product to make sure the product is suitable for your application 3 Installer must be a trained experienced service technician 4 After installation is complete check out product operation as provided in these instructions CAUTION Disconnect power supply before connecting wiring to prevent electrical shock or equipment damage Location and Mounting Fig 1 Mount the sens...

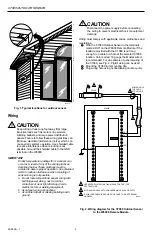
Page 2: ...t dimming circuits electric motors or welding equipment b Avoid poor wiring connections c Avoid intermittent or missing building earth ground CAUTION Disconnect the power supply before connecting the wiring to prevent electrical shock or equipment damage Wiring must comply with applicable codes ordinances and regulations 1 Wire the C7089 Outdoor Sensor to the terminals marked OUT on the W8900 Remo...

Page 3: ...5 30 25 20 15 10 5 0 5 10 15 20 25 30 35 40 45 50 55 60 65 70 75 80 85 90 95 100 105 110 115 120 120 130 135 140 145 150 40 0 37 2 34 4 31 7 28 9 26 1 23 3 20 6 17 8 15 0 12 2 9 4 6 7 3 9 1 1 1 7 4 4 7 2 10 0 12 8 15 6 18 3 21 1 23 9 26 7 29 4 32 2 35 0 37 8 40 6 43 3 46 1 48 9 51 7 54 4 57 2 60 0 62 8 65 6 2929 to 2905 2953 to 2929 2978 to 2953 3002 to 2978 3026 to 3002 3050 to 3026 3074 to 3050 ...

Page 4: ...ess the CHECK key on the PC8900 until the display shows OUT followed by the temperature reading See Fig 4 The PC8900 reading should match the reading taken outdoors To verify the resistance of the sensor remove one wire from one of the C7089 wiring terminals Use an ohmmeter to measure the resistance across the sensor Then verify sensor accuracy with the temperature resistance curve of Fig 3 CALIBR...

Reviews: