background image

21 

21 

atomic time signal from the NIST Atomic clock in Boulder, Colorado. 
The WWVB tower icon on the unit’s display will flash indicating a radio signal 
reception from the WWVB station. If the tower icon is not fully lit, or if the time 
and date are not set automatically, please consider the following:   


During night-time hours, atmospheric disturbances are typically less 
severe and radio signal reception may improve. A single daily reception 
is sufficient enough to keep the clock accuracy within 1 second. 


Make sure the unit is positioned at 8 feet (2 meters) distance from any 
interference source such as a TV, computer monitor, microwave, etc. 


Within concrete wall rooms such as basements or office buildings, the 
received signal may be weakened. Always place the Weather 
Forecaster near the window for better reception.   


ATOMIC CLOCK 

Immediately after establishing communication between the main unit and 
remote sensor, the atomic time signal receiver will open and start to search for 
the atomic time signal. The search usually takes between 5-8 minutes.   

NOTE

Do not press any buttons on the main unit during auto search


as it 

may


interrupt product’s operation, and you will need to start set up 

procedure again

Once the atomic time signal is received, the date and time will be set 
automatically, and the [ ] icon will appear. 

NOTE: It is necessary to set your Time Zone, having in mind that the 
default zone is a US Pacific Standard Time (PST). (

Refer to 

MANUAL 

SETTINGS

 section

If the time signal has not been received in 8 minutes, you may use the 

MODE


button to set the time and date manually. (Refer to the 

MANUAL SETTINGS


section). 

22 

After the clock is set manually, place the Weather Forecaster by the window for 
the better reception. The atomic clock receiver is programmed that it will 
continue to search for the atomic time signal daily for every hour between 1:00 
am and 4:30 am.   
Once the time signal has been successfully received, the time and date will be 
updated automatically. 


TIME AND CALENDAR DISPLAY MODES 

The Barometric Weather Forecaster displays current time in two display 
modes – in hour-minutes-seconds format and in hour-minutes-day. 
The date is displayed in month-date format. 
 

MANUAL SETTINGS 

NOTE

: Use buttons on the front 

It is necessary to set the desired US 

TIME ZONE

TIME ZONE 


Press 

MODE

 button 

once

 so that the

 Day of the Week 

abbreviation is 

displayed to the right of the time; for example: 

pm 2:37tu


Select the Time Zone by pressing and holding 

UP 

) button for 3 

seconds  


Keep holding 

UP

 ( 

) button until the desired US Time Zone (Pacific, 

Mountain, Central or Eastern) is highlighted on the display’s US map, 
located to the right of the time display and above the day of the week 


Release the 

UP

 ( 

) button. The Time Zone is set 

CLOCK 


Press and hold 

MODE 

button for 3 seconds: the year will flash. Press 

UP ( 

)

 or 

DOWN ( 

)

 to change flashing digits. 


After the year is set, press 

MODE 

button


to confirm and move to the 

Summary of Contents for TS33C

Page 1: ...SURE MODE 15 REMOTE AND INDOOR TEMPERATURE HUMIDITY 16 AUTO SCANNING 17 PROGRAMMABLE TEMPERATURE ALARM 17 COMFORT LEVEL INDICATORS 18 MAXIMUM AND MINIMUM READINGS 19 LOST COMMUNICATION 19 TRANSMISSION COLLISION 20 WWVB RADIO CONTROLLED TIME 20 ATOMIC CLOCK 21 TIME AND CALENDAR DISPLAY MODES 22 MANUAL SETTINGS 22 CLOCK ALARMS 23 SNOOZE 24 BACKLIGHT 25 TROUBLESHOOTING 25 PRECAUTIONS 26 SPECIFICATION...

Page 2: ...nstall batteries in the remote sensor before the main unit Insert batteries before first use matching the polarity in the battery compartment Remove protective plastic screen from LCD display if any During an initial setup place the remote sensor close to the main unit After reception is established all remote readings will appear on the main unit s display position the remote sensor and the main ...

Page 3: ...s the temperature display in Fahrenheit or Celsius NOTE Install the batteries select the channel and temperature in C or F before mounting the sensor BATTERY INSTALLATION Remove the screws from the battery compartment with a small Phillips screwdriver Set the channel 1 through 3 The switch is located in the battery compartment Channel 1 is typically selected if only one remote sensor is being used...

Page 4: ...d all remote sensors It should be placed indoors FEATURES Time Time automatically sets to the US Atomic Clock 12 or 24 hour time format Manual adjustment of time and date Day of the week displayed in English Spanish French German and Italian Moon Phase calendar Dual crescendo alarms with programmable snooze Programmable Ice Warning Alarm 8 Weather Weather forecast for the next 12 to 24 hour in fiv...

Page 5: ... into the alarm programming mode for a selected parameter E TEMP ALARM button Allows toggling between high low limits for temperature alarm and current outdoor temperature reading Activates a high low temperature alarm programming mode F UP button Increases the parameters When depressed and held activates manual search for atomic time signal Enables or disables time alarms W and S and Ice Warning ...

Page 6: ...move the table stand from the unit PLACEMENT Make sure that the main unit is locating within the operating range of the remote sensor Ideally the remote sensor should be mounted within the line of sight of the main unit Transmission range may be affected by trees metal structures and electronic appliances Test reception before permanently mounting the remote sensor Avoid placing the main unit in t...

Page 7: ...cal altitude units and value To set the pressure altitude units and program your altitude use the main unit buttons located on the back Press UP or DOWN button on the back of the unit selecting the pressure in inHg or hPa mBar Press UNIT button to confirm and move to the altitude unit selection mode Press UP or DOWN button selecting the altitude unit in feet or meters Press UNIT button to confirm ...
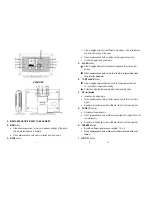
Page 8: ...either button for the quick digits advance Press PRESSURE ALTITUDE button to confirm selection REMOTE AND INDOOR TEMPERATURE HUMIDITY After batteries are installed remote sensor will transmit temperature and humidity data at 45 second intervals The main unit may take up to two minutes to receive the initial readings Upon successful reception remote temperature and humidity will appear next to the ...

Page 9: ...ls Press the TEMP ALARM button once to enter into the High Temperature Alarm programming mode the abbreviation OF with the high temperature limit symbol will be displayed on the remote temperature line Press and hold TEMP ALARM button until the abbreviation OF will 18 flash Use UP or DOWN T arrow buttons to adjust the higher temperature limit Press the TEMP ALARM button to confirm the selected val...

Page 10: ...e sensor with small Phillips screwdriver and open the battery compartment Remove the batteries from the battery compartment and reinstall them in the same manner Remote sensor LED indicator will flash showing transmission of the signal Remove the batteries from the main unit and reinstall them in the same manner On the main unit select the same channel number using CHANNEL button as set on the rem...

Page 11: ...Time Zone having in mind that the default zone is a US Pacific Standard Time PST Refer to MANUAL SETTINGS section If the time signal has not been received in 8 minutes you may use the MODE button to set the time and date manually Refer to the MANUAL SETTINGS section 22 After the clock is set manually place the Weather Forecaster by the window for the better reception The atomic clock receiver is p...

Page 12: ...een set previously Press and hold ALARM button for two seconds The hour digit will flash Adjust the hour using UP or DOWN buttons 24 Press ALARM button again The minute digits will flash Adjust the minutes using UP or DOWN buttons Press ALARM button again to confirm and the weekday alarm time will be set Set Single S day alarm if desired in the same manner SETTING THE ICE WARNING ALARM PRE AL If W...

Page 13: ...ch Press and hold DOWN button on the main unit 26 PRECAUTIONS This product is engineered to give you years of satisfactory service if handled carefully Here are a few precautions Do not immerse the units in water Do not clean the units with abrasive or corrosive materials They may scratch the plastic parts and corrode the electronic circuits Do not subject the product to excessive force shock dust...

Page 14: ...e harmful interference and 2 This device must accept any interference received including interference that may cause undesired operation Warning Changes or modification to this unit not expressly approved by the party responsible for compliance could void the user s authority to operate the equipment NOTE This equipment had been tested and found to comply with the limits for a Class B Digital devi...

Page 15: ... abuse commercial use or unauthorized adjustment and repair Note that online product registration is required to ensure valid warranty protection To register your product go to our Company website at www honeywellweatherstations com Click Online Product Registration under the Customer Service menu Should you require assistance with this product and its operation please contact our Customer Service...

Reviews: