PLUMBING
Refer to the VC Series Cartridge Valve Installation and Instruction
sheet, form number 95C-10919, for plumbing instructions.
!
IMPORTANT:
For trouble-free operation of the product, good installation
practice must include initial system flushing, chemical
water treatment, and the use of a 50 micron (or finer)
system side stream filter(s). Remove all filters before
flushing.
Put the VC actuator manual lever in the manual open or the
fully open (down) position to allow initial system flushing with
the actuator mounted. This may be done without electrical
hook-up. Alternatively, reusable flush caps, part # 272866B,
may be purchased separately for use in initial flushing of dirty
hydronic systems.
Do not use boiler additives, solder flux and wetted
materials which are
petroleum based or contain mineral
oil, hydrocarbons, or ethylene glycol acetate. Compounds
which can be used, with minimum 50% water dilution, are
diethylene glycol, ethylene glycol, and propylene glycol
(antifreeze solutions).
TO INSTALL ACTUATOR
Installation of the actuator does not require draining the system,
provided the valve body and valve cartridge assembly remain in the
pipeline. Wiring may be done either before or after the actuator is
installed.
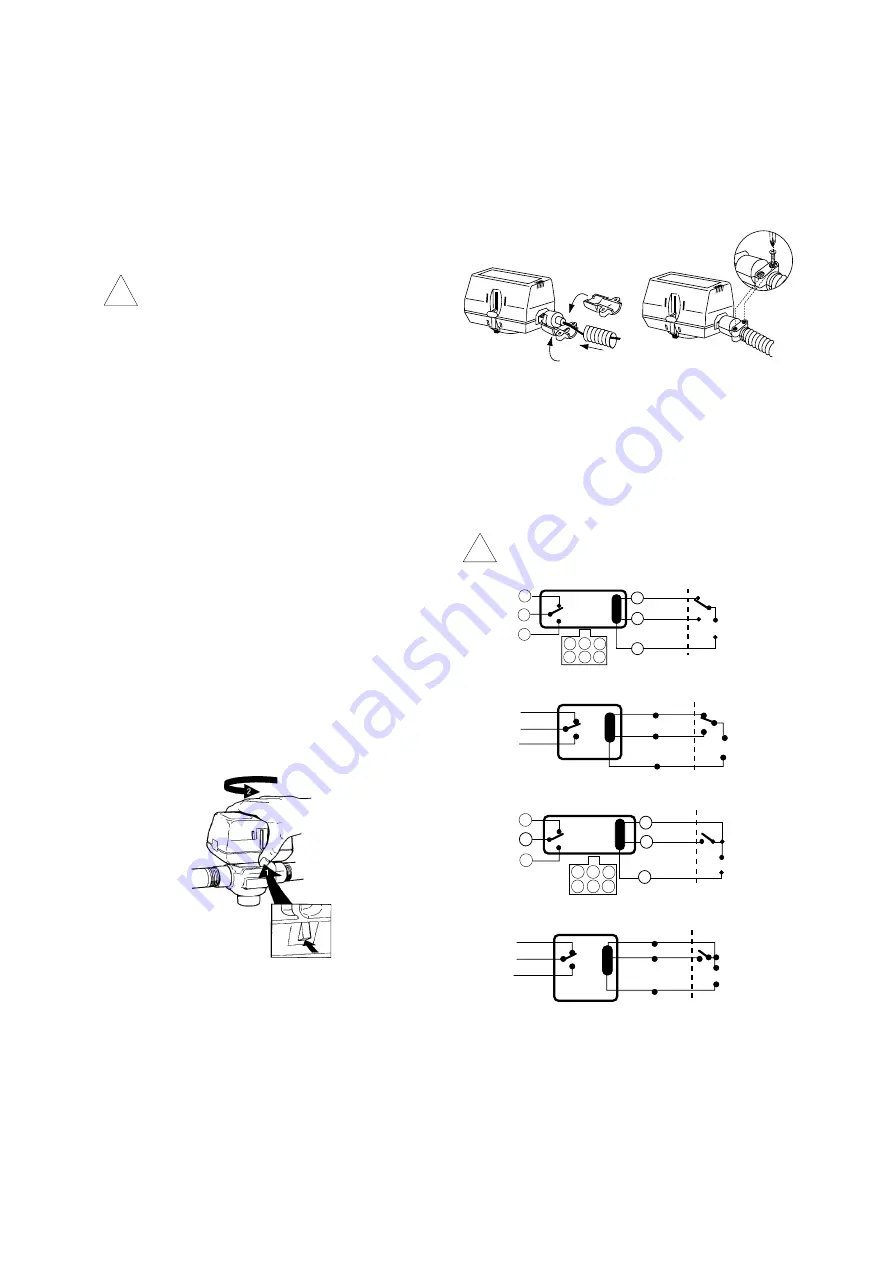
1. The actuator head is automatically latched to the valve. Align the
coupling hole in the bottom of the actuator with the valve stem.
Press the actuator down towards the body with moderate hand force
and turn the actuator counter-clockwise by 1/8 turn (45 degrees) to
line up the actuator with the piping. The latch will click when
engaged. See Figure 2.
NOTE:
The actuator can also be installed at right angles to the valve
body but in this position the latch mechanism will not engage.
2. Connect leadwires. See Figure 3 for flexible conduit installation
with plenum-cable models.
Figure 2 - Latch Mechanism to detach Actuator
4
1
2
3
3/8" flex
conduit
Figure 3 - Flexible Conduit Attachment
WIRING
NOTE: Each 3-wire (SPDT) actuator must have individual spdt
controller. Use series 40 or 80 for single controller to control
multiple valves.
Figures 4, 5, 6 and 7 show wiring connections. Port "A"
open and
closed denote valve open and closed positions respectively. On
auxiliary switch models, terminal 4 (grey wire) contact makes at the
end of the Port A opening stroke. On Molex connector models, valve
& auxiliary switch boltage must be the same to meet approval
requirement. For mixed line voltage and 24 VAC (Safety Extra Low
Voltage) application, the cable version is recommended.
!
CAUTION:
Disconnect power supply before connecting wiring to prevent
electrical shock and equipment damage.
5
Port "A"
4
1
*
AUX.SW.
3 2 1
3
Closed
Open
6
2
(3 WIRE)
*
Valve
5 4
6
MODELS
L
~
N
Figure 4 - Wire configuration for MOLEX™ models for
SPDT controller. (Series 20 & 60).
WHITE
BLUE
BLACK
BROWN
*
Open
Closed
Port "A"
Valve
ORANGE
L
GREY
~
(3 WIRE)
N
*
AUX.SW.
MODELS
Figure 5 - Wiring color code for cable models for SPDT
controller. ( Series 20 & 60 )
Port "A"
Closed
Open
L
~
N
*
AUX.SW.
MODELS
1
( 2 WIRE +
COMMON)
*
Valve
5
3
1
2
4
6
2
5
4
6
3
Figure 6 - Wire configuration for MOLEX™ models for SPST
controller. (Series 40 & 80)
BLACK
BROWN
*
Closed
Open
Port "A"
WHITE
Valve
ORANGE
L
GREY
~
( 2 WIRE +
N
*
AUX.SW.
COMMON)
BLUE
MODELS
Figure 7 - Wiring color code for cable models for SPST
controller. ( Series 40 & 80)
3


