background image

69-0624—2

6

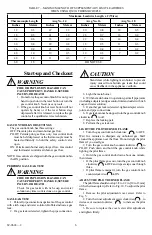
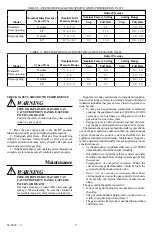
TABLE 7—MAXIMUM LENGTH OF SUPPLEMENTARY LIMIT LEADWIRES

WHEN USING Q309A THERMOCOUPLE.

Maximum Leadwire Length x 2 (Wires)

Thermocouple Length

Awg No. 14

Awg No. 16

Awg No. 18

Inches  

Meters

Inches  

Meters

Inches  

Meters

Inches  

Meters

12

0.3

47

1.2

30

0.8

18

0.5

18

0.5

41

1.0

26

0.7

16

0.4

24

0.6

35

0.9

22

0.6

14

0.4

30

0.8

29

0.8

18

0.5

11

0.3

36

0.9

23

0.6

15

0.4

9

0.2

40

1.0

19

0.5

12

0.3

7

0.2

48

1.2

11

0.3

7

0.2

60

1.5

DO NOT USE.

Start-up and Checkout

WARNING

FIRE OR EXPLOSION HAZARD CAN
CAUSE PROPERTY DAMAGE, SEVERE
INJURY, OR DEATH
1. Do not force the gas control knob. Use only your

hand to push down the reset button or turn the
gas control knob. Never use any tools.

2. If the gas control knob or reset button will not

operate by hand, or if the reset button stays
depressed after it is released, to replace the gas
control call a qualified service technician.

GAS CONTROL KNOB SETTINGS

The gas control knob has three settings:
OFF: Prevents pilot and main burner gas flow.
PILOT: Permits pilot gas flow only. Gas control knob

must be held depressed or the thermocouple must be
heated sufficiently to hold the safety control valve
open.

ON: Permits main burner and pilot gas flow. Gas control

and thermostat control main burner gas flow.

NOTE: Gas controls are shipped with the gas control knob in

the ON position.

PERFORM GAS LEAK TEST

WARNING

FIRE OR EXPLOSION HAZARD CAN
CAUSE PROPERTY DAMAGE, SEVERE
INJURY, OR DEATH
Check for gas leaks with rich soap and water
solution any time work is done on a gas control.

GAS LEAK TEST

1. Paint all pipe connections upstream of the gas control

with a rich soap and water solution. Bubbles indicate a gas
leak.

2. If a gas leak is detected, tighten the pipe connection.

CAUTION

Stand clear while lighting main burner to prevent
injury caused from hidden gas leaks that could
cause flashback in the appliance vestibule.

3. Light the main burner.
4. With the main burner in operation, paint all pipe joints

(including adapters) and gas control inlet and outlet with rich
soap and water solution.

5. If another gas leak is detected, tighten adapter screws,

joints, and pipe connections.

6. If gas leak cannot be stopped, turn the gas control knob

clockwise           to off.

7. Replace the leaking part.
8. Perform the gas leak test.

LIGHT THE PILOT BURNER FLAME

1. Turn the gas control knob clockwise               to OFF.

Wait  five minutes to dissipate any unburned gas. Sniff
around the appliance near the floor. Do not relight the pilot
flame if you smell gas.

2. Turn the gas control knob counterclockwise          to

PILOT. Push down and hold the gas control knob while
lighting the pilot flame.

3. Hold the gas control knob down about one minute,

then release.

• If the pilot flame goes out, turn the gas control knob

clockwise          to OFF and repeat steps one through
three.

• If pilot flame remains lit, turn the gas control knob

counterclockwise          to ON.

ADJUST THE PILOT BURNER FLAME

The pilot flame should envelop 3/8 to 1 /2 in. [10 to 13 mm]

of the thermocouple tip. Refer to Fig. 10. To adjust the pilot
flame:

1. Remove the pilot adjustment cover screw. Refer to

Fig. 5.

2. Turn the inner adjustment screw clockwise            , to

decrease or counterclockwise              to increase the pilot
flame.

3. Be sure to replace the cover screw after adjustment

and tighten firmly.

Summary of Contents for VR8300

Page 1: ... cu m hr 290 cu ft hr 8 2 cu m hr 3 4 x 3 4 200 cu ft hr 5 7 cu m hr 30 cu ft hr 0 8 cu m hr 300 cu ft hr 8 5 cu m hr a Capacity based on 1000 Btu cu ft 0 64 specific gravity natural gas at 1 in wc pressure drop 37 3 MJ cu m 0 64 specific gravity natural gas at 0 25 kPa pressure drop Model Number Ambient Temperature Range Regulator Type VR8300A 0 F to 175 F 18 C to 79 C Standard opening VR8300C 0 ...

Page 2: ...use a gas control set for natural gas on LP gas or a gas control set for LP gas on natural gas ToconvertagascontrolfromnaturalgastoLPgasorfrom LP gas to natural gas contact your Honeywell representative Standard orslow openinggascontrolsareconvertedfrom one gas to another with a conversion kit ordered separately Order part number 393691 to convert from natural to LP gas Order part number 394588 to...

Page 3: ...ontrol 0 90 degrees in any direction from the upright position of the gas control knob 2 Mount the gas control so gas flow is in the direction of the arrow on the bottom of the gas control 3 ThreadpipetheamountshowninTable5forinsertion into gas control IMPORTANT Donotthreadpipetoofar Valvedistortion or malfunction may result if the pipe is inserted too deeply into the gas control Refer to Fig 3 TA...

Page 4: ...INLET PRESSURE TAP PRESSURE REGULATOR ADJUSTMENT UNDER CAP SCREW PILOT OUTLET PILOT ADJUSTMENT UNDER CAP SCREW GAS CONTROL KNOB RED RESET BUTTON M1639C GAS CONTROL TIGHTEN NUT ONE TURN BEYOND FINGER TIGHT FITTING BREAKS OFF AND CLINCHES TUBING AS NUT IS TIGHTENED TO BURNER M3076A provided on the gas control Never use the old compres sion fitting because it may not provide a gas tight seal 4 Push t...

Page 5: ...NCE TERMINALS TH TR TH TR VR8300 TERMINALS HIGH LIMIT CONTROLLER POWER SUPPLY PROVIDE DISCONNECT MEANS AND OVERLOAD PROTECTION AS REQUIRED DO NOT JUMPER THESE TERMINALS THIS SHORTS VALVE COIL AND MAY BURN OUT ANTICIPATOR IN THERMOSTAT CONVENIENCE TERMINALS SERVE AS A TIE POINT ONLY THEY ARE NOT INTERNALLY WIRED TO THE CONTROL CIRCUIT OR TO GROUND OPTIONAL HIGH LIMIT 1 2 3 4 2 3 4 M8581 Fig 9 VR830...

Page 6: ...n a gas control GAS LEAK TEST 1 Paint all pipe connections upstream of the gas control with a rich soap and water solution Bubbles indicate a gas leak 2 If a gas leak is detected tighten the pipe connection CAUTION Stand clear while lighting main burner to prevent injury caused from hidden gas leaks that could cause flashback in the appliance vestibule 3 Light the main burner 4 With the main burne...

Page 7: ...Using a screwdriver turn the inner adjustment screw clockwise to increase or counterclockwise to decrease the main burner gas pressure c Always replace the cap screw and tighten firmly to be sure of proper operation 4 If the desired outlet gas pressure or gas flow rate cannot be achieved by adjusting the gas control check the gas control inlet pressure using a manometer at the inlet pressure tap I...

Page 8: ...l system The maintenance program should include regular check out of the gas control as outlined in Start up and Checkout section checkout the control system as described in the appliance manufacturers literature Maintenance frequency must be determined individually for each application Some considerations are Cyclingfrequency Appliancesthatmay cycle100 000 times annually should be checked monthly...

Page 9: ...ostat several degrees above room temperature 3 Use an ac voltmeter to measure the voltage across terminals TH and TR or MV PV and MV If a No voltage is present check the control circuit for proper operation b 24 Vac is present but first operator did not click open check for excessive inlet gas pressure If inlet gas pressure is correct replace the gas control 4 Measure the open and closed thermocou...

Page 10: ...gas continue with the next step 6 Remove the pilot burner access panel located below and behind the gas control 7 Find the pilot burner by following the metal tube from the gas control The pilot burner is located between the two burner tubes behind the pilot burner access panel 8 Turn the gas control knob counterclockwise to PILOT 9 Push and hold the gas control knob all the way in Immediately lig...

Reviews: