background image


USER MANUAL


HN-BP6025XES


1080P AHD/CVI/TVI/1200TVL 


2.7-13.5mm 5x Optical Motorized 

Zoom Auto Focus Camera


Summary of Contents for HN-BP6025XES

Page 1: ...USER MANUAL HN BP6025XES 1080P AHD CVI TVI 1200TVL 2 7 13 5mm 5x Optical Motorized Zoom Auto Focus Camera ...

Page 2: ...format that your DVR support in 10 seconds if your DVR do not support default 1080P TVI mode After 10 seconds it will be locked You need power off and power on the camera again IF no image or the image in black white please power off and then power on the camera again to switch to corresponding video format 4 1080P HD modes TVI AHD CVI DO NOT compatible with 720P or 960P DVR 5 At least DC 12V 2A p...

Page 3: ...tor via DVR UTC menu 9 If there is no yellow indicator at OSD menu at night on 1080P TVI mode please OSD menu System TV system TV format B W Burst off change it to Burst on then the yellow indicator will show change it to Burst off again if there is any problem of the image or any compatibility issue of your DVR occur 10 Make a security system work well a DVR should support the one of the four vid...

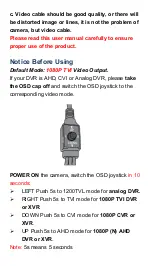
Page 4: ...lt Mode 1080P TVI Video Output If your DVR is AHD CVI or Analog DVR please take the OSD cap off and switch the OSD joystick to the corresponding video mode POWER ON the camera switch the OSD joystick in 10 seconds LEFT Push 5s to 1200TVL mode for analog DVR RIGHT Push 5s to TVI mode for 1080P TVI DVR or XVR DOWN Push 5s to CVI mode for 1080P CVR or XVR UP Push 5s to AHD mode for 1080P N AHD DVR or...

Page 5: ...e Make sure the equipment is clean and no connectors are broken damaged or loose If equipment appears to be damaged or defective please contact us for assistance 3 Special Attention i The installer must comply with electrical safety standards There must be sufficient space between the camera s power supply and video line and any high voltage equipment and or cables ii To help ensure the camera s l...

Page 6: ...nt voltage polarity and operating temperature must match requirement of this equipment vii Only qualified installers are allowed to install test and disassemble the camera viii The camera is a low voltage product If installed outdoors proper safety and lightening grounding are required 4 Wiring Connections i Connect the power supply s DC plug to the camera s power outlet ii Connect the camera to t...

Page 7: ...Note Before connecting the power supply please check its output voltage 12V 2A 5A required 5 How to Zoom and Focus auto focus ...

Page 8: ...r the zoom position has been set B 1080P TVI AHD CVI mode 1 If your DVR could support UTC UP the Coax you could zoom in and zoom out the camera by pressing Zoom plus or minus buttons via UTC menu UTC menu may be integrated to PTZ menu in some DVRs it s the most convenient way to operate the camera You may also APP of your DVR to zoom in out the camera if that APP is applicable 2 If your DVR do not...

Page 9: ...1 42 9 4 0mm 4 5 6 0 9 0 12 0 22 5 30 0 6 0mm 3 0 4 0 6 0 8 0 15 0 20 0 8 0mm 2 3 3 0 4 5 6 0 11 3 15 0 12 0mm 1 5 2 0 3 0 4 0 7 5 10 0 13 5mm 1 3 1 8 2 8 3 8 6 8 9 4 50 feet 75 feet 100 feet 2 7mm 61 8 83 9 94 4 125 125 4 167 4 2 8mm 63 4 85 7 96 4 128 128 6 171 4 4 0mm 45 0 60 0 67 5 90 0 90 0 120 0 6 0mm 30 0 40 0 45 0 60 0 60 0 80 0 8 0mm 22 5 30 0 33 8 45 0 45 0 60 0 12 0mm 15 0 20 0 22 5 30 ...

Page 10: ...r setting is followed by press the joystick to access to the next screen 5 When a finger button is present press and hold the SET button PUSHING will display once the setting has been changed 6 To go back to the main menu select RETURN or EXIT and then press the joystick OSD menu will show on display as following MAIN MENU IRIS MANUAL MOTOR ZOOM EXPOSURE BACKLIGHT OFF DAY NIGHT EXTERN COLOR DNR MI...

Page 11: ...there will be no signal please power off and power on camera again then switch to the video format you need by OSD joystick IRIS MENUAL LEVEL 0 20 NOT USABLE RETURN MOTOR ZOOM AF MODE SCANNIN G ONEPUSH AF SYNC TDN INITIAL RETURN Auto Manual Half Full On On Off On EXPOSUR E BRIGHTN ESS SHUTTER SENS UP AGC RETURN 0 20 Auto Normal Deblur Manual 1 25 1 25600 Flicker Off x2 x4 x8 x16 x32 0 10 ...

Page 12: ...N MAG RE D BLU RETURN H Pos 0 20 V Pos 0 20 H Size 0 20 V Size 0 20 Return MODE NORMAL ROI ROI WIND0W ZONE 0 3 WINDOW USE ON OFF H Pos 0 1920 V Pos 0 1080 H Size 0 1920 V Size 0 1080 RETURN Weight Low Middle High Return DAY NI GHT EXTERNA L SMART IR OFF ON Anti Sat 1 20 Not used when smart IR off ...

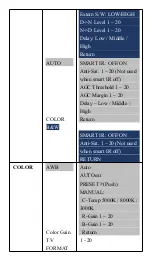
Page 13: ...IR OFF ON Anti Sat 1 20 Not used when smart IR off AGC Threshold 1 20 AGC Margin 1 20 Delay Low Middle High Return SMART IR OFF ON Anti Sat 1 20 Not used when smart IR off RETURN COLOR AWB Color Gain TV FORMAT Auto AUTOext PRESET Push MANUAL C Temp 5000K 8000K 3000K R Gain 1 20 B Gain 1 20 Return 1 20 ...

Page 14: ...HARPNE SS GAMMA MIRROR FLIP ACE DEFOG PRIVACY TV FORMAT This setting is same as Main MENU SYSTEM TV SYSTEM TV FORMAT DO NOT CHANGE 1 10 RETURN 0 55 0 65 0 75 0 45 Off On Off On Off Low Middle High Off On ON Mode Auto Manual Level Low Middle High RETURN Off On ON Zone Num 0 15 Zone Disp Off On H Pos V Pos H Size V Size ...

Page 15: ...Pos Det V Pos Det H Size Det V Size Return Det Tone 0 4 MDRECT FILL On Off Sensitivity 0 10 Motion OSD On Off Text Alarm On Off Signal Out Off On Return SYSTEM TV SYSTEM TV FORMAT Y GAIN 0 32 not used CVBS CB Gain 0 255 not used CVBS CR Gain 0 255 not used CVBS Position 0 255 not used CVBS Burst Freq 0 255 not used CVBS ...

Page 16: ...Byte DO NOT CHANGE 720 EX Off On used TVI RETURN 1080P 30FPS DO NOT CHANGE 60HZ DO NOT CHANGE FULL COMP USER USER OFFSET 0 32 RETURN HD CbCr YUV SD CbCr OFF ON ENG CHN CHN S JPN KOR Off Right Up Left Down ON EXIT EXIT SAVE EXIT CA NCEL OSD Menu Description The following menu description gives more in depth information about the menu options In some instances ...

Page 17: ...utomatically after zooming in out MANUAL Allows for manual lens focus using the joystick or DVR support UTC SCANNING Half Goes through the half range of lens when focusing quicker Full Goes through full range of lens when focusing slower ONEPUSHAF Press and hold the OSD joystick button to force the lens to Auto Focus to the current zoom level focal length SYNC TDN Set to ON to automatically change...

Page 18: ...ither AUTO MANUAL or FLICKER AUTO Automatic shutter speed control NORMAL Set when the camera is installed in an indoor environment DEBLUR Set when the camera is installed in an outdoor environment MANUAL Control the shutter speed manually 1 30 1 30000 FLICKER Select this when you experience picture flicker which can happen when there is a clash with the frequency of the installed lighting SENS UP ...

Page 19: ... UP level the brighter the screen but the more likely it is that an after image will appear Possible image blur is normal with increased zoom while using SENS UP BACKLIG HT OFF HLC BLC WDR MODE IGHT ONLY ALL DAY Level 0 20 Color BLK Customize WHT YEL CYN GRN MAG RE D BLU RETURN H Pos 0 20 V Pos 0 20 H Size 0 20 V Size 0 20 Return MODE NORMAL ROI ROI WIND0W ZONE 0 3 WINDOW USE ON OFF ...

Page 20: ...etail Use the HLC feature to remove these bright lit areas to allow detail such as a car license plate number to become more visible LEVEL The lower the level the more of the HLC mask will be applied COLOR Black White Yellow Cyan Green Magenta Red and Blue BLC Back Light Compensation An area with a bright light source in the background can cause objects in the foreground to appear as silhouettes U...

Page 21: ...ontal Size V SIZE Adjust LEFT or RIGHT to increase or decrease the Vertical Size WDR Wide Dynamic Range This function illuminates darker areas of an image while retaining the same light level for brighter areas to even out the overall brightness of images with high contrast between bright and dark areas WEIGHT Set to LOW MIDDLE or HIGH NOTES WDR mode will not function when the camera CVBS 1200TVL ...

Page 22: ... OFF ON Anti Sat 1 20 Not used when smart IR off Extern S W LOW HIGH D N Level 1 20 N D Level 1 20 Delay Low Middle High Return SMART IR OFF ON Anti Sat 1 20 Not used when smart IR off AGC Threshold 1 20 AGC Margin 1 20 Delay Low Middle High Return SMART IR OFF ON Anti Sat 1 20 Not used when smart IR off RETURN ...

Page 23: ...placed in an area that is subject to shadows or intermittent light level changes AUTO Do not choose this option The mode is switched to COLOR in a normal environment but switches to B W mode when ambient illumination is low Default setting for standard cameras cameras without IR LEDs ANTI SAT Cameras equipped with IR LEDs may have an over saturated night time image Adjust the level of ANTI SAT to ...

Page 24: ...ching does not occur B W The image is always displayed in black and white Automatic switching does not occur COLOR AWB Color Gain TV FORMAT Return Auto AUTOext PRESET Push MANUAL C Temp 5000K 8000K 3000K R Gain 1 20 B Gain 1 20 Return 0 20 This setting is same as Main MENU SYSTEM TV SYSTEM TV FORMAT DO NOT CHANGE AUTO Select this to automatically readjust the white balance each time a change in th...

Page 25: ...e image will lose most of the color NOTES WHITE BALANCE may not work properly under the following conditions 1 When the color temperature of the environment surrounding the subject is out of the control range ie clear sky or sunset 2 When the ambient illumination of the subject is dim 3 If the camera is directed towards a fluorescent light or is installed in a place where illumination changes dram...

Page 26: ... as the brightness of the image but trailing may occur with moving objects IMAGE SHARPNE SS GAMMA MIRROR FLIP ACE DEFOG PRIVACY TV FORMAT This setting is same as Main MENU SYSTEM TV SYSTEM TV FORMAT DO NOT CHANGE 1 10 RETURN 0 55 0 65 0 75 0 45 Off On Off On Off Low Middle High Off On ON Mode Auto Manual Level Low Middle High RETURN Off On ON Zone Num 0 15 ...

Page 27: ...eaner and more distinctive as the SHARPNESS level increases If you increase the SHARPNESS level too high the picture may become distorted or noise may appear GAMMA Adjust how light and color are displayed COLOR GAIN The higher the value the more saturated the colors are The lower the value the less color there is overall MIRROR Mirror the camera image horizontally FLIP Flip the camera image vertic...

Page 28: ...areas to be created to provide privacy masking Zone Disp Off On The Zone Display allows you to switch on and off the zone number H Pos V Pos H Size V Size Each area can be positioned using the H Pos horizontal position VPos vertical position and sized using the H Size horizontal size and V Size vertical size options The Zone Display allows you to switch on and off the zone number Y Level 1 20 CR L...

Page 29: ...ined box around the moving object DET WINDOW Choose from 4 different detection windows to adjust their size and position as needed DET TONE Select the motion area transparency MDRECT FILL Select how the motion area is displayed ON OFF When on the motion area box fills with transparent red when motion is detected when off the box will just have a border SENSITIVITY Sets the sensitivity of the motio...

Page 30: ...Y IMAGE RANGE COLOR SPACE TV FORMAT Y GAIN 0 32 not used CVBS CB Gain 0 255 not used CVBS CR Gain 0 255 not used CVBS Position 0 255 not used CVBS Burst Freq 0 255 not used CVBS Burst Gain 0 128 not used CVBS B W BURST OFF ON used TVI UCC Select 8 Byte DO NOT CHANGE 720 EX Off On used TVI RETURN 1080P 30FPS DO NOT CHANGE 60HZ DO NOT CHANGE FULL COMP USER ...

Page 31: ...B W Only change to burst on if there is no yellow indicator on screen display at night when you change OSD settings at TVI mode change it back to burst off when all settings are finished FRAME RATE Set the frame rate and resolution output from the camera Please do not change it or it may lose signal Frequency Choose either 60HZ NTSC or 50HZ PAL depending on the region of the world the camera is in...

Page 32: ...inance UV color SD CbCr Standard Definition Chrominance Blue and Red COLOR BAR Color bar pattern output LANGUAGE Change the language of the OSD Menu ENGLISH CHINESE CHINESE S JAPANESE or KOREAN CAM TITLE Use this feature if you want to quickly identify a given image by assigning a title that will display on screen 1 Select CAM TITLE then use the LEFT RIGHT button to set it to RIGHT UP or LEFT DOWN...

Page 33: ...tion 1080P 1200TVL Effective Pixels 1920 1080 in HD mode TV System PAL NTSC Electronic Shutter 1 30s 1 30 000s S N Ratio 50dB Scanning System Progressive Scan Lens Focus Length 2 7 13 5mm Focus Control Auto Horizontal View Angle 22 8 91 6 Degrees Lens Type Motorized Zoom Pixels 2 Mega Pixels Auto Iris Support NO Night Vision Infrared LED 42µ x 4pcs Infrared Distance 100 130 Feet IR Status Under 10...

Page 34: ...2V 10 2000mA Dimension 211 W x 92 H x 90 D mm Weight 1400g Stated maximum IR range is based on ideal conditions in typical outdoor environment Actual range and image clarity depends on installation location viewing area and light reflection absorption level of object Trouble Shooting a No picture or only black and white picture after applying power i Check all plugs and cables are securely connect...

Page 35: ...not clear i Check if the lens is clean Clean the lens with a clean cloth ii Check the focus of the camera iii Adjust the contrast feature of the monitor iv Make sure that the screen is not exposed directly to a bright light Move the camera if necessary v The power supply voltage level may be unstable therefore try another power supply vi Ensure the cables are correctly connected and or the cables ...

Page 36: ...LOR Day Night mode is not working Check the delay in the DAY NIGHT EXTERNAL sub menu g The camera is not switching to B W mode at night Check the DAY NIGHT setting If the camera is equipped with IRs leave set to EXTERN h SENS UP function is not working Check if Shutter settings are set to AUTO or FLICKER We are here to help If you need further help email HONIC Technical Support support honictech c...

Page 37: ...e camera video signal match your DVR First check the DVR signal type then adjust the OSD joystick to corresponding signal mode to make it match Make sure the camera and DVR are with same video format both NTSC or both PAL Q Will this camera work with other brand DVRs A Yes it could work with most brand DVRs please make sure the DVR resolution and signal type is proper Q I have an SDI system is thi...

Page 38: ...cidental accidental or consequential damages arising from the use of or the inability to use this product Any costs associated with the fitting or removal of this product by a tradesman or other person or any other costs associated with its use are the responsibility of the end user This warranty applies to the original purchaser of the product only and is not transferable to any third party Unaut...

Reviews: