background image

USER MANUAL

HN-GB200ESL

1080P AHD/CVI/TVI/1200TVL 

Varifocal Outdoor Camera

Summary of Contents for HN-GB200ESL

Page 1: ...USER MANUAL HN GB200ESL 1080P AHD CVI TVI 1200TVL Varifocal Outdoor Camera ...

Page 2: ...ch to the corresponding video format that your DVR support 4 1080P HD modes TVI AHD CVI DO NOT compatible with 720P or 960P DVR 5 At least DC 12V 2A power adapter is required If there is no video or IR Led is not working properly at night please use DC 12V 3A or 5A power adapter It depends on the power cable length and quality 6 Peel off the protective film on the lens and glass panel before insta...

Page 3: ... for analog DVR RIGHT Push 5s to TVI mode for 1080P TVI DVR or XVR DOWN Push 5s to CVI mode for 1080P CVR or XVR UP Push 5s to AHD mode for 1080P N AHD DVR or XVR Note 5s means 5 seconds Installation and Operation 1 Unpacking and Handling Each unit is shipped assembled and factory tested Ensure that all accessories are removed from the container before discarding packing material Package includes ...

Page 4: ... and or cables ii To help ensure the camera s life and proper operation do not point the camera towards the sun or strong light iii Do not install the camera in an environment where the temperature is too high or too low recommended operating temperature is 14F 122F iv Do not install the camera near a magnetic field or a high power motor v Only use a dry cloth to clean the camera If there is dirt ...

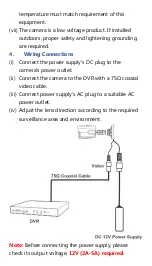
Page 5: ...ections i Connect the power supply s DC plug to the camera s power outlet ii Connect the camera to the DVR with a 75Ω coaxial video cable iii Connect power supply s AC plug to a suitable AC power outlet iv Adjust the lens direction according to the required surveillance area and environment Note Before connecting the power supply please check its output voltage 12V 2A 5A required ...

Page 6: ...o we suggest you adjust zoom knob to the position you need then adjust focus knob to make it almost clear then adjust zoom knob again to make it 100 clear Note It can be difficult to know what the right zoom and focus settings are and these adjustments are best made when the camera is at its intended location There are several methods one can use to ensure proper adjustments 1 A second person loca...

Page 7: ... 0 42 6 8mm 38 5 32 6 12mm 26 2 22 1 7 Detailed Lens Chart Detailed Lens Chart 5 feet 10 feet 25 feet 2 8mm 6 4 8 6 12 9 17 1 32 1 42 9 4 0mm 4 5 6 0 9 0 12 0 22 5 30 0 6 0mm 3 0 4 0 6 0 8 0 15 0 20 0 8 0mm 2 3 3 0 4 5 6 0 11 3 15 0 12 0mm 1 5 2 0 3 0 4 0 7 5 10 0 50 feet 75 feet 100 feet 2 8mm 63 4 85 7 96 4 128 128 6 171 4 4 0mm 45 0 60 0 67 5 90 0 90 0 120 0 6 0mm 30 0 40 0 45 0 60 0 60 0 80 0 ...

Page 8: ... the joystick to access to the next screen 5 When a finger button is present press and hold the SET button PUSHING will display once the setting has been changed 6 To go back to the main menu select RETURN or EXIT and then press the joystick 7 Please SAVE each setting when it is changed OSD menu will show on display as following MAIN MENU FOCUS ADJ OFF ON EXPOSURE BACKLIGHT OFF DAY NIGHT COLOR DNR...

Page 9: ... BRIGHTNE SS SHUTTER SENS UP AGC RETURN 0 20 Auto Normal Deblur Manual 1 30 1 30000 Flicker Off x2 x4 x8 x16 x32 0 10 BACKLIG HT OFF HLC BLC MODE IGHT ONLY ALL DAY Level 0 20 Color BLK Customize WHT YEL CYN GRN MAG RE D BLU RETURN H Pos 0 20 V Pos 0 20 H Size 0 20 V Size 0 20 Return ...

Page 10: ...20 V Size 0 1080 RETURN Weight Low Middle High Return DAY NIG HT AUTO COLOR B W EXTERN IR LED ADAPTIVE OFF Anti Sat 1 20 Not used when smart IR off D N THRES 1 20 N D THRES 1 20 Delay Low Middle High Return IR LED ADAPTIVE FULL OFF Anti Sat 1 20 RETURN NOT USED COLOR AWB Auto AUTOext PRESET Push ...

Page 11: ...NR DNR OFF LOW MIDDLE HIGH IMAGE SHARPNES S GAMMA MIRROR FLIP ACE DEFOG PRIVACY 1 10 0 55 0 65 0 75 0 45 Off On Off On Off Low Middle High Off On ON Mode Auto Manual Level Low Middle High RETURN Off On ON Zone Num 0 15 Zone Disp Off On H Pos V Pos H Size V Size Y Level 1 20 CR Level 1 20 ...

Page 12: ...Det V Size Return Det Tone 0 4 MDRECT FILL On Off Sensitivity 0 10 Motion OSD On Off Text Alarm On Off Signal Out Off On Return SYSTEM OUTPUT MODE FRAME RATE FREQUEN CY CONFIRM IMAGE RANGE AHD TVI CVI CVBS 1080P 30FPS DO NOT CHANGE FOR NTSC 60HZ DO NOT CHANGE FOR NTSC YES PLEASE SAVE IT FULL COMP USER USER OFFSET 0 32 ...

Page 13: ... options In some instances recommendations are made to hopefully enhance the results However every installation will be different and there will occasions when alternative solutions may be more suitable FOCUS ADJ This function provides convenience to the user by allowing focusing by utilizing a bar graph adjust to the highest level possible without any Green showing in the bar graph This function ...

Page 14: ...s installed in an indoor environment DEBLUR Set when the camera is installed in an outdoor environment MANUAL Control the shutter speed manually 1 30 1 30000 FLICKER Select this when you experience picture flicker which can happen when there is a clash with the frequency of the installed lighting SENS UP During low light situations the camera will automatically detect the light level and maintain ...

Page 15: ...e screen but the more likely it is that an after image will appear Possible image blur is normal with increased zoom while using SENS UP BACKLIG HT OFF HLC BLC WDR MODE IGHT ONLY ALL DAY Level 0 20 Color BLK Customize WHT YEL CYN GRN MAG RE D BLU RETURN H Pos 0 20 V Pos 0 20 H Size 0 20 V Size 0 20 Return MODE NORMAL ROI ROI WIND0W ZONE 0 3 WINDOW USE ON OFF H Pos 0 1920 V Pos 0 1080 ...

Page 16: ...bright lit areas to allow detail such as a car license plate number to become more visible LEVEL The lower the level the more of the HLC mask will be applied COLOR Black White Yellow Cyan Green Magenta Red and Blue BLC Back Light Compensation An area with a bright light source in the background can cause objects in the foreground to appear as silhouettes Use this setting to adjust the exposure of ...

Page 17: ... or RIGHT to increase or decrease the Vertical Size WDR Wide Dynamic Range This function illuminates darker areas of an image while retaining the same light level for brighter areas to even out the overall brightness of images with high contrast between bright and dark areas WEIGHT Set to LOW MIDDLE or HIGH NOTES WDR mode will not function when the camera CVBS 1200TVL mode WDR mode is an FHD only ...

Page 18: ...n smart IR off Extern S W LOW HIGH D N Level 1 20 N D Level 1 20 Delay Low Middle High Return SMART IR OFF ON Anti Sat 1 20 Not used when smart IR off AGC Threshold 1 20 AGC Margin 1 20 Delay Low Middle High Return SMART IR OFF ON Anti Sat 1 20 Not used when smart IR off RETURN ...

Page 19: ...HRES Night to Day change level DELAY Sets a delay time before the switch is made from day to night night to day Useful if the camera is placed in an area that is subject to shadows or intermittent light level changes COLOR The image is always displayed in color Automatic switching does not occur B W The image is always displayed in black and white Automatic switching does not occur EXTERN Invalid ...

Page 20: ... adjustable COLOR GAIN The setting range is 0 20 The smaller the setting value the smaller the color gain gets and the image will lose most of the color NOTES WHITE BALANCE may not work properly under the following conditions 1 When the color temperature of the environment surrounding the subject is out of the control range ie clear sky or sunset 2 When the ambient illumination of the subject is d...

Page 21: ...that the higher the level is set the greater the reduction in noise level as well as the brightness of the image but trailing may occur with moving objects IMAGE SHARPNES S GAMMA MIRROR FLIP ACE DEFOG PRIVACY 1 10 RETURN 0 55 0 65 0 75 0 45 Off On Off On Off Low Middle High Off On ON Mode Auto Manual Level Low Middle High RETURN Off On ON Zone Num 0 15 Zone Disp Off On ...

Page 22: ... more distinctive as the SHARPNESS level increases If you increase the SHARPNESS level too high the picture may become distorted or noise may appear GAMMA Adjust how light and color are displayed COLOR GAIN The higher the value the more saturated the colors are The lower the value the less color there is overall MIRROR Mirror the camera image horizontally FLIP Flip the camera image vertically ACE ...

Page 23: ...be created to provide privacy masking Zone Disp Off On The Zone Display allows you to switch on and off the zone number H Pos V Pos H Size V Size Each area can be positioned using the H Pos horizontal position VPos vertical position and sized using the H Size horizontal size and V Size vertical size options The Zone Display allows you to switch on and off the zone number Y Level 1 20 CR Level 1 20...

Page 24: ...d the moving object DET WINDOW Choose from 4 different detection windows to adjust their size and position as needed DET TONE Select the motion area transparency MDRECT FILL Select how the motion area is displayed ON OFF When on the motion area box fills with transparent red when motion is detected when off the box will just have a border SENSITIVITY Sets the sensitivity of the motion detection MO...

Page 25: ...STEM OUTPUT MODE FRAME RATE FREQUEN CY CONFIRM IMAGE RANGE COLOR SPACE COLOR BAR LANGUAG E CAM TITLE AHD TVI CVI CVBS 1080P 30FPS DO NOT CHANGE FOR NTSC 60HZ DO NOT CHANGE FOR NTSC YES PLEASE SAVE IT FULL COMP USER USER OFFSET 0 32 RETURN HD CbCr YUV SD CbCr OFF ON ENG CHN CHN S JPN KOR Off Right Up Left Down ...

Page 26: ...ing on the region of the world the camera is installed and display settings other connecting video components are set to In North America leave set to 60HZ NTSC Do not change it IMAGE RANGE Image Range allows you to set the proper Black and White levels according to the external display you use FULL Display all BLACK level and WHITE level without compression COMP Display BLACK level and WHITE leve...

Page 27: ...ss the SET button 2 Use the 4 direction buttons to move to a desired letter and select the letter Repeat this to enter multiple letters You can enter up to 8 letters RESET Press and hold the SET button to reset the camera OSD settings to the factory defaults Release the SET button when PUSHING is displayed Specifications Model No HN GB200ESL Video Output Mode TVI AHD CVI CVBS AHD by default Camera...

Page 28: ...stance 100 130 Feet IR Status Smart IR Control Camera Features Day Night YES OSD Menu Language YES White Balance AUTO MANUAL Gain Control AUTO Noise Reduction 3DNR Picture Adjustment YES WDR YES FHD Mode Only OSD Support YES UTC YES FHD Mode Only General Housing Metal IP66 Bracket YES IR Cut Filter YES Operation Temperature 14F 122F RH95 Max Storage Temperature 4F 140F RH95 Max Power Source DC12V ...

Page 29: ...y is providing the correct voltage and current iii Ensure switch the camera video output mode to correspond your DVR video type iv Ensure your AHD DVR is 1080P or 1080N CVI and TVI DVR is 1080P v Ensure power supply is working well and the current is 2A 5A b The picture has ripples i Check to see if the power supply is experiencing AC ripple if so a filter may be required ii Determine if the monit...

Page 30: ...ce d The screen is flickering i A fluorescent lamp s magnetic field may cause color roll therefore reduce the number of fluorescent lamps or increase the distance between the camera and the lamps e The camera surface is too hot and black stripes appear on the screen Check if an appropriate power source to the camera complies with the manufacturer s standard requirement or if the voltage keeps chan...

Page 31: ... A Make sure the camera video signal match your DVR First check the DVR signal type then adjust the OSD joystick to corresponding signal mode to make it match Make sure the camera and DVR are with same video format both NTSC or both PAL Q Will this camera work with other brand DVRs A Yes it could work with most brand DVRs please make sure the DVR resolution and signal type is proper Q I have an SD...

Page 32: ...ot cover any incidental accidental or consequential damages arising from the use of or the inability to use this product Any costs associated with the fitting or removal of this product by a tradesman or other person or any other costs associated with its use are the responsibility of the end user This warranty applies to the original purchaser of the product only and is not transferable to any th...

Reviews: