background image


_________________________________________________________________________________________________ 


________________________________________________________________________________________  

 
10/15


U326_UVAintAS102_B_e_210316


8


Funktionsbeschreibung 


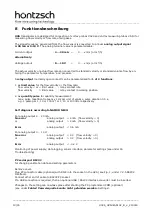
UVA transducers are designed for connection of vortex probes VA40 and vortex measuring tubes VA Di for 
measuring flow velocity or flow rate of air/gases. 


The signal frequency generated from the flow sensor is converted to a linear analog output signal  
4-20 mA or 0-10 V
. The analog terminal value is parameterisable. 


Current output 

4 ... 20 mA  =   

0 ... x m/s (or m³/h) 

 
alternatively: 
 
Voltage output                 

0 ... 10 V 

=      0 ... x m/s (or m³/h) 


The actual velocity or actual flow rate can converted to standard velocity or standard volume flow by en-
tering the parameter 'temperature' and 'pressure' . 
 
relay output (normally open contact) can be parameterised for 1 of 2 functions
 
1. as limit value for the flow velocity or the flow rate: 
    flow velocity < or = limit value 

: relay contact idle 

    flow velocity        > limit value 

: relay contact in working position 

 
2. as quantity pulse for quantity measurement: 
    max. pulse repetition frequency 1 Hz per unit of volume, pulse duration 0.5 s, 
    e.g. 1 pulse per 1, 10 or 100 m³ or 1, 10 or 100 litre respectively 


Self diagnosis according to NAMUR NE43: 
 
For analog output 4 … 20 mA: 
No error 

: analog output 

= 4 mA  (flow velocity = 0) 

or 

  analog output 

> 4 mA  (flow velocity > 0) 

 
Error 

: analog output 

< 3.6 mA 

 
For analog output 0 … 10 V: 
No error 

: analog output 

= 0 V   (flow velocity = 0) 

or 

  analog output 

> 0 V   (flow velocity > 0) 

 
Error 

: analog output 

< -0.2 V 

 
Monitoring of power supply, data logging, sensor interface, parameter settings (see under 16  
Troubleshooting) 
 
 
PC serial port RS232 
for changing calibration data and setting parameters. 
 
Remove cover. 
Plug PC connector cable (optional) with RJ22 into the socket in the UVA (see Fig. 1, under 7.2.5 RS232 
Interface).  
Connect other end of cable to RS232 PC socket.  
If a USB connection is required, then an optional USB / RS232 interface converter must be inserted. 
 
Changes to the setting can now take place after starting the PC programme UCOM (optional) 
(see under Fehler! Verweisquelle konnte nicht gefunden werden. Settings). 


Summary of Contents for UVA

Page 1: ...s 4 6 1 Conformity with Standards 4 6 2 Storage Conditions 4 6 3 Operating Conditions 5 6 4 Housing and Connectors 5 6 5 Electrical Data 5 6 6 Measurement Uncertainty 6 7 Installation 6 7 1 Block Diagram 6 7 2 Wiring Diagrams 6 7 2 1 Shielding contact at cable bush 7 7 2 2 Power supply 7 7 2 3 Analog output v 7 7 2 4 Relay output 8 7 2 5 RS232 Interface 8 7 2 6 LCD display in housing cover optiona...

Page 2: ...e device by the customer handling the device outside the specified operating conditions handling the transducers outside the specified operating conditions use of unsuitable power supplies and peripheral devices improper use of the device Prevention of voltage hazards use only the dedicated adapter plug for the mains supply make sure that the PC is correctly connected to the mains earthed safety s...

Page 3: ...w the instructions on the type plate especially the information regarding supply voltage 4 Operating Safety All steps described below must be carried out by qualified personnel only Please read the Operating Instructions carefully before unpacking theequipment Safety can only be guaranteed if the equipment is operated in accordance with the regulations Improper handling can result in serious injur...

Page 4: ...integrated temperature measurement S N serial no Di inside diamter Di of measuring tube VA Di and VAT Di only PS max permissible pressure FLOW TRANSDUCER integrated transducer Type UVA transducer for vortex sensors VA Power supply voltage 24 VDC 24 V direct voltage 12 VDC 12 V direct voltage Output 4 20 mA current output 4 20 mA 0 10 V voltage output 0 10V RS232 RJ22 plug 6 Technical Specification...

Page 5: ...tion simply insert the strand ends twisted or with end sleeve into the terminal Separate strands by applying pressure to the terminal release spring with a pen or screwdriver 6 5 Electrical Data Supply voltage mains supply 24 V DC 20 27 V DC power 5 W The mains supply is electrically isolated from the UVA outputs UVA analog output v 4 20 mA 0 x m s or m h terminal value x configurable burden max 4...

Page 6: ...nal value 0 15 Linearity error 0 1 Temperature coefficient 20 ppm K at 25 K temperature difference equivalent to 0 05 7 Installation The current European Specifications for Assembly the recognised standards of good practice and this Operating Instructions apply 7 1 Block Diagram Terminals 10 14 are not populated and only accessible internally 7 2 Wiring Diagrams Electrical connection must be carri...

Page 7: ...t one of the following wiring dia grams must be taken into account Wiring diagrams for measuring systems in customer specific design will be supplied separately 7 2 1 Shielding contact at cable bush 7 2 2 Power supply Before connecting please check that the power supply is within the specification Remove the cover of the integrated UVA to reveal the type plate with the relevant information 7 2 3 A...

Page 8: ...ecific programmed value can be found in the accompanying documents 7 2 4 Relay output The normally open contact of the relay is shown in rest position relay coil off The function of the relay output and the corresponding setting parameter are parameterable with the PC software UCOM via the RS232 interface The customer specific settings are in the parameter printout 7 2 5 RS232 Interface The RS232 ...

Page 9: ...ter for the contrast of the LCD display the reset button for the quantity counter the ST1 and ST2 jumpers see under 8 Functional Description 7 2 7 Analog output t temp optional The initial value x C 4 mA and the terminal value y C 20 mA are permanent hardware settings and recorded in the Technical Data Sheet The negative terminal of the analog output t terminal 9 is on the same potential as the ne...

Page 10: ...elay contact idle flow velocity limit value relay contact in working position 2 as quantity pulse for quantity measurement max pulse repetition frequency 1 Hz per unit of volume pulse duration 0 5 s e g 1 pulse per 1 10 or 100 m or 1 10 or 100 litre respectively Self diagnosis according to NAMUR NE43 For analog output 4 20 mA No error analog output 4 mA flow velocity 0 or analog output 4 mA flow v...

Page 11: ... werden Settings parameter switching pulse m cbm l litre and parameter m cbm l litre per pulse and parameter decimal places quantity display with error error 01 parameter error error 02 sensor error see under 16 Troubleshooting Reset button in cover see Fig 2 under 7 2 6 Reset the quantity counter by pressing the reset button for more than 3 seconds 9 Settings The following setting parameters can ...

Page 12: ...lease ensure that the supply voltage is switched off 13 Inspection see under 8Functional Description Self diagnosis 14 Maintenance Only use cleaning agents which dry without leaving any residue and which are compatible with the housing materials Any repair work is to be carried out solely by Höntzsch GmbH Co KG 15 Meaning of LEDs LED green LED yellow Description off off no power supply on off powe...

Page 13: ...tructions profile factor set at 0 000 set profile factor to relevant nominal diameter and sensor type measured value too low sensor contaminated clean sensor according to instructions profile factor setting too low set profile factor to relevant nominal diameter and sensor type input output section too short change sensor position improve flow con ditions with a flow rectifier rotational flow repo...

Page 14: ...n the sensor If adhesion of hazardous substances cannot be ruled out then detailed safety measures to be taken when handling the equipment must be itemised 18 Disposal The customer should assume the duty to dispose of the equipment at his own expense and according to statutory provisions e g ElektroG in Germany 19 Replacement Parts 1 1 2 Fig 3 Fuse TR5 Fuse TR5 2 is situated in the base behind the...

Page 15: ...l info hoentzsch com Internet www hoentzsch com Änderungen vorbehalten We Höntzsch GmbH Co KG Gottlieb Daimler Str 37 D 71334 Waiblingen bearing sole responsibility hereby declare that the product Transducer UVA in AS102 housing referred to in this declaration is in conformity with the following standards or norma tive documents Provisions of the Directive Reference and date of issue 2014 30 EU El...

Reviews: