background image

Contact Customer Care 1+(619) 449-2392  

|3

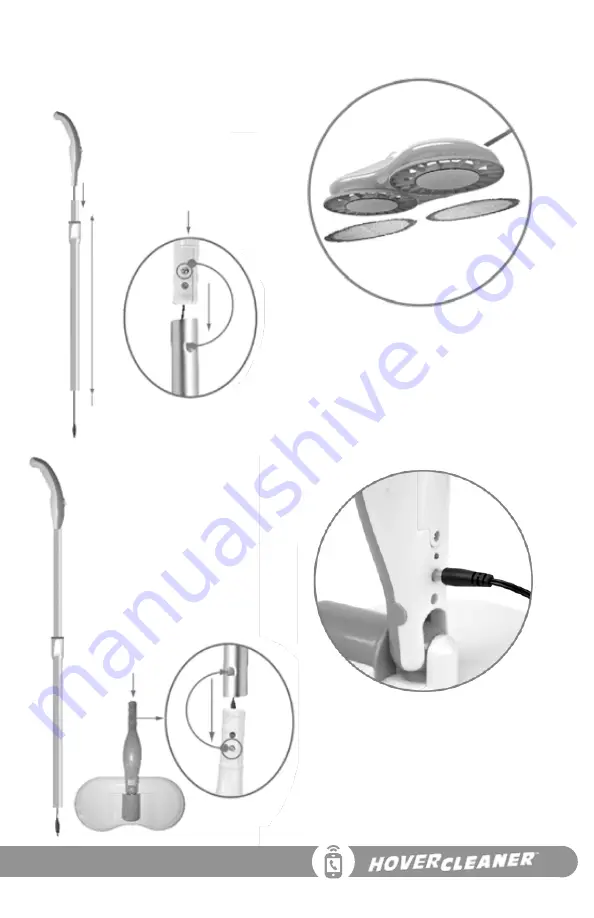
Step 1a:  

Press in silver alignment button on 

handle. While button is depressed, 

slide the handle into the Aluminum 

Telescopic Pole.  Make sure the  

depressed alignment button in lined 

up with the hole in the Aluminum Tele-

scopic Pole. Slide until the alignment 

button snaps into the hole. Do not 

push past metal button and hole.

Step 1b: 

Prior to plugging the power cord 

into the Main Body (in the next step), 

extend the Aluminum Telescopic 

Pole, by pressing & sliding up the 

adjustment button. 

Step 3: 

Center the Microfiber Pads on the Plastic 

Trays and attach using the Hook & Loop 

built into the Plastic Trays. The Plastic 

Trays come pre-installed in the Main 

Body and do not need to be removed to 

install or remove the microfiber pads, but 

if desired can be removed for cleaning.

Assembly:

Step 2: 

Depress the silver  alignment button 

then place the Aluminum Telescopic 

Pole onto the end of main Body.  Align 

the holes in the end of the pole with 

the silver alignment button on the 

main body. Push in the button and 

slide the pole down until the button 

locks into  the hole on the pole. 

Do not 

push past metal button and hole.

Step 4: (Refer to images above) 

Plug in charge cable into the charge 

port slot on the Main Body. Charge 

battery for 3 to 4 hours prior to using. 

The unit will not run (power up) While 

charging.

Summary of Contents for HOVER CLEANER

Page 1: ...INSTRUCTIONS Living Room Bathroom Windows ...

Page 2: ...CleanerTM Main Body Battery Battery included inside of the Main Body Aluminum Telescopic Pole 1 Set of Green Microfiber Pads General Cleaning 1 Mesh Washing Bag 1 Set of Dark Green Scrubbing Pads Heavy Duty Scrubbing 2 Plastic Trays Pre Installed Battery Charger ...

Page 3: ...stic Trays and attach using the Hook Loop built into the Plastic Trays The Plastic Trays come pre installed in the Main Body and do not need to be removed to install or remove the microfiber pads but if desired can be removed for cleaning Assembly Step 2 Depress the silver alignment button then place the Aluminum Telescopic Pole onto the end of main Body Align the holes in the end of the pole with...

Page 4: ...Rotary Joints Can be rotated front and back within 1000 left and right within 1800 the aluminum telescopic pole is upright when the buckle is fixed at 850 Rechargeable Battery Connection Port Aluminum Telescopic Pole Length Adjustment Button Adjusts in 12 sections Operation Function ...

Page 5: ...crubber pads with cool water to clean Do not put in washing machine Frequently Asked Questions 1 Q If the Hover Cleaner TM rotates slowly or stops working A It is time to recharge the battery 2 Q The Hover Cleaner TM rotates unevenly A The Microfiber Pads are installed incorrectly 3 Q The Hover Cleaner TM doesn t work on a full charge A Check the Electrical Connector on the end of the Main Body in...

Page 6: ... in wet location 4 Use only the included battery 5 Battery life expectancy is approximately 2 years 6 Battery Type is FCY 7 4V 2000Mah 7 Contact our customer care for a replacement battery at 1 619 449 2392 8 Do not attempt to disassemble remodel or destroy the battery as it may cause battery leakage fire or bursting and could also create sulfuric acid spills from the battery resulting in possible...

Page 7: ...ship Hover Cleaner TM warrants the original purchaser of this product that the product will be free from manufacturing defects in workmanship and material for a period of one 1 year from the date of original purchase If within one 1 year this product fails due to defect in material or workmanship Hover Cleaner TM will repair replace or supply any defective part at their option The purchaser must c...

Page 8: ...il customercare hovercleaner com On the web www hovercleaner com Facebook Pinterest hovercleaner Instagram hovercleaner Twitter yrdllc Yeiser Research Development LLC 2019 All rights reserved 001058 HC rev 8b G2 us Made in China ...

Reviews: