2
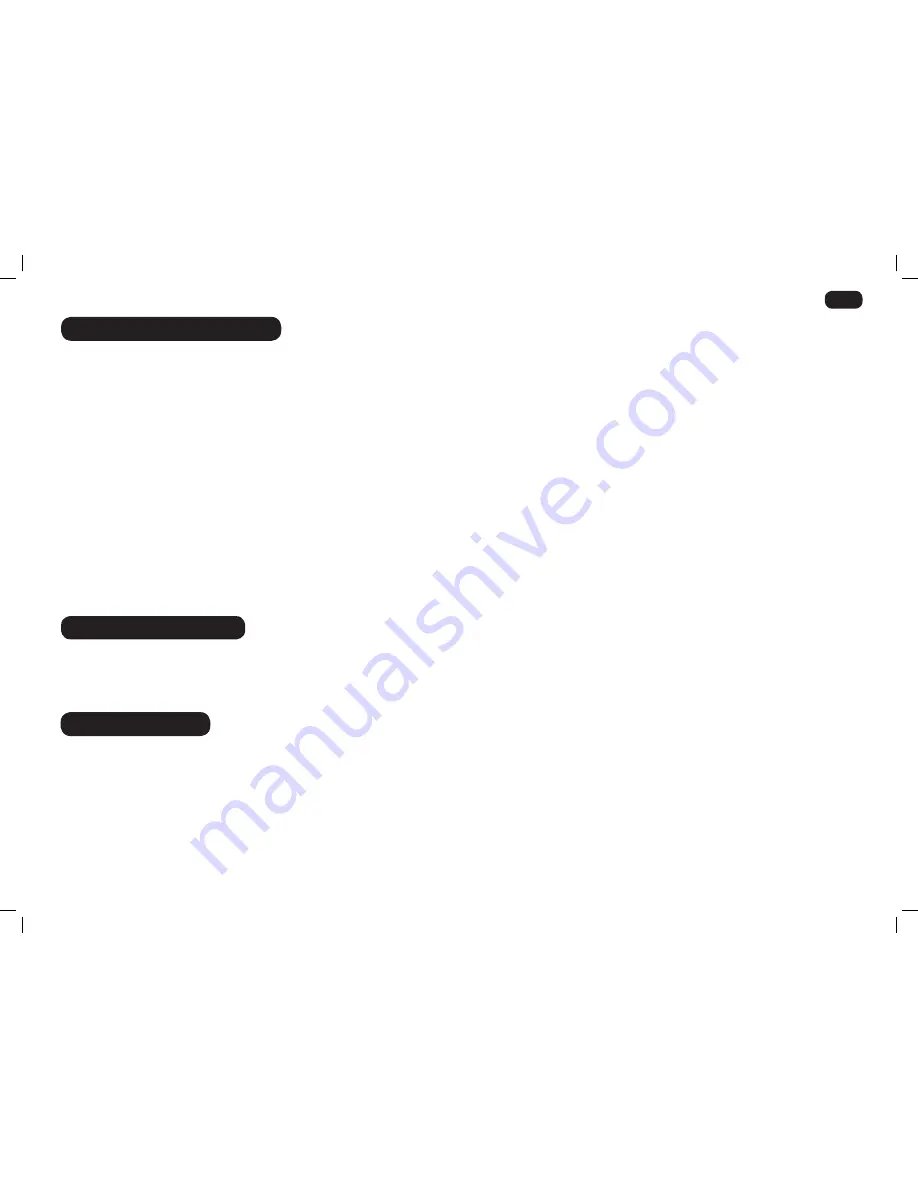
GETTING TO KNOw yOUR ClEANER
GB
A.
Cleaner main body
B.
Handle
C.
Steam Release Trigger
D.
Power Cord
E.
Upper cord Clip
F.
Lower cord clip
G.
On/Off Button
H.
On Indicator Light (Blue)
I.
Steam Ready Indicator Light (Green)
J.
Floor Brush
K.
Floor Head
L.
Floor brush Release Pedal
M.
Clean Water Tank
N.
Textile Pad
O.
Carpet Glider
P.
Hard Water Filter
Q.
De-scaling Tool
ASSEmBlING yOUR ClEANER
Remove all components from the packaging.
1.
Insert the handle into the cleaner main body until it locks into position.
[2]
2.
Assemble the main body of the cleaner to the floor Brush.
[3]
3.
Assemble the cleaner with floor brush to the floor head.
[4]
USING yOUR ClEANER
BEFORE yOU BEGIN ClEANING
1.
Remove the clean water tank up and out from the cleaner main body.
[5]
2.
Twist the cap anti clockwise and remove.
[6]
3.
Fill the clean water tank with cold tap water. Replace cap.
[7]
Do not add any chemicals,
detergents or perfumes to the clean water tank.
4.
Re-fit the clean water tank to the cleaner ensuring the hard water filter is in place.
5.
Attach a textile pad to the base of the floor head.
[8]
ImPORTANT: Always unplug the cleaner when adding water or changing a textile pad.
NOTE: wash the textile pad prior to use to remove any lint.
Steam cleaning hard floors
NOTE:
Always sweep or vacuum the floor prior to use to remove any loose dirt
or debris.
ImPORTANT: Do not use the cleaner without a textile pad attached to the floor head.
NOTE:
Do not use the carpet glider when cleaning hard floors.
1.
Plug the steam cleaner into the main power. The blue ON light will illuminate.
2.
After a few seconds the green Steam Ready light will illuminate indicating the cleaner is
ready for use.
3.
Recline the cleaner by placing a foot on the floor head and lowering the main body
towards the floor.
[9]
4.
To produce steam press the Steam Trigger Button.
[10]
5.
Move the cleaner slowly backwards and forwards paying particular attention to high
traffic areas.
[11]
Steam cleaning hard floor - intensive clean
Use the triangular floor brush on hard floors that require deep cleaning. Please note that there
is no mop to allow the steam to be aimed directly at the surface to clean more intensely. The
area will have to be mopped separately.
NOTE: Always sweep or vacuum the floor prior to use to remove any loose dirt or
debris.
1.
Remove the floor brush from the floor head by pressing the release pedal at the rear. Lift
the cleaner with floor brush attached out of the floor head.
[12]
2.
Plug the steam cleaner into the main power. The blue ON light will illuminate. After a
few seconds the green Steam Ready light will illuminate indicating the cleaner is ready
for use.
3.
Recline the cleaner by placing a foot on the floor brush and lowering the main body
towards the floor.
[13]
4.
To produce steam press the Steam Trigger Button.
[10]
5.
Move the cleaner slowly backwards and forwards paying particular attention to high
traffic areas.
[14]
Refreshing carpets
NOTE: Always sweep or vacuum the floor prior to use to remove any loose dirt or
debris.
ImPORTANT: Do not use the cleaner without a textile pad attached to the floor head.
1.
Attach the carpet glider to the floor head.
[15]
2.
Plug the steam cleaner into the main power. The blue ON light will illuminate.
3.
After a few seconds the green Steam Ready light will illuminate indicating the cleaner is
ready for use.
4.
Recline the cleaner by placing a foot on the floor head and lowering the main body
towards the floor.
[9]
5.
To produce steam press the Steam Trigger Button.
[10]
6.
Move the cleaner slowly backwards and forwards paying particular attention to high
traffic areas.
[11]