GB
1
USER INSTRUCTIONS
Please read this manual carefully before use.
Contents:
Important safety reminders . . . . . . . . . . . . . . . . . . . . . . . . . . . . . . . . . . . . . . . . . . . . . . . . . . . . . . . . . . . . . . . . . . . . . . . . . . . .1
Getting to know your product . . . . . . . . . . . . . . . . . . . . . . . . . . . . . . . . . . . . . . . . . . . . . . . . . . . . . . . . . . . . . . . . . . . . . . . . . .1
Do not . . . . . . . . . . . . . . . . . . . . . . . . . . . . . . . . . . . . . . . . . . . . . . . . . . . . . . . . . . . . . . . . . . . . . . . . . . . . . . . . . . . . . . . . . . . .1
Environment . . . . . . . . . . . . . . . . . . . . . . . . . . . . . . . . . . . . . . . . . . . . . . . . . . . . . . . . . . . . . . . . . . . . . . . . . . . . . . . . . . . . . . . .1
How to start . . . . . . . . . . . . . . . . . . . . . . . . . . . . . . . . . . . . . . . . . . . . . . . . . . . . . . . . . . . . . . . . . . . . . . . . . . . . . . . . . . . . . . . .1
Using your product . . . . . . . . . . . . . . . . . . . . . . . . . . . . . . . . . . . . . . . . . . . . . . . . . . . . . . . . . . . . . . . . . . . . . . . . . . . . . . . . . .1
Accessories . . . . . . . . . . . . . . . . . . . . . . . . . . . . . . . . . . . . . . . . . . . . . . . . . . . . . . . . . . . . . . . . . . . . . . . . . . . . . . . . . . . . . . . .2
Important information . . . . . . . . . . . . . . . . . . . . . . . . . . . . . . . . . . . . . . . . . . . . . . . . . . . . . . . . . . . . . . . . . . . . . . . . . . . . . . . . .2
Troubleshooting guide . . . . . . . . . . . . . . . . . . . . . . . . . . . . . . . . . . . . . . . . . . . . . . . . . . . . . . . . . . . . . . . . . . . . . . . . . . . . . . . .2
Guarantee statement . . . . . . . . . . . . . . . . . . . . . . . . . . . . . . . . . . . . . . . . . . . . . . . . . . . . . . . . . . . . . . . . . . . . . . . . . . . . . . . . .2
Environment . . . . . . . . . . . . . . . . . . . . . . . . . . . . . . . . . . . . . . . . . . . . . . . . . . . . . . . . . . . . . . . . . . . . . . . . . . . . . . . . . . . . . . . .2
IMPORTANT SAFETY REMINDERS
This product should only be used for domestic cleaning as described in this user manual. Please ensure that this guide is fully
understood before operating this appliance.
WARNING:
Remember electricity can be dangerous this appliance must be earthed. This plug is fitted with a 13-amp fuse (UK only)
IMPORTANT:
The wires in the mains lead are coloured in accordance with the following code:
BLUE – Neutral
BROWN – Live
GREEN/YELLOW – Earth
REMEMBER:
After use, switch the product off and remove the plug from the electricity supply. Always switch off and remove the
plug before cleaning the product or attempting any maintenance.
GETTING TO KNOW YOUR PRODUCT
DO NOT
•
Position the product above you when cleaning stairs.
•
Put any liquids in the boiler other than water.
•
Submerge the product in any liquid.
•
Touch the product with wet hands or feet with the cable plugged into the mains.
•
Leave the product unattended whilst plugged into the mains.
•
Attempt to disassemble the product.
•
Use the product if it appears to be faulty.
•
Direct steam towards people, animals or other appliances.
•
Spray with or pick up any flammable liquids, as this risks explosion.
•
Stand on or wrap the power cord around legs or arms while in use.
TO AVOID SAFETY HAZARDS, THE PRODUCT MUST ONLY BE REPAIRED BY AN AUTHORISED HOOVER SERVICE
ENGINEER.
ENVIRONMENT
Hoover has made a long-term commitment, in all its activities, to safeguarding the environment. Our environmental policy states:
"To adopt the best practicable environmental methods in design, production, packaging, use and disposal of products, whilst
continuing to improve benefits to the consumer".
The majority of materials used in this product are recyclable. Please use the best available disposal method to take advantage of
this feature.
HOW TO START
Accessories:
Accessories can be connected directly to the hose handle or to the extension tubes.
•
The accessories are simply pushed together and held by the locking button. (Fig. 3).
•
To disconnect simply depress the locking button and remove the accessory (Fig. 4).
Reminder: while assembling or changing accessories it is advisable to unplug the product from the mains to prevent accidental
steam emission.
Filling the boiler:
Unscrew the Boiler safety cap (Fig. 5) and fill with water using the funnel supplied (Fig. 6). Ensure that no more than 1.4L of water is
filled into the boiler.
USING YOUR PRODUCT
•
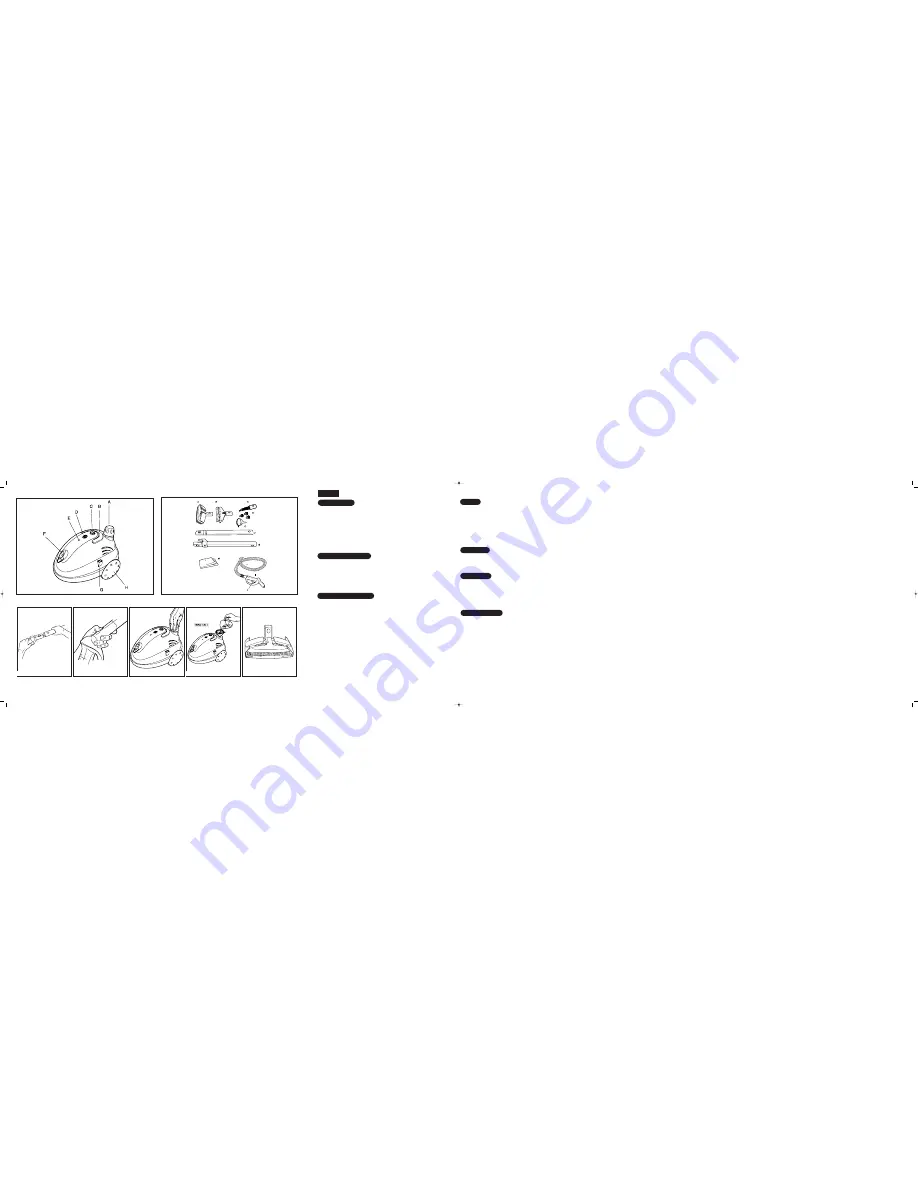
Press the mains on/off button, this should illuminate red (Fig. 1D).
•
The steam ready light will illuminate, then switch off when steam is available (Fig. 1E).
•
To release steam press and hold the steam trigger on the hose handle (Fig. 2L).
•
Steam quantity can be selected through the steam regulation knob on the control panel (Fig. 1C).
Reminder: Follow strictly these instructions to refill the empty boiler:
•
Press the steam trigger on the handle until no more steam exits, to release any residual steam and pressure within the boiler.
•
Switch off the product by pressing the mains on/off switch.
•
Disconnect the power supply cable from the mains.
•
Unscrew the safety cap. Please note that the safety cap cannot be opened if there is even minimal steam pressure in the boiler.
This guarantees maximum safety for the end user.
•
Wait for a few minutes to allow the boiler to cool down.
•
To refill the boiler, simply use the funnel provided and fill no more than 1.4L of water.
WARNING: When refilling the hot boiler, we strongly recommend adding water SLOWLY to avoid steam blowback from the aperture.
Fig. 1 Product
A.
boiler cap
B.
integrated handle
C.
steam regulation knob
D.
on/off button
E.
steam ready led
F.
hose connection
G.
parking slot
H. wheel
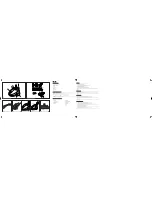
Fig. 2 Accessories
A.
floor brush
B.
window squeege nozzle
C.
angled steam jet nozzle
D.
round brushes
E.
funnel
F.
extension tube 1
G.
extension tube 2
H.
flexible tube
I.
handle
L.
trigger
M. cloth
Fig. 1
Fig. 2
Fig. 3
Fig. 4
Fig. 5
Fig. 6
Fig. 7
VaporLite_cover_landscape.qxp 05/08/2005 11:55 Page 4


