background image

www.horizoneducational.com | support@horizoneducational.com 

-

1

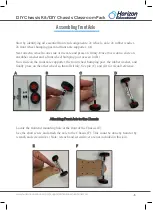
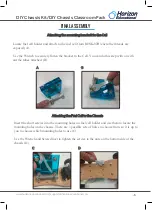
Start by identifying all essential front end components:


2x wheels, axle, 2x rubber washer, 

2x front wheel bumping post and front axle supporter. (A).
Next attach a wheel to one side of the axle and press on firmly. Once this is done, slide on 

an rubber washer and a front wheel bumping post as seen in (B).
Now slide on the front axle supporter, the front wheel bumping post, the rubber washer, and 

finally press on the other wheel so that all firmly. See pix (C) and (D) for visual reference.

Assembling Front Axle

             B

C

D

Attaching Front Axle to the Chassis

Locate the frontend mounting hole at the front of the Chassis (E).
Use the short screw and attach the axle to the Chassis (F). This could be done by hand or by 

wrench and screwdriver. (Note: wrench and screwdriver are not included in this kit).

E


F

DIY Chassis Kit

/DIY Chassis Classroom Pack

Summary of Contents for RESK-02C-1

Page 1: ...12 years old and up and only under the supervision of adults who have familiarized themselves with the safety measures described in the kit Keep small children and animals away as it contains small p...

Page 2: ...X 48X 24X 84X Small Nut Big Nut Short Screw Long Screw Flat Metal Washer Metal Profilled Washer 12X Small Screw Small Nut Big Nut Flat Metal Washer Metal Profilled Washer Axle Rubber Washer Front Whee...

Page 3: ...her outside or in sufficiently ventilated rooms Oxygen O2 is a strongly oxidizing gas When this gas gets in contact with organic substances e g oil grease spontaneous combustion may occur at room temp...

Page 4: ...s to avoid damage Handle all parts and components with care 5 Do not attempt to dismantle any part item or component in this kit 6 Keep small children away because this kit contains small parts that c...

Page 5: ...t as seen in B Now slide on the front axle supporter the front wheel bumping post the rubber washer and finally press on the other wheel so that all firmly See pix C and D for visual reference Assembl...

Page 6: ...s of the Axle B A B Make sure the hole in the chassis is aligned to the exposed gear on the Gearbox C Use 2 of the long screws to attach the gearbox to the Chassis D Use the provided Screw Driver and...

Page 7: ...attached B Insert the short screws into the mounting holes on fuel cell holder and use them to locate the mounting holes on the chassis There are 3 possible sets of holes to choose from so it is up to...

Page 8: ...Kit RESK 02C 1 DIYFuel CellKit RESK 02B 1 Horizon Fuel Cell Europe s r o Narodni 416 37 110 00 Prague Czech Republic www horizoneducational com Horizon Fuel Cell Americas Inc 2531 W 237th Street Ste 1...

Reviews: