132
6-9
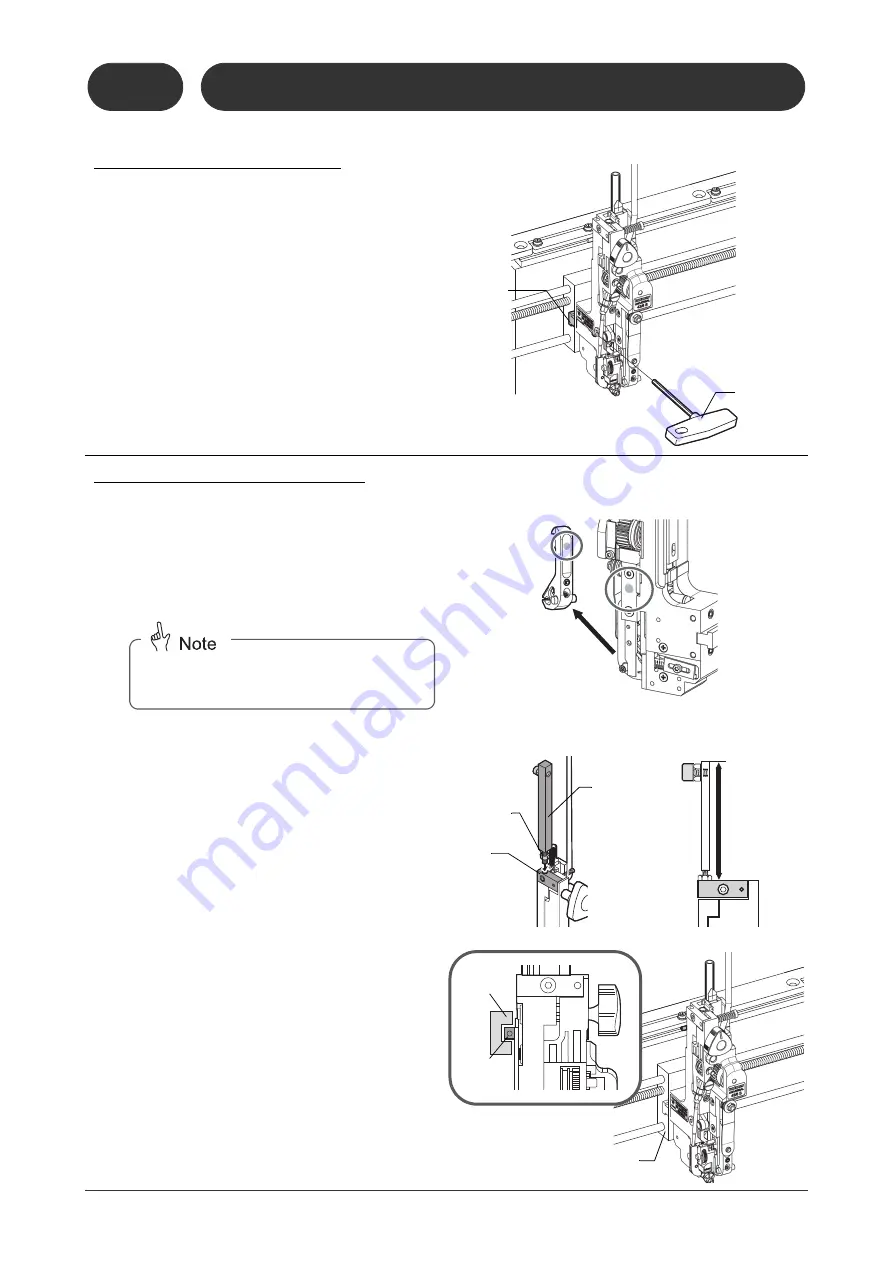
Stitcher Head Removal / Attachment
6-9-1 Stitcher Head Removal
1
Turn off the power switch.
2
Cut the wire and stick the end of
wire in the wire coil.
3
Loosen the locking screw for the
T-nut on the stitcher head.
- Loosen with a T-wrench.
4
Slide the stitcher head to the side
and remove it.
6-9-2 Stitcher Head Attachment
1
Turn off the power switch.
2
The stitcher head and former are
marked with dots of the same
color paint.
3
Attach the accessory detection bar
to the stitcher head.
- Attach the detection bar to the stitcher head
on the operator side only.
- Screw the detection bar into the screw hole
on the block.
- Set the detection bar height at about 82 mm
or 3.23.”
4
Attach the stitcher head to the
head slider.
- Press the drive pusher firmly into the drive
beam. If the two parts are not engaged cor-
rectly, the stitcher head may get damaged.
11119
60901A1
T-Nut
T-Wrench
11119
40101K1
Each stitcher head and former work together.
Mark the former so that you can attach it to the
correct stitcher head.
11119
60902D1
11119
60902C1
Detection
Bar
Mounting
Nut
Block
About 82
mm
11119
60902A1
Head Slider
ãÏìÆÉrÅ[É
11119
60902B1
Drive
Pusher
Drive
Beam
Summary of Contents for Bookletmaker FC-200A
Page 84: ...This page is intentionally left blank...
Page 94: ...This page is intentionally left blank...
Page 146: ...This page is intentionally left blank...
Page 202: ...This page is intentionally left blank...
Page 217: ...This page is intentionally left blank...
Page 218: ...Manufacturer Phone 81 75 934 6700 Fax 81 75 934 6708 www horizon co jp...


