


BEFORE
YOU
BEGIN
26
INTRODUCTION
IMPORT
ANT
PRECAUTIONS
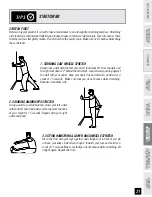
ASSEMBL
Y
BEFORE
YOU
BEGIN
ELLIPTICAL
OPERA
TION
LIMITED
W
ARRANTY
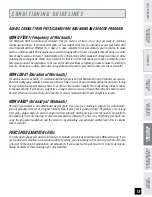
CONDITIONING
GUIDELINES
ASSEMBL
Y
TROUBLESHOOTING
&
MAINTENANCE
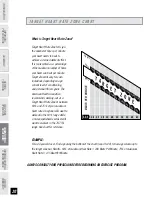
WHAT KIND OF ROUTINE MAINTENANCE IS REQUIRED?
We use sealed bearings throughout our ellipticals so lubrication is not needed. The most important
maintenance step is to simply wipe your perspiration off the trainer after each use.
HOW DO I CLEAN MY ELLIPTICAL?
Clean with soap and water cleaners only. Never use solvents on plastic parts.
Cleanliness of your elliptical and its operating environment will keep maintenance problems
and service calls to a minimum. For this reason, Horizon Fitness recommends that the following
preventive maintenance schedule be followed.
AFTER EACH USE (DAILY)
Turn off the elliptical by unplugging the power cord from the wall outlet
• Wipe down the elliptical with a damp cloth. Never use solvents, as they can cause damage to the
elliptical.
• Inspect the power cord. If the power cord is damaged, contact Horizon Fitness.
• Make sure the power cord is not underneath the elliptical or in any other area where it can become
pinched or cut.
To remove power from the elliptical, the power cord must be disconnected from
the wall outlet.
WEEKLY
Clean underneath the elliptical, following these steps:
• Turn off the elliptical
• Move the elliptical to a remote location.
• Wipe or vacuum any dust particles or other objects that may have accumulated underneath the
elliptical.
• Return the elliptical to its previous position.
EVERY MONTH
• Inspect all assembly bolts and pedals on the machine for proper tightness.
• Clean any debris off of the pedal arm wheels and guide rails.
MAINTENANCE


