background image

29

28

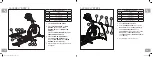
WEIGHT CAPACITY = 300 lbs (136.1 kilograms)

FRAME • LIFETIME 

Manufacturer warrants the frame against defects in workmanship 

and materials for the lifetime of the original owner, so long as 

the device remains in the possession of the original owner. (The 

frame is defined as the welded metal base of the unit and does not 

include any parts that can be removed.)

ELECTRONICS & PARTS • 1 YEAR


Manufacturer warrants the electronic components, finish and 

all original parts for the period specified above from the date of 

original purchase, so long as the device remains in the possession 

of the original owner.

LABOR • 1 YEAR  

Manufacturer shall cover the labor cost for the repair of the 

device for the period specified above from the date of the original 

purchase, so long as the device remains in the possession of the 

original owner.

EXCLUSIONS AND LIMITATIONS

Who IS covered: 

• 

The original owner and is not transferable.

What IS covered: 

• 

Repair or replacement of a defective motor, 

electronic component, or defective part and is the 

sole remedy of the warranty.

What IS NOT covered: 

• 

Normal wear and tear, improper assembly or 

maintenance, or installation of parts or accessories 

not originally intended or compatible with the 

equipment as sold.

• 

Damage or failure due to accident, abuse, 

corrosion, discoloration of paint or plastic, neglect, 

theft, vandalism, fire, flood, wind, lightning, freezing, 

or other natural disasters of any kind, power 

reduction, fluctuation or failure from whatever 

cause, unusual atmospheric conditions, collision, 

introduction of foreign objects into the covered 

unit, or modifications that are unauthorized or not 

recommended by the Manufacturer.

• 

Incidental or consequential damages. The 

Manufacturer is not responsible or liable for indirect, 

special or consequential damages, economic loss, 

loss of property, or profits, loss of enjoyment or use, 

or other consequential damages of whatsoever 

nature in connection with the purchase, use, repair 

or maintenance of the equipment.  

SERVICE/RETURNS

• 

In-home service is available within 150 miles 

of the nearest authorized Service Provider 

(Mileage beyond 150 miles from an authorized 

service center is the responsibility of  

the consumer).

• 

All returns must be pre-authorized by  

the Manufacturer.

• 

Manufacturer’s obligation under this warranty 

is limited to replacing or repairing, at the 

Manufacturer’s option, the same or  

comparable model.

• 

Manufacturer may request defective 

components be returned to the Manufacturer 

upon completion of warranty service using a 

prepaid return shipping label. If you have been 

advised to return parts and did not receive a 

label, please contact Customer Tech Support.

• 

Replacement units, parts and electronic 

components reconditioned to as-new condition 

by the Manufacturer or its vendors may 

sometimes be supplied as warranty replacement 

and constitute fulfillment of warranty terms.

• 

This warranty gives you specific legal rights, and 

your rights may vary from state to state.

The Manufacturer does not provide monetary or other 

compensation for any such repairs or replacement parts costs, 

including but not limited to gym membership fees, work time 

lost, diagnostic visits, maintenance visits or transportation.

• 

Equipment used for commercial purposes or any use other 

than a single family or Household, unless endorsed by the 

Manufacturer for coverage.

• 

Equipment owned or operated outside the US and Canada.

• 

Delivery, assembly, installation, setup for original or replacement 

units or labor or other costs associated with removal or 

replacement of the covered unit.

• 

Any attempt to repair this equipment creates a risk of injury. 

The Manufacturer is not responsible or liable for any damage, 

loss or liability arising from any personal injury incurred 

during the course of, or as a result of any repair or attempted 

repair of your fitness equipment by other than an authorized 

service technician. All repairs attempted by you on your fitness 

equipment are undertaken AT YOUR OWN RISK and the 

Manufacturer shall have no liability for any injury to the person 

or property arising from such repairs.

• 

If you are out of the Manufacturer’s warranty but have an 

extended warranty, refer to your extended warranty contract for 

contact information regarding requests for extended warranty 

service or repair.

HZ14_OM_NA_CE8.8_Rev1_2.indd   28-29

6/4/14   8:59 AM

Summary of Contents for CE8.8

Page 1: ...ELLIPTIQUE avant de se servir du pr sent MANUEL DU PROPRI TAIRE Lea la GU A DE LA M QUINA EL PTICA antes de usar este MANUAL DEL PROPIETARIO ELLIPTICAL OWNER S MANUAL MANUEL DU PROPRI TAIRE DE L EXERC...

Page 2: ...ptical It is the responsibility of the owner to ensure that all users of this elliptical are adequately informed of all warnings and precautions If you have any questions after reading this guide cont...

Page 3: ...ded outlet only WARNING TO REDUCE THE RISK OF BURNS FIRE ELECTRICAL SHOCK OR INJURY TO PERSONS Keep power cord away from heated surfaces Do not carry this unit by its supply cord or use the cord as a...

Page 4: ...and may cause irritating noises To prevent damage to the elliptical the assembly instructions must be reviewed and corrective actions should be taken Before proceeding find your elliptical s serial n...

Page 5: ...UBE MAIN FRAME LOWER LINK ARM UNPACKING Unpack the product where you will be using it Place the elliptical carton on a level flat surface It is recommended that you place a protective covering on your...

Page 6: ...1 PART TYPE QTY A BUTTON HEAD BOLT 4 B SPRING WASHER 4 C ARC WASHER 4 ASSEMBLY STEP 2 3 4 E B F D A Open HARDWARE FOR STEP 2 B Attach MANUAL INCLINE LIFT LEVER 3 to GUIDE RAIL SET 4 using 4 BOLTS D 4...

Page 7: ...ttaching the console mast ASSEMBLY STEP 4 A Open HARDWARE FOR STEP 4 B Carefully pull the CONSOLE CABLE 5 through the CONSOLE MAST 6 using the twist tie located inside the CONSOLE MAST 6 C Attach CONS...

Page 8: ...using 1 FLAT WASHER K 1 SPRING WASHER B and 1 BOLT L E Repeat steps B D on the opposite side of the elliptical O M P B 6 12 13 L ASSEMBLY STEP 6 A Open HARDWARE FOR STEP 6 B Slide 1 RUBBER WASHER O a...

Page 9: ...AT WASHER K and 1 NUT F D Repeat steps B C on the opposite side of the elliptical 14 R 16 6 15 4 17 ASSEMBLY STEP 8 A Open HARDWARE BAG 8 B Slide FRONT TOP CAP PIECE 14 and REAR TOP CAP TPIECE 15 over...

Page 10: ...the CONSOLE 19 B Attach the CONSOLE CABLES 5 to the CONSOLE 19 C Carefully tuck the CONSOLE CABLES 5 into the CONSOLE MAST 6 before attaching the CONSOLE Attach CONSOLE 19 to CONSOLE MAST 6 using 4 P...

Page 11: ...KEYS press to select workout F AUDIO IN JACK plug your media player into the console using the included audio adaptor cable G VOLUME used to adjust volume up or down H FAN KEY personal workout fan I Q...

Page 12: ...AY WINDOW TIME Shown as minutes seconds View the time remaining or the time elapsed in your workout DISTANCE Shown as miles Indicates distance traveled or distance remaining during your workout CALORI...

Page 13: ...ne lever is set to 0 25 50 75 or 100 Hollywood Sign 1708 ft vertical distance Empire State Building 1250 ft vertical distance Gateway Arch 630 ft vertical distance Space Needle 605 ft vertical distanc...

Page 14: ...27 26 LIMITED HOME USE WARRANTY HZ14_OM_NA_CE8 8_Rev1_2 indd 26 27 6 4 14 8 59 AM...

Page 15: ...horized Service Provider Mileage beyond 150 miles from an authorized service center is the responsibility of the consumer All returns must be pre authorized by the Manufacturer Manufacturer s obligati...

Page 16: ...tous les utilisateurs de cet exerciseur elliptique soient ad quatement inform s de tous les avertissements et de toutes les mesures pr ventives Pour toute question apr s la lecture de ce guide communi...

Page 17: ...s cet appareil par son cordon d alimentation et n utilisez pas le cordon comme poign e N utilisez pas d autres accessoires qui ne sont pas recommand s par le fabricant Les accessoires peuvent causer d...

Page 18: ...r les dommages l exerciseur elliptique relisez les instructions d assemblage et prenez les mesures correctives qui s imposent Avant de continuer recherchez le num ro de s rie de votre exerciseur ellip...

Page 19: ...LIMENTATION TUBE DE STABILISATION CADRE PRINCIPAL BARRE DE LIAISON INF RIEURE D BALLAGE D ballez le produit l endroit o vous l utiliserez Placez l emballage de l exerciseur elliptique sur une surface...

Page 20: ...A BOULON T TE RONDE 4 B RONDELLE RESSORT 4 C RONDELLE EN ARC 4 ASSEMBLAGE TAPE 2 3 4 E B F D A Ouvrez le sac de QUINCAILLERIE POUR L TAPE 2 B Fixez le LEVIER D INCLINAISON MANUEL DE LA PENTE 3 L ENSEM...

Page 21: ...4 A Ouvrez le sac de QUINCAILLERIE POUR L TAPE 4 B Tirez d licatement le C BLE DE LA CONSOLE 5 travers le MONTANT DE LA CONSOLE 6 l aide de l attache torsad e situ e l int rieur du MONTANT DE LA CONSO...

Page 22: ...LE PLATE K d une RONDELLE RESSORT B et d un BOULON L E R p tez les tapes B D sur le c t oppos de l exerciseur elliptique O M P B 6 12 13 L ASSEMBLAGE TAPE 6 A Ouvrez la TROUSSE DE QUINCAILLERIE POUR L...

Page 23: ...OU F D R p tez les tapes B et C sur le c t oppos de l exerciseur elliptique 14 R 16 6 15 4 17 ASSEMBLAGE TAPE 8 A Ouvrez le SAC DE QUINCAILLERIE 8 B Glissez LE CAPUCHON SUP RIEUR AVANT 14 et LE CAPUCH...

Page 24: ...ette tape est pr install e A Retirez 4 BOULONS PR INSTALL S 18 de la CONSOLE 19 B Fixer les C BLES DE LA CONSOLE 5 la CONSOLE 19 C Ins rez soigneusement les C BLES DE LA CONSOLE 5 dans le MONTANT DE L...

Page 25: ...R E AUDIO branchez votre lecteur de m dia dans la console l aide du c ble adaptateur audio inclus G VOLUME utilis pour augmenter ou baisser le volume H TOUCHE DU VENTILATEUR ventilateur personnel pour...

Page 26: ...er le niveau de r sistance pendant votre entra nement FEN TRE D AFFICHAGE TIME DUR E indiqu e en minutes secondes Consultez la dur e restante ou la dur e pass e pendant votre entra nement DISTANCE ind...

Page 27: ...de 1708 pi L Empire State Building Distance verticale de 1250 pi La Porte de l Ouest Distance verticale de 630 pi La Space Needle Distance verticale de 605 pi Le crat re Diamond Head Distance vertical...

Page 28: ...55 54 GARANTIE LIMIT E POUR USAGE R SIDENTIEL HZ14_OM_NA_CE8 8_Rev1_2 indd 54 55 6 4 14 8 59 AM...

Page 29: ...it du consommateur Tous les retours doivent tre pr autoris s par le fabricant Les obligations du fabricant en vertu de cette garantie se limitent la r paration ou au remplacement de l quipement la dis...

Page 30: ...se de que todos los usuarios de esta m quina el ptica est n informados adecuadamente de todas las advertencias y las precauciones Si tiene preguntas despu s de leer esta gu a comun quese con el Servic...

Page 31: ...INCENDIOS DESCARGA EL CTRICA O LESIONES Mantenga el cable de alimentaci n alejado de superficies calientes No mueva la unidad por el cable de suministro el ctrico ni utilice el cable como agarradera N...

Page 32: ...s necesario repasar las instrucciones de ensamblaje y hacer las correcciones necesarias Antes de seguir adelante busque el n mero de serie de la m quina el ptica que se encuentra ubicado en una etique...

Page 33: ...DE PULSO POSTE DE LA CONSOLA BARRA DE SUJECI N INFERIOR CIG E AL TOMA DEL CABLE DE ALIMENTACI N TUBO ESTABILIZADOR BASTIDOR PRINCIPAL BRAZO CONECTOR INFERIOR DESEMPAQUE Extraiga el producto del paque...

Page 34: ...SEMIESF RICA 4 B ARANDELA EL STICA 4 C ARANDELA DE ARCO 4 ENSAMBLAJE PASO 2 3 4 E B F D A Abra la BOLSA DE TORNILLER A PARA EL PASO 2 B Una la PALANCA DE ELEVACI N DE INCLINACI N MANUAL 3 al CONJUNTO...

Page 35: ...onsola ENSAMBLAJE PASO 4 A Abra la BOLSA DE TORNILLER A PARA EL PASO 4 B Jale con cuidado el CABLE DE LA CONSOLA 5 a trav s del POSTE DE LA CONSOLA 6 usando el lazo de torcedura ubicado dentro del POS...

Page 36: ...LA PLANA K 1 ARANDELA EL STICA B y 1 PERNO L E Repita los pasos B D en el lado opuesto de la m quina el ptica O M P B 6 12 13 L ENSAMBLAJE PASO 6 A Abra la BOLSA DE LA TORNILLER A PARA EL PASO 6 B Des...

Page 37: ...asos B C en el lado opuesto de la m quina el ptica 14 R 16 6 15 4 17 ENSAMBLAJE PASO 8 A Abra la BOLSA DE TORNILLER A 8 B Deslice la PIEZA DELANTERA DE LA TAPA SUPERIOR 14 y la PIEZA TRASERA DE LA TAP...

Page 38: ...NSOLA 19 B Conecte los CABLES DE LA CONSOLA 5 a la CONSOLA 19 C Meta con cuidado los CABLES DE LA CONSOLA 5 en el POSTE DE LA CONSOLA 6 antes de unir la CONSOLA Una la CONSOLA 19 al POSTE DE LA CONSOL...

Page 39: ...DIO conecte su reproductor en la consola con el cable adaptador de audio que se incluye G VOLUME VOLUMEN se utiliza para bajar o subir el volumen H TECLA DE VENTILADOR ventilador personal para la sesi...

Page 40: ...LLA TIME TIEMPO aparece en minutos segundos Indica el tiempo restante o el que ha pasado en su sesi n de ejercicio DISTANCE DISTANCIA aparece en millas Indica la distancia recorrida o la distancia por...

Page 41: ...t fijada 0 25 50 75 o 100 El letrero de Hollywood 1708 pies de distancia vertical El edificio Empire State 1250 pies de distancia vertical El Arco Gateway 630 pies de distancia vertical La Aguja Espac...

Page 42: ...83 82 GARANT A LIMITADA PARA EL USO DOM STICO HZ14_OM_NA_CE8 8_Rev1_2 indd 82 83 6 4 14 8 59 AM...

Page 43: ...rvicio autorizado son responsabilidad del cliente Todas las devoluciones deben ser autorizadas previamente por el Fabricante La obligaci n del Fabricante de acuerdo a esta garant a se limita a sustitu...

Page 44: ...87 86 HZ14_OM_NA_CE8 8_Rev1_2 indd 86 87 6 4 14 8 59 AM...

Page 45: ...ments suppl mentaires sur le produit sont disponibles sur notre site Web NO VUELVA AL VENDEDOR MINORISTA si tiene problemas durante el ensamblaje o si faltan piezas Para obtener un servicio r pido y g...

Reviews: