background image

1

INTRODUCTION

IMPORT

ANT

PRECAUTIONS

ASSEMBL

Y

BEFORE

YOU 
BEGIN

TREADMILL

OPERA

TION

LIMITED

W

ARRANTY

TROUBLESHOOTING

MAINTENANCE

CONDITIONING

GUIDELINES

1

INTRODUCTION

IMPORT

ANT

PRECAUTIONS

ASSEMBL

Y

BEFORE YOU 

BEGIN

TREADMILL OPERA

TION

CONDITIONING GUIDELINES

TROUBLESHOOTING & 

MAINTENANCE

LIMITED WARRANTY

TIME • 

Shown as Minutes: Seconds. View the time remaining or the time elapsed in your workout.

DISTANCE • 

Shown as Miles. Indicates distance traveled or distance remaining during your workout.

SPEED

  • Shown as MPH. Indicates how fast your walking or running surface is moving.

CALORIES • 

Total Calories burned or calories remaining left to burn during your workout.

INCLINE • 

Shown as Percent. Indicates the incline of your walking or running surface.

PULSE • 

Shown as Beats Per Minute. Used to monitor your heart rate 

(displayed when contact is made with both pulse grips).

SCROLL • 

When the scroll option is highlighted, the display will automatically scroll through the six feedback options.

PROGRAM PROFILES • 

Represents the profile of the program being used 


           (speed during speed based programs and incline during incline based programs).

TIME TO COMPLETE GOAL • 

Shown as Days and Hours. Indicates time remaining to reach your goal.

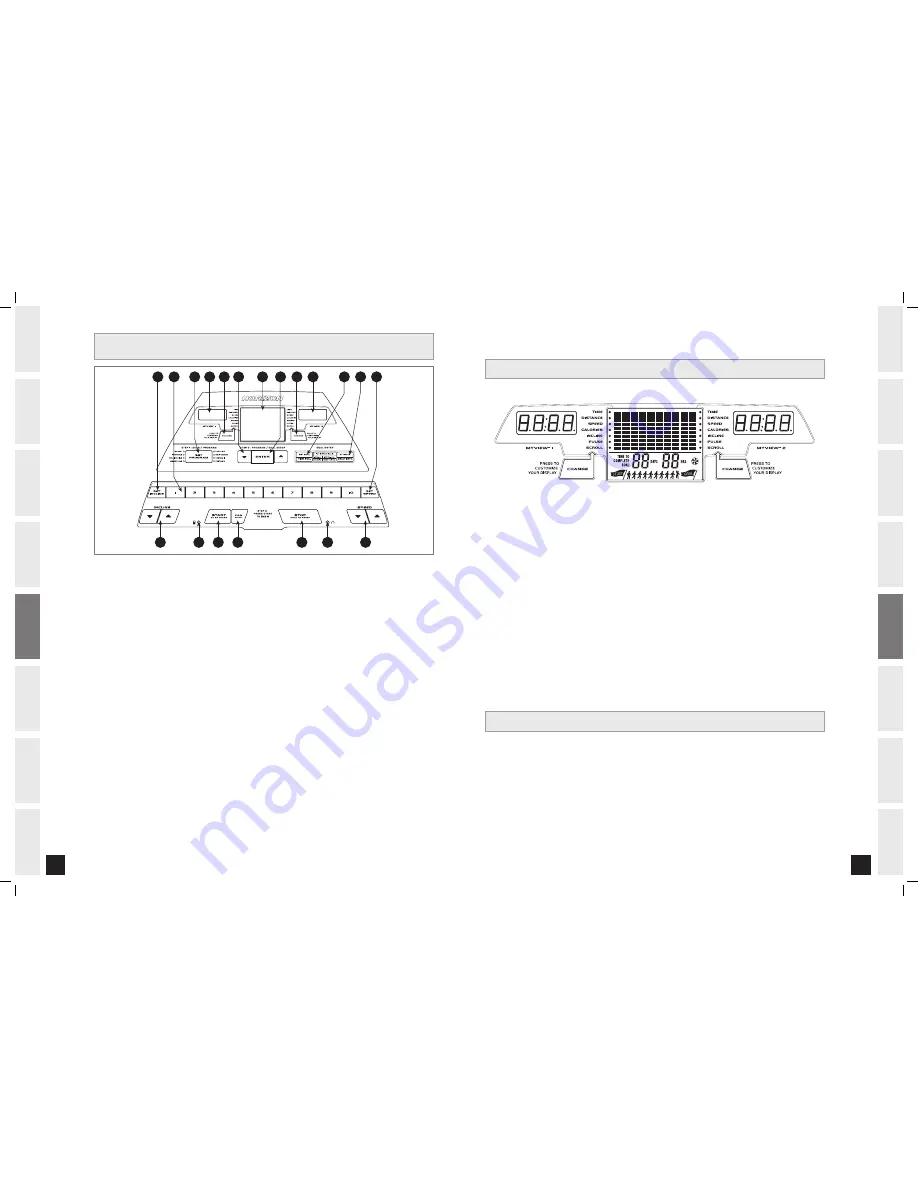
MONITOR DISPLAY

MONITOR DISPLAY:

 Time, Distance, Speed, Calories, Incline, Pulse, Workout Profiles and  

Time to Complete Goal.

MYVIEW

 1 AND MYVIEW

 2 LCD DISPLAYS:

  Customizable user feedback windows. 

CHANGE DISPLAY KEYS:

 Used to adjust LCD window to customize desired feedback.

START:

 Simply press to begin exercising.

STOP:

 Press to pause/end your workout. Hold for 3 seconds to reset the treadmill.

SET PROGRAM KEY:

 Used to select a program.

ENTER:

 Used to select Program, Level, Time and Weight.

PROGRAM SETTING KEYS:

 Press to adjust program settings.

SET / VIEW GOAL KEY:

 Used to set and view goal information.

ACTIVATE / DEACTIVATE KEY:

 Used to turn off 

WEEKLY GOAL CENTER

INCLINE ARROW KEYS:

 Used to adjust incline in small increments (0.5% increments).

SPEED ARROW KEYS:

 Used to adjust speed in small increments (0.1 mph increments).

SET INCLINE KEY:

 Used to reach desired incline more quickly. Press before 

NUMBER KEYS

.

SET SPEED KEY:

 Used to reach desired speed more quickly. Press before 

NUMBER KEYS

NUMBER KEYS:

 After pressing 

SET SPEED

 or 

SET INCLINE

, press desired number to set speed or incline.

FAN BUTTON:

 Turns fan on or off.

AUDIO IN:

 Plug your CD / MP3 player into the console using the included audio adaptor cable.

AUDIO OUT / HEADPHONE JACK:

 Plug your headphones into this jack to listen to your music through the 

headphones. NOTE: When headphones are plugged into the headphone jack the sound will no  

longer come out through the speakers.


TREADMILL OPERATION

A

G

E

R

L

K

Q

D

P

C

H

O

F

B

C

I

B

N

J

M

MY VIEW

Customize your display and see the feedback that matters most with the Sports Authority’s exclusive MyView


display. MyView

 allows you to view the feedback you need to reach your fitness goals.

CUSTOMIzING THE MY VIEW

 DISPLAY

 – To change the “My View” display, press the “Change” key on either 

side of the display. You can customize both sides of the display at any time to provide you with the feedback 

desired. For example: if distance and calories are the feedback you would like to display, simply press either 

“Change” key repeatedly until the display is customized to your liking. The light on the right and left side 

of the display will illuminate next to the feedback that is currently being displayed. The feedback available 

includes time, distance, speed, calories, incline, pulse and scroll.

GS_1040T_Treadmill_Rev.1.7.indd   16-17

4/3/08   9:13:35 AM

Summary of Contents for GS 1040T

Page 1: ...GOAL SERIES TREADMILL USER S GUIDE FOR MODEL GS 1040T GS_1040T_Treadmill_Rev 1 7 indd 1 4 3 08 9 13 06 AM...

Page 2: ...ed to get stronger and healthier faster Because we re committed to designing fitness equipment from the inside out we use only the highest quality components It s a commitment we back with one of the...

Page 3: ...The treadmill is not compatible with GFCI equipped outlets It is essential that your treadmill is used only indoors in a climate controlled room If your treadmill has been exposed to colder temperatu...

Page 4: ...the upright folded position with the lock latch secure Unpack the unit where it will be used The enclosed treadmill is equipped with high pressure shocks and may spring open if mishandled Never grab h...

Page 5: ...ease may aid in the installation of hardware Any grease such as lithium bike grease is recommended WARNING Open HARDWARE BAG 1 Cut banding straps Do not move or lift treadmill from packaging Move left...

Page 6: ...ul not to pinch any wires while attaching the console FLAT WASHER E BOLT D RIGHT CONSOLE MAST MAIN FRAME WAVY WASHER F ELEVATION FRAME CONSOLE CABLE PRE ATTACHED BOLT FOOT LOCK LATCH RIGHT LINKAGE ARM...

Page 7: ...vent or air openings The treadmill should not be located in a garage covered patio near water or outdoors DO NOT STAND ON THE BELT While you are preparing to use the treadmill do not stand on the bel...

Page 8: ...latch secured Failure to follow these instructions could result in injury WARNING WARNING CENTERING THE RUNNING BELT The running belt has been properly adjusted at the factory before it was shipped A...

Page 9: ...Weight PROGRAM SETTING KEYS Press to adjust program settings SET VIEW GOAL KEY Used to set and view goal information ACTIVATE DEACTIVATE KEY Used to turn off WEEKLY GOAL CENTER INCLINE ARROW Keys Used...

Page 10: ...tes each and are included in program times PROGRAM INTERVALS MANUAL INTERVALS ROLLING WEIGHT LOSS GOLF COURSE RACE CUSTOM 1 CUSTOM 2 THR ZONE 1 THR ZONE 2 VALLEY TOUR Motivates with different combinat...

Page 11: ...2 3 4 5 6 7 8 9 10 11 12 13 14 15 Cool Down Level 1 0 0 0 5 0 0 0 5 1 0 3 0 1 0 3 0 2 0 3 0 2 0 3 5 2 0 3 0 2 0 3 0 1 0 3 0 1 0 0 5 0 0 0 5 0 0 Level 2 0 0 0 5 0 0 0 5 1 0 3 0 2 0 3 0 2 0 3 0 2 5 3 5...

Page 12: ...quipped with Horizon s exclusive Weekly Goal Center you ve taken an important step towards achieving your personal fitness goals Congratulations on your purchase decision Horizon s Weekly Goal Center...

Page 13: ...is by monitoring your heart rate using the grip pulse handlebars and the second is by evaluating your perceived exertion level this is simpler than it sounds PERCEIVED EXERTION LEVEL A simple way to g...

Page 14: ...LE STRETCH Sit on the floor with your legs together and straight out in front of you Do not lock your knees Extend your fingers towards your toes and hold for a count of 15 seconds Make sure that you...

Page 15: ...program is to determine your goals Is your primary goal for exercising to lose weight Improve muscle Reduce stress Prepare for the spring racing schedule Knowing what your goals are will help you deve...

Page 16: ...al tone of voice it is considered normal noise TROUBLESHOOTING TREADMILL Your treadmill is designed to be reliable and easy to use However if you experience a problem please reference the troubleshoot...

Page 17: ...tions will give the technicians the ability to send proper replacement parts and the service necessary to get you and your Horizon Fitness treadmill running again MAINTENANCE WARNING DO NOT stand on r...

Page 18: ...uential damages Horizon Fitness is not responsible or liable for indirect special or consequential damages economic loss loss of property or profits loss of enjoyment or use or other consequential dam...

Page 19: ...ting Customer Tech Support To receive additional product information visit us at www horizonfitness com CUSTOMER TECH SUPPORT DO NOT RETURN TO THE RETAILER if you have any problems during assembly or...

Reviews: