


BEFORE
YOU
BEGIN
10
INTRODUCTION
IMPORT
ANT
PRECAUTIONS
ASSEMBL
Y
BEFORE
YOU
BEGIN
ELLIPTICAL
OPERA
TION
LIMITED
W
ARRANTY
TROUBLESHOOTING
&
MAINTENANCE
CONDITIONING
GUIDELINES
BEFORE YOU
BEGIN
ASSEMBL
Y
11
INTRODUCTION
ELLIPTICAL OPERA
TION
CONDITIONING GUIDELINES
TROUBLESHOOTING &
MAINTENANCE
LIMITED WARRANTY
IMPORT
ANT
PRECAUTIONS
ASSEMBLY
STEP
ASSEMBLY
STEP 5
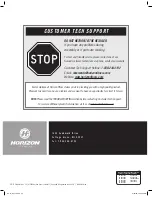
A) Open
HARDWARE BAG FOR STEP 5
(contents on next page)
.
B) Slide
SPACER (H)
into
LOWER LINK ARM.
C)
Place
TEFLON WASHERS (I)
on either side of
SPACER (H).
While holding
TEFLON WASHERS (I)
slide
LOWER
LINK ARM
into bottom end of
LOWER HANDLEBAR
.
D) Insert
BOLT (J)
into
LOWER HANDLEBAR
and secure using
NUT (K)
.
E) Attach the
OUTSIDE ELBOW COVER
to elbow joint using 1
SCREW (L)
.
F) Snap the
INSIDE ELBOW COVER
onto the
OUTSIDE ELBOW COVER
.
Note the position of the snap tabs before snapping into position.
G) Repeat on other side.
INSIDE
ELBOW COVER
OUTSIDE
ELBOW COVER
SCREW (L)
LOWER HANDLEBAR
GUIDE RAIL
TEFLON WASHERS (I)
LOWER HANDLEBAR
NUT (K)
BOLT (J)
LOWER LINK ARM
SPACER (H)
LOWER LINK ARM
SPACER
TEFLON WASHERS
LOWER
HANDLEBAR
LOWER HANDLEBAR
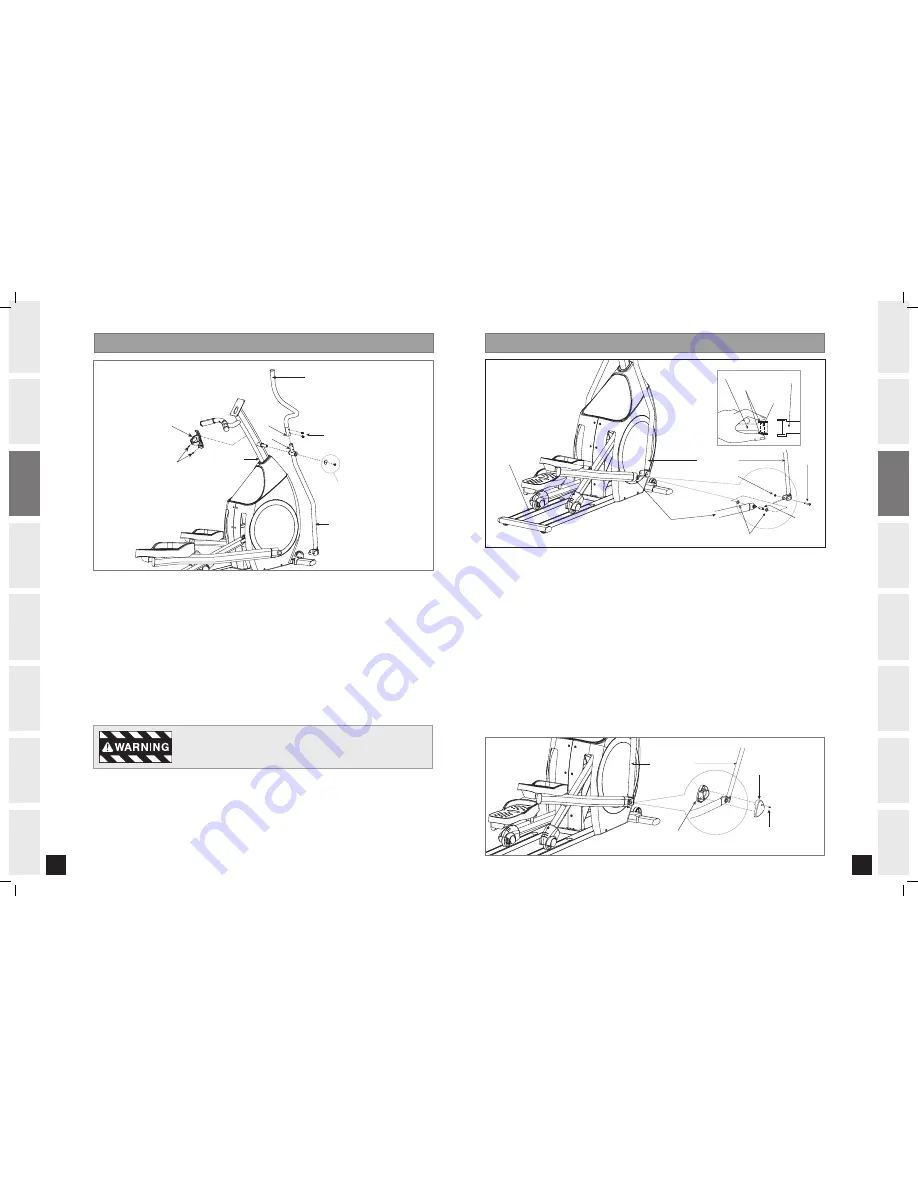
CONSOLE MAST
PRE-ATTACHED
BOLT & WASHER
UPPER HANDLEBAR
PRE-ATTACHED
SET SCREWS
NOTCH
TAB
WATER BOTTLE HOLDER
PRE-ATTACHED
SCREWS
NOTE:
There is NO hardware bag for this step. All hardware is pre-installed.
A) Remove
PRE-ATTACHED BOLT & WASHERS
from
CONSOLE MAST.
B) Slide
LOWER HANDLEBARS
onto
CONSOLE MAST
and attach by re-inserting
PRE-ATTACHED BOLT & WASHERS.
C) Slide
UPPER HANDLEBARS
onto
LOWER HANDLEBARS
and align
NOTCH
with
TAB
making sure handlebars are
joined together completely. Secure
UPPER HANDLEBARS
to
LOWER HANDLEBARS
using
PRE-ATTACHED SET
SCREWS
.
D) Repeat on other side.
E) Attach
WATER BOTTLE HOLDER
to
CONSOLE MAST
using
PRE ATTACHED SCREWS.
After handlebars are assembled they will rotate freely – be cautious. Until the
machine is fully assembled, do not grab the handlebars for support.
EX-57_Rev.1.3.indd 10-11
6/25/08 10:40:33 AM


