12
INTR
ODUC
TION
IMPOR
TANT
PRE
CA
UTIONS
BEF
ORE
YOU
BE
GIN
TREADMILL
OPER
ATION
LIMITED
W
ARR
ANTY
TR
OUBLE
SHOO
TING
&
MAINTENANCE
CONDITIONING
GUIDELINE
S
AS
SEMBL
Y
BEF
ORE
YOU
BE
GIN
AS
SEMBL
Y
1
INTR
ODUC
TION
IMPOR
TANT
PRE
CA
UTIONS
TREADMILL OPER
ATION
CONDITIONING GUIDELINE
S
TR
OUBLE
SHOO
TING
&
MAINTENANCE
LIMITED
W
ARR
ANTY
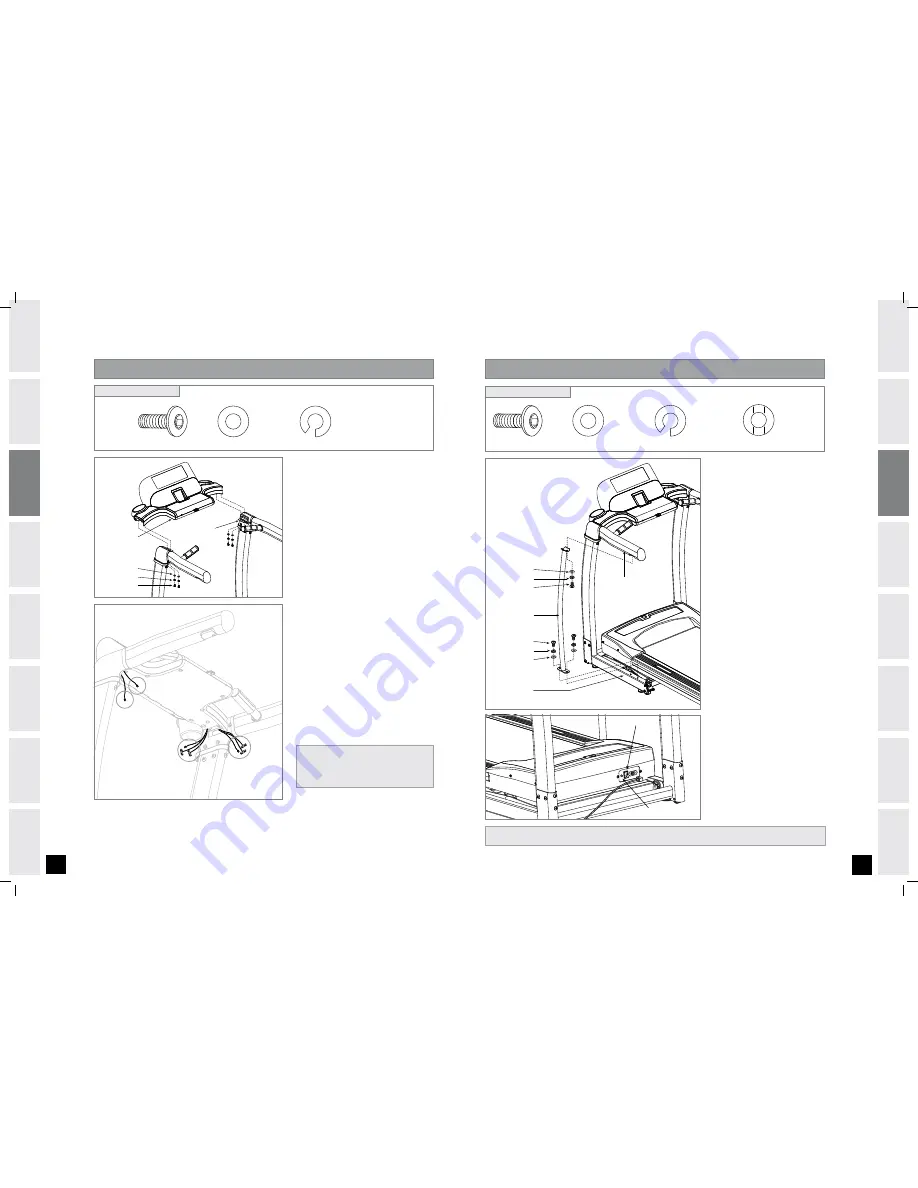
YOU’RE FINISHED!
CIRCUIT BREAKER
ON/OFF SWITCH
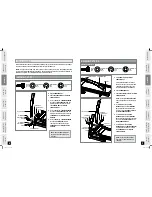
ASSEMBLY
STEP
FLAT WASHERS (B)
SPRING WASHERS (C)
BOLTS (G)
CONSOLE
HANDLEBAR BRACKET
RIGHT SIDE:
CONNECT CONSOLE
CABLES, PULSE CABLES
AND POWER CABLES
LEFT SIDE:
CONNECT PULSE
CABLES ONLY
FLAT WASHER (B)
8 mm
Qty: 4
SPRING WASHER (C)
8 mm
Qty: 4
BOLT (G)
16 mm
Qty: 4
HARDWARE BAG CONTENTS:
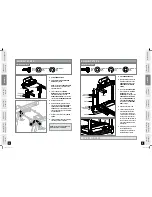
Open
HARDWARE BAG
.
Place
CONSOLE
onto
HANDLEBAR
BRACKETS
as shown.
NOTE:
Do not pinch
CONSOLE CABLE
when placing the console onto the
handlebar brackets.
Insert 2
BOLTS (G)
, 2
SPRING
WASHERS (C)
and
2
FLAT WASHERS
(B)
through the bottom of the
HANDLEBAR BRACKET
to secure the
console to the
HANDLEBAR BRACKET
.
Repeat on other side.
Reach inside the right underside of
the console to pull out the
CONSOLE
CABLE
,
PULSE CABLE
and
POWER
CABLE
. Attach to the matching cables
that are hanging out of the cable hole
in the handlebar.
Repeat on left side to attach
PULSE
CABLE
.
Thread attached cables back through
the cable holes when finished.
A
B
C
D
E
F
G
ASSEMBLY
STEP
FLAT WASHERS (B)
SPRING WASHERS (C)
BOLTS (A)
ARC WASHER (D)
SPRING WASHER (C)
BOLT (A)
SUPPORT BAR
MAIN FRAME
HANDLEBAR
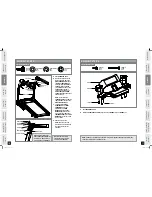
Open
HARDWARE BAG
.
With the running deck in the
lowered position, place the
SUPPORT BAR
between the
HANDLEBAR
and the
MAIN
FRAME
.
To attach the
SUPPORT BAR
,
insert 1
BOLT (A)
, 1
SPRING
WASHER (C)
and 1
ARC
WASHER (D)
in the top of the
SUPPORT BAR
and 2
BOLTS
(A)
, 2
SPRING WASHERS (C)
and 2
FLAT WASHERS (B)
in
the bottom of the
SUPPORT
BAR
as shown.
Repeat on the other side
Connect power plug to the
treadmill and connect the
cord to a power outlet. The
on/off switch is located next
to the power cord. Flip this
switch to the 'ON' position, so
that the switch is lit. You will
hear a beep and the console
will light up.
Before the first use, lubricate
the treadmill deck by
following the instructions in
the Maintenance section.
A
B
C
D
E
F
FLAT WASHER (B)
8 mm
Qty: 4
SPRING WASHER (C)
8 mm
Qty: 6
ARC WASHER (D)
8 mm
Qty: 2
BOLT (A)
20 mm
Qty: 6
HARDWARE BAG CONTENTS:
NOTE:
Do not completely tighten any
bolts until step 6 is complete!
T1201_Rev.1.7.indd 12-13
7/31/08 4:52:44 PM


