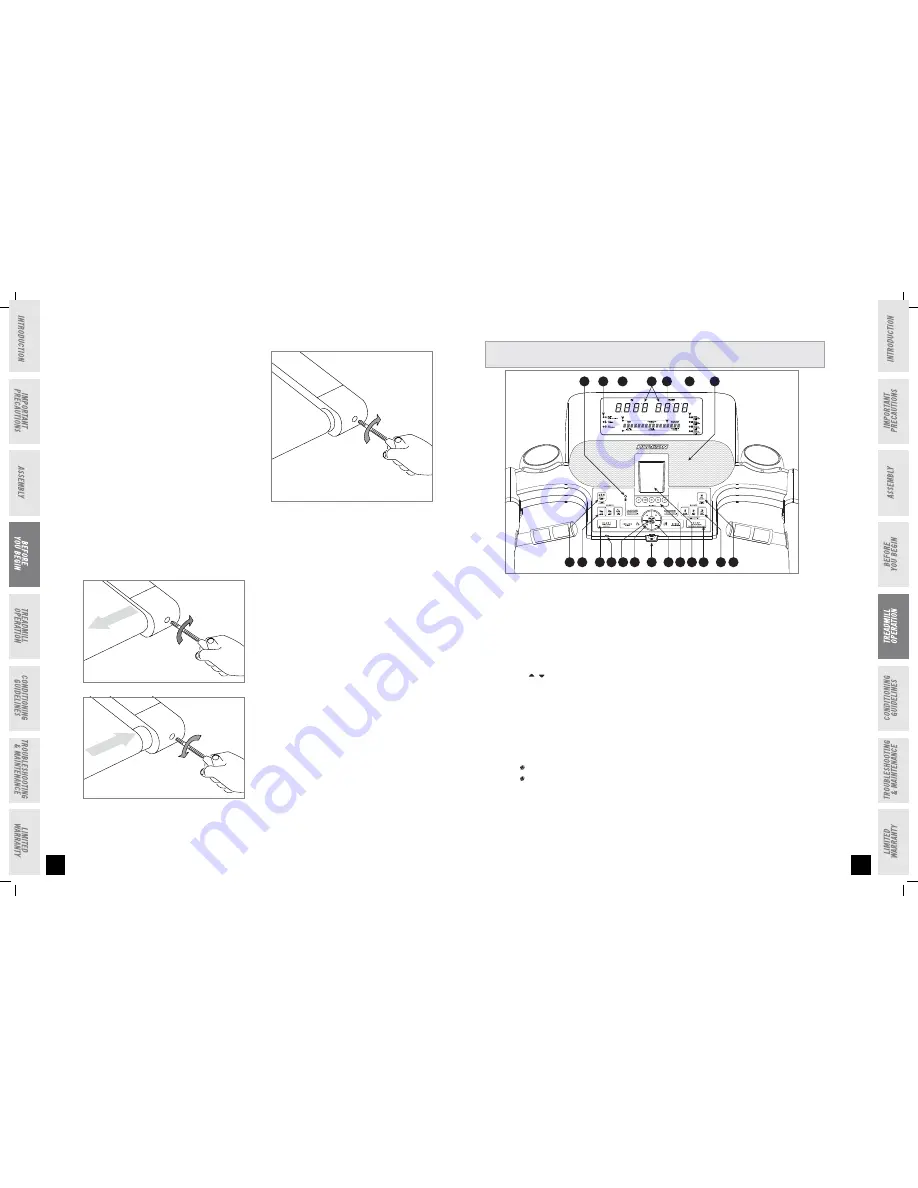
Belt is too far to the right side
Belt is too far to the left side
TENSIONING THE RUNNING BELT
The running belt has been properly adjusted at the factory
before it was shipped. At times the belt can move off-center
during shipment.
CAUTION:
Running belt should NOT be moving during tension-
ing. Over-tightening the running belt can cause excessive
wear on the treadmill as well as its components. Never over-
tighten the belt.
If you can feel a slipping sensation when running on the
treadmill, the running belt must be tightened. In most cases,
the belt has stretched from use, causing the belt to slip. This
is a normal and common adjustment. To eliminate this
slipping,
TURN THE TREADMILL OFF
and tension
BOTH THE
REAR ROLLER BOLTS
using the supplied Allen wrench,
turning them 1/4 TURN to the right as shown. Turn the tread-
mill on and check for slipping. Repeat if necessary, but
NEVER
TURN
the roller bolts more than 1/4 turn at a time. Belt is
properly tensioned when the slipping sensation is gone.
The running belt has been properly adjusted at the factory
before it was shipped. At times the belt can move off-center
during shipment. Before operating the treadmill, make sure
the belt is centered and remains centered to maintain
smooth operation.
CAUTION:
Do not run belt faster than 1/2 mph while center-
ing. Keep fingers, hair and clothing away from belt at all
times.
If the running belt is too far to the right side:
With the
treadmill running at 1/2 mph, turn the right adjustment
bolt clockwise 1/4
TURN
at a time (using the supplied Allen
wrench). Check the belt alignment. Allow belt to run a full
cycle to gauge if more adjustment is needed. Repeat if
necessary, until the belt remains centered during use.
If the running belt is too far to the
l
eft side:
With the tread-
mill running at 1/2 mph, turn the right adjustment bolt
counter- clockwise 1/4 TURN at a time (using the supplied
Allen wrench). Check the belt alignment. Allow belt to run a
full cycle to gauge if more adjustment is needed. Repeat if
necessary, until the belt remains centered during use.
CENTERING THE RUNNING BELT
TREADMILL OPERATION
A
LARGE LED WINDOWS:
Time & Distance.
B
ALPHANUMERIC LED WINDOW:
Pace, % Complete, Heart Rate, Incline, Calories and Speed.
C
FEEDBACK LEDS:
Indicate what workout feedback is currently being displayed.
D
TRAINING MODE LEDS:
Indicate what training mode is currently selected.
E
SAVED WORKOUT LEDS:
Indicate when a saved workout is selected.
F
START:
Press start to begin exercising, starts your workout, or resume exercising after pause.S
G
STOP:
Press to pause/end your workout. Hold for 3 seconds to reset the treadmill.
H
INCLINE / KEYS:
Used to adjust incline in small increments (0.5% increments).
I
SPEED + / - KEYS:
Used to adjust speed in small increments (0.1 mph increments or 0.1 kmph incremens).
J
ENTER:
Used to confirm selection and adjust settings. Press to change display feedback during workout.
K
SELECT TRAINING MODE KEY:
Used to select between 3 training modes: Weight Loss, Event Training and
Cardio Training.
L
SAVE WORKOUT KEY:
Used to select and use any of 4 pre-saved workouts. After your workout, press to save a
workout for future use.
M INCLINE MYKEYS™:
Used to reach desired incline more quickly. See next page for details.
N
SPEED MYKEYS™:
Used to reach desired speed more quickly. See next page for details.
O
IPOD
CONTROLS:
Press to adjust your attached iPod® audio settings. See page 13 for more info (ROJO T5 only).
P
IPOD
DOCKING STATION:
Used to dock and charge your iPod®.
Q
SPEAKERS:
Music plays through speakers when your CD / MP3 player is connected to the console.
R
AUDIO IN JACK:
Plug your CD / MP3 player into the console using the included audio adaptor cable.
S
AUDIO OUT / HEADPHONE JACK:
Plug your headphones into this jack to listen to your music through the head
phones. NOTE: When headphones are plugged into the headphone jack the sound will no longer come out
through the speakers.
T
SAFETY KEY POSITION:
Enables treadmill when safety key is inserted.
Note:
There is a thin protective sheet of clear plastic on the overlay of the console that should be removed.
iPod Controls
A
C
D
B
E
Q
R
k M
F S J H
T
I O P G
L
N
8
9
2/15/09 10:20 AM
®
®


