background image

INTRODUCTION

IMPORT

ANT

PRECAUTIONS

ASSEMBL

Y

BEFORE

YOU 
BEGIN

TREADMILL

OPERA

TION

LIMITED

W

ARRANTY

TROUBLESHOOTING

MAINTENANCE

CONDITIONING

GUIDELINES

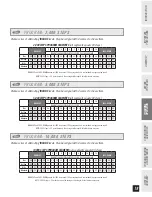
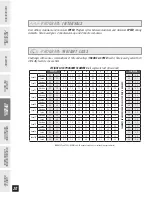
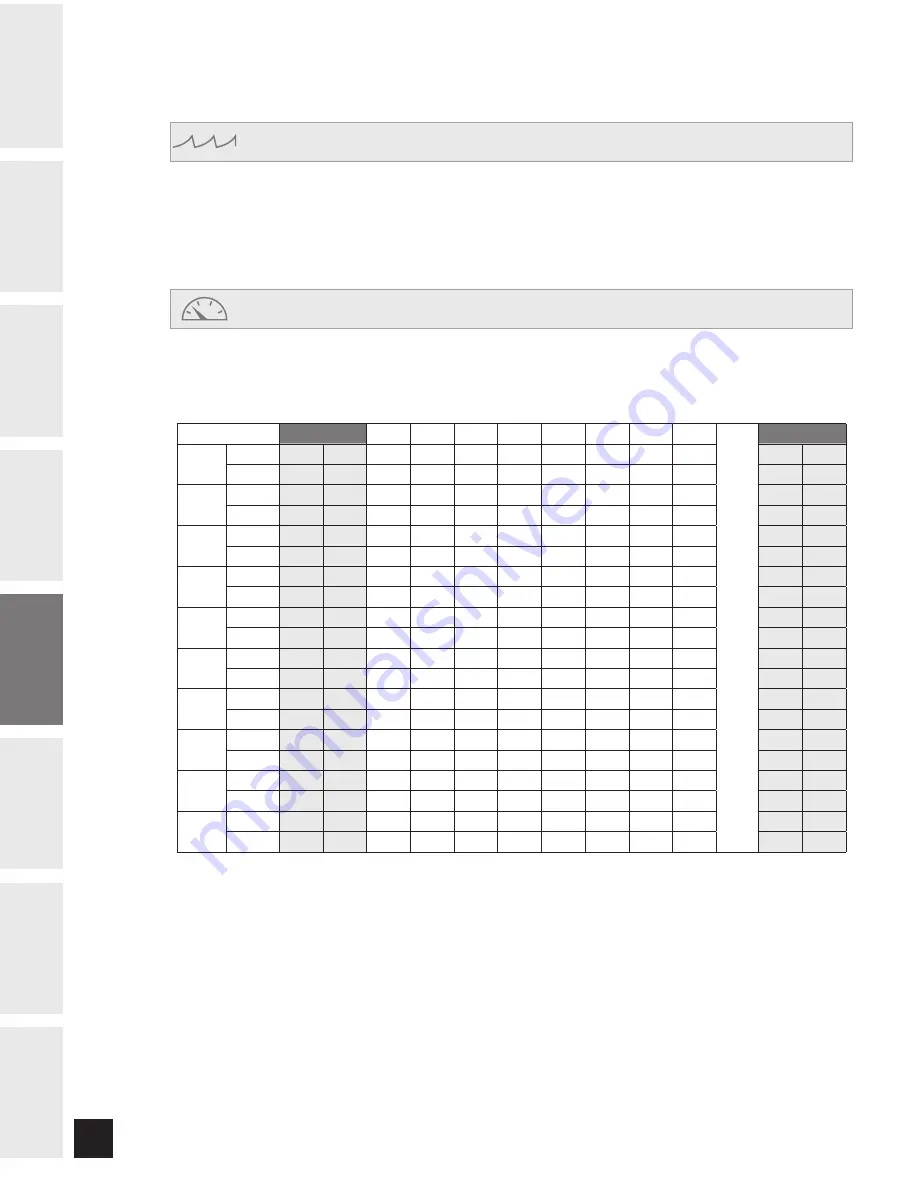
Challenges with various combinations of hills and valleys (

INCLINE & SPEED

 levels). Time-based goal with 10 

difficulty levels to choose from.

WEIGHT LOSS PROGRAM SEGMENTS 

(all segments last 30 seconds)

WARM-UP

1

2

3

4

5

6

7

8

SEGMENTS ARE REPEA

TED UNTIL SELECTED TIME IS REACHED

COOL-DOWN

Level 1

Elevation

0.0

0.5

1.5

1.5

1.0

0.5

0.5

0.5

1.0

1.5

0.5

0.0

Speed

1.0

1.5

2.0

2.5

3.0

3.5

4.0

3.5

3.0

2.5

2.3

1.5

Level 2

Elevation

0.0

0.5

1.5

1.5

1.0

0.5

1.0

0.5

1.0

1.5

0.5

0.0

Speed

1.3

1.9

2.5

3.0

3.5

4.0

4.5

4.0

3.5

3.0

2.6

1.8

Level 3

Elevation

0.5

1.0

2.0

2.0

1.5

1.0

1.0

1.0

1.5

2.0

1.0

0.5

Speed

1.5

2.3

3.0

3.5

4.0

4.5

5.0

4.5

4.0

3.5

3.0

2.0

Level 4

Elevation

0.5

1.0

2.0

2.0

1.5

1.0

1.0

1.0

1.5

2.0

1.0

0.5

Speed

1.8

2.6

3.5

4.5

4.5

5.0

5.5

5.0

4.5

4.5

3.4

2.3

Level 5

Elevation

1.5

1.5

2.5

2.5

2.0

1.5

1.5

1.5

2.0

2.5

1.5

1.0

Speed

2.0

3.0

4.0

4.5

5.0

5.5

6.0

5.5

5.0

4.5

3.8

2.5

Level 6

Elevation

1.5

1.5

2.5

2.5

2.0

1.5

1.5

1.5

2.0

2.5

1.5

1.0

Speed

2.3

3.4

4.5

5.0

5.5

6.0

6.5

6.0

5.5

5.0

4.1

2.8

Level 7

Elevation

1.5

2.0

3.0

3.0

2.5

2.0

2.0

2.0

2.5

3.0

2.0

1.5

Speed

2.5

3.8

5.0

5.5

6.0

6.5

7.5

6.5

6.0

5.5

4.5

3.0

Level 8

Elevation

1.5

2.0

3.0

3.0

2.5

2.0

2.0

2.0

2.5

3.0

2.0

1.5

Speed

2.8

4.1

5.5

6.0

6.5

7.0

7.5

7.0

6.5

6.0

4.9

3.3

Level 9

Elevation

2.0

2.5

3.5

3.5

3.0

2.5

2.5

2.5

3.0

3.5

2.5

2.0

Speed

3.0

4.5

6.0

6.5

7.0

7.5

8.0

7.5

7.0

6.5

5.3

3.5

Level 10

Elevation

2.0

2.5

3.5

3.5

3.0

2.5

2.5

2.5

3.0

3.5

2.5

2.0

Speed

3.3

4.9

6.5

7.0

7.5

8.0

8.5

8.5

7.5

7.0

5.6

3.8

(WARM-UP and COOL-DOWN last 4:00 minutes each and are included in program times)

PROGRAM:

 WEIGHT LOSS

������

���������

�����

�����������

����������

����������

����������

�����������

PROGRAM:

 INTERVALS

������

���������

�����

�����������

����������

����������

����������

�����������

User defines maximum and minimum 

SPEED

. Program cycles between maximum and minimum 

SPEED

 during 

workouts. Time-based goal. 4 minute warm-up and 4 minute cool-down.

20

Summary of Contents for WT950

Page 1: ...HZ SERIES TREADMILL USER S GUIDE FOR MODEL WT950...

Page 2: ......

Page 3: ...tive features you need to get stronger and healthier faster Because we re committed to designing fitness equipment from the inside out we use only the highest quality components It s a commitment we b...

Page 4: ...rounded in accordance with local codes and ordinances Improper connection of the equipment grounding conductor can result in a risk of electric shock Check with a qualified electrician or serviceman i...

Page 5: ...no time should more than one person be on treadmill while in operation The treadmills should not be used by persons weighing more than 300 pounds Failure to comply will void the warranty The treadmil...

Page 6: ...must be reviewed and corrective actions should be taken UNPACKING Place the treadmill carton on a level flat surface It is recommended that you place a protective covering on your floor Take CAUTION...

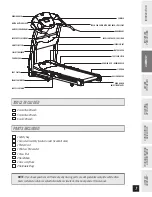
Page 7: ...rdware Bags READING RACK WATER BOTTLE HOLDER GRIP PULSE HANDRAILS ON OFF SWITCH CIRCUIT BREAKER FOOT PLATE TRANSPORT WHEEL SAFEY KEY PLACEMENT POWER CORD AIR CELL CUSHION CONSOLE TOUCH PAD PANEL WITH...

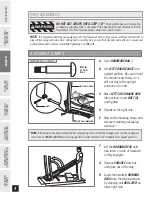
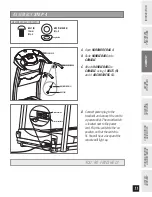
Page 8: ...Open HARDWARE BAG 1 Lift LEFT CONSOLE MAST into upright position Be sure to hold the console mast firmly as it will not stay in the upright position on it s own Move LEFT SIDE LINKAGE ARM into positio...

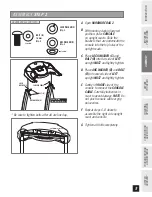
Page 9: ...and BOLT B into flat side of LEFT upright MAST and lightly tighten Place ARC WASHER D and BOLT B into curved side of LEFT upright MAST and lightly tighten Gently lift RIGHT side of the console to con...

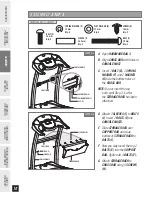
Page 10: ...MAST C Insert 1 BOLT E 1 SPRING WASHER F and 1 WASHER G into the bottom holes of the CROSS BAR NOTE Do not insert the top bolts until Step 3 F after the STORAGE RACK has been attached D Attach 2 SLEE...

Page 11: ...en HARDWARE BAG 4 B Slide HANDLEBARS onto CONSOLE C Attach HANDLEBARS to CONSOLE using 4 BOLTS K and 4 ARC WASHERS L D Connect power plug to the treadmill and connect the cord to a power outlet The on...

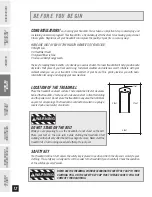
Page 12: ...our new machine LOCATION OF THE TREADMILL Place the treadmill on a level surface There should be 6 feet of clearance behind the treadmill 3 feet on each side and one foot in front for folding and the...

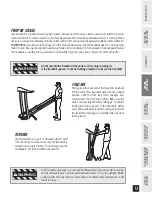
Page 13: ...treadmill if the power cord or plug is damaged If the treadmill appears to not be working properly do not use the treadmill FOLDING Firmly grasp the back end of the treadmill Carefully lift the end of...

Page 14: ...lockwise 1 4 TURN at a time using the supplied Allen wrench Check the belt alignment Allow belt to run a full cycle to gauge if more adjustment is needed Repeat if necessary until the belt remains cen...

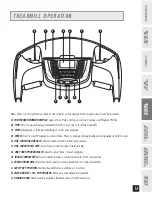
Page 15: ...ng or starts your program D ENTER Used to select Program Level and Time Press to change display feedback during workout Hold to scan E ONE TOUCH INCLINE KEYS Used to reach desired incline more quickly...

Page 16: ...the number of steps you have taken during the work out PROGRESS INDICATOR Running Man icon represents how far you have to go to reach the end of the program PROGRAM PROFILES Represents the profile of...

Page 17: ...keys Once a PROGRAM has been chosen press ENTER SELECT A LEVEL Select a PROGRAM LEVEL using the ARROW keys Once a PROGRAM LEVEL has been chosen press ENTER SELECT A TIME Select a Time using the ARROW...

Page 18: ...WN periods last 200 steps each 50 per segment and are included in program step count NOTE 1 000 steps 0 5 miles based on the average stride length Actual distance may vary PROGRAM 1 000 STEPS Your tre...

Page 19: ...EPS ARE REACHED Flat 0 0 0 0 0 0 0 0 0 0 0 0 0 0 0 0 0 0 0 0 0 0 0 0 0 0 0 0 0 0 0 0 0 0 0 0 0 0 0 0 Rolling 0 0 0 0 0 5 0 5 1 0 0 5 1 0 0 5 2 0 3 0 2 0 2 0 4 0 2 0 3 0 0 5 0 5 0 5 0 0 0 0 Hills 0 5 0...

Page 20: ...Speed 1 8 2 6 3 5 4 5 4 5 5 0 5 5 5 0 4 5 4 5 3 4 2 3 Level 5 Elevation 1 5 1 5 2 5 2 5 2 0 1 5 1 5 1 5 2 0 2 5 1 5 1 0 Speed 2 0 3 0 4 0 4 5 5 0 5 5 6 0 5 5 5 0 4 5 3 8 2 5 Level 6 Elevation 1 5 1 5...

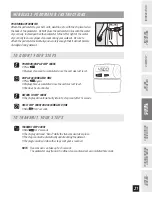
Page 21: ...TY WIRELESS PEDOMETER INSTRUCTIONS TO COUNT YOUR STEPS TO TRANSMIT YOUR STEPS TRANSMIT STEP COUNT Hold for 2 seconds The display will read Send while the transmission takes place The step count will a...

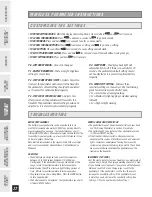
Page 22: ...tery in your pedometer can be expected to last six months for someone who walks 10 000 steps per day Results may vary depending on usage Your pedometer uses one 1 Lithium CR1225 battery Should your di...

Page 23: ...new findings suggest that we should instead be counting the number of steps we take each day And what is the magic number 10 000 Studies have shown that counting steps is more motivational and in turn...

Page 24: ...sociation recommends working out at a Target Heart Rate Zone of between 60 and 75 of your maximum heart rate A beginner will want to workout in the 60 range while a more experienced exerciser will wan...

Page 25: ...about 18 from the wall and the right foot about 12 behind the other foot Lean forward pushing against the wall with your palms Keep your heels flat and hold this position for a count of 15 seconds Mak...

Page 26: ...common exercise goals Weight Loss lower intensity longer duration workouts Improve Body Shape and Tone interval workouts alternate between hi and low intensities Increased Energy Level more frequent...

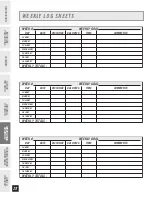
Page 27: ...GOAL WEEKLY TOTALS DAY SUNDAY MONDAY TUESDAY WEDNESDAY THURSDAY FRIDAY SATURDAY DATE DISTANCE CALORIES TIME COMMENTS WEEK WEEKLY GOAL WEEKLY TOTALS DAY SUNDAY MONDAY TUESDAY WEDNESDAY THURSDAY FRIDAY...

Page 28: ...KLY GOAL WEEKLY TOTALS DAY SUNDAY MONDAY TUESDAY WEDNESDAY THURSDAY FRIDAY SATURDAY DATE DISTANCE CALORIES TIME COMMENTS WEEK WEEKLY GOAL WEEKLY TOTALS DAY SUNDAY MONDAY TUESDAY WEDNESDAY THURSDAY FRI...

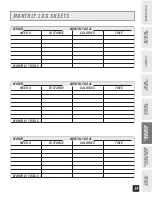
Page 29: ...E MONTH MONTHLY GOAL MONTHLY TOTALS WEEK DISTANCE CALORIES TIME MONTH MONTHLY GOAL MONTHLY TOTALS WEEK DISTANCE CALORIES TIME INTRODUCTION IMPORTANT PRECAUTIONS ASSEMBLY BEFORE YOU BEGIN TREADMILL OPE...

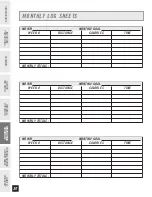
Page 30: ...TREADMILL OPERATION LIMITED WARRANTY TROUBLESHOOTING MAINTENANCE CONDITIONING GUIDELINES MONTH MONTHLY GOAL MONTHLY TOTALS WEEK DISTANCE CALORIES TIME MONTH MONTHLY GOAL MONTHLY TOTALS WEEK DISTANCE...

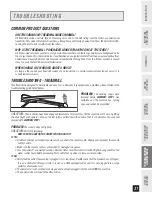
Page 31: ...f you experience a problem please reference the troubleshooting guide listed below PROBLEM The banding straps were removed before ASSEMBLY STEP 1 was complete and the machine has sprung open and canno...

Page 32: ...ement and vibration due to constantly holding the heart rate handlebars while exercising If you are receiving erratic heart rate readouts try to only hold the grips long enough to monitor your heart r...

Page 33: ...particles or other objects that may have accumulated underneath the treadmill Return the treadmill to its previous position EVERY MONTH IMPORTANT Turn off the treadmill with the on off switch then un...

Page 34: ...t responsible or liable for indirect special or consequential damages economic loss loss of property or profits loss of enjoyment or use or other consequential damages of whatsoever nature in connecti...

Page 35: ......

Page 36: ...comments you may contact one of our trained customer technicians via phone email or our website Customer Tech Support Hotline 1 800 244 4192 Email comments horizonfitness com Website www horizonfitnes...

Reviews: