background image

5

EN

Revolutionary SAFE

®

 (Sensor Assisted Flight Envelope) technology uses an innovative combination of multi-axis sensors and 

software that allows model aircraft to know its position relative to the horizon. This spatial awareness is utilized to create a 
controlled fl ight envelope the aircraft can use to maintain a safe region of bank and pitch angles so you can fl y more safely. 
Far beyond stability, this level of protection offers multiple modes so the pilot can choose to develop his or her skills with a 
greater degree of security and fl ight control that always feels crisp and responsive. 

SAFE technology delivers:
• Flight envelope protection you can enable at the fl ip of a switch.
• Multiple modes let you adapt SAFE technology to your skill level instantly.
Best of all, sophisticated SAFE technology doesn’t require any work to enjoy. Every aircraft with SAFE installed is ready to use 
and optimized to offer the best possible fl ight experience.

FlySAFERC.com

Technology

®

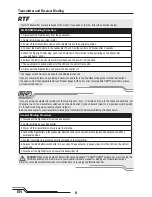
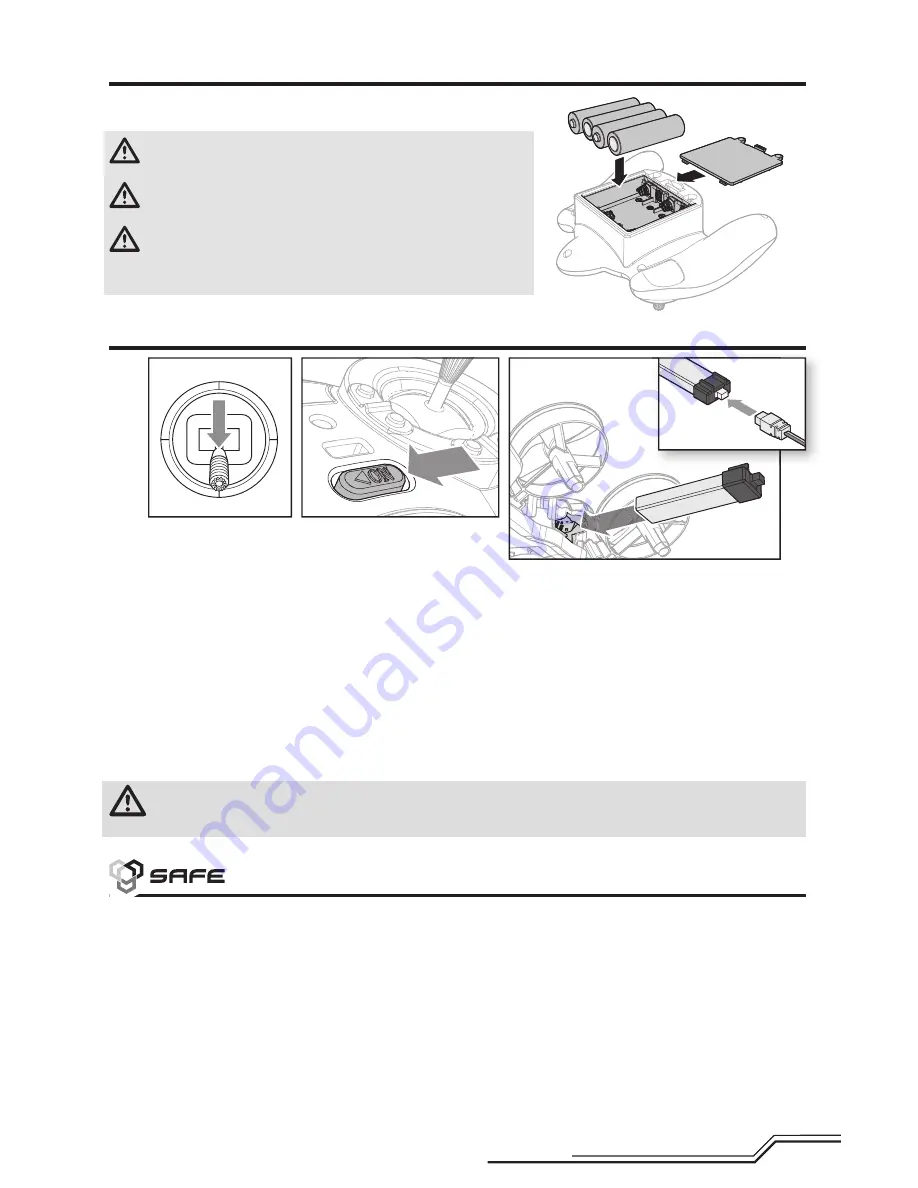
1. Lower the throttle to the lowest setting.
2. Power on the transmitter.
3.  Install the battery by sliding it into the battery mounting slot below the control unit. Slide the battery into the slots 

with the label facing upward so that the battery key molded into the battery end-cap comes in contact with
the key on the battery slot.

4.  Connect the battery cable to the control unit.
5. Place the craft on a fl at surface and leave the craft still until the LED on the control unit indicates one of the following 

fl ight modes:

Solid white:

 Air mode

Solid blue:

 Multirotor mode

Solid green:

 Hovercraft mode (1 stick)

Solid amber:

 Hovercraft mode (2 stick)

CAUTION: 

Always disconnect the Li-Po battery from the aircraft when not fl ying to avoid over-discharging the

battery. Batteries discharged to a voltage lower than the lowest approved voltage may become damaged,

resulting in loss of performance and potential fi re when batteries are charged.

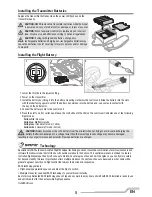
Installing the Transmitter Batteries

Replace the transmitter batteries when the power LED fl ashes and the 
transmitter beeps.

CAUTION: 

NEVER remove the transmitter batteries while the model 

is powered on. Loss of model control, damage, or injury may occur.

CAUTION:

 Risk of explosion if battery is replaced by an incorrect 

type. Dispose of used batteries according to national regulations.

CAUTION:

 If using rechargeable batteries, charge only 

rechargeable batteries. Charging non-rechargeable batteries may 

cause the batteries to burst, resulting in injury to persons and/or damage 
to property.

Installing the Flight Battery

1

2

3

4

Summary of Contents for Blade Inductrix Switch Air BNF

Page 1: ...Instruction Manual Bedienungsanleitung Manuel d utilisation Manuale di Istruzioni RTF...

Page 2: ...warnings for this and any optional support equipment chargers rechargeable battery packs etc Always keep all chemicals small parts and anything electrical out of the reach of children Always avoid wa...

Page 3: ...r the European Union 17 Never attempt to dismantle the charger or use a damaged charger Always use only rechargeable batteries designed for use with this type of charger Always inspect the battery bef...

Page 4: ...rged 150mAh battery takes approximately 30 minutes The light goes out when the charge is complete CHARGING Solid Red MAX CHARGE OFF CAUTION Once charging is complete immediately remove the battery Nev...

Page 5: ...slots with the label facing upward so that the battery key molded into the battery end cap comes in contact with the key on the battery slot 4 Connect the battery cable to the control unit 5 Place the...

Page 6: ...ter and Receiver Binding CAUTION When using a Futaba transmitter with a Spektrum DSM2 DSMX module you must reverse the throttle channel and re bind Refer to your Spektrum module manual for binding and...

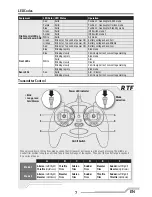
Page 7: ...e LED Codes Equipment LED Color LED Status Operation Flight control LED on the control board RGB Red Solid Position 2 Quadcopter AS3X mode Purple Solid Position 1 Quadcopter Horizon mode Blue Solid Po...

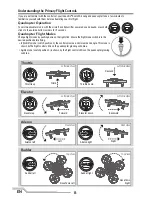
Page 8: ...e right stick Ensure the ight mode switch is in the desired position before ying In Stability mode switch position 0 the controls provide a minimum bank angle This mode is shown by the ight control LE...

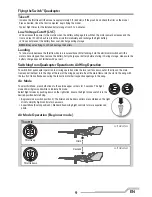
Page 9: ...oes not fall below 3V per cell Flying the Switch Quadcopter Throttle Throttle down Throttle up Left Side View Left Side View Descend Climb Switching from Quadcopter Operation to Air Wing Operation To...

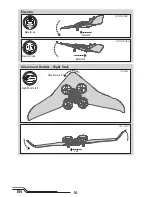
Page 10: ...10 EN Elevator Forward Elevator down Elevator up Backward Left Side View Left Side View Nose Yaws Left Top View Aileron and Rudder Right Stick Right Stick to left Left Rear View...

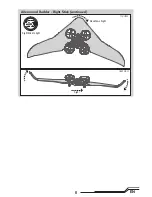
Page 11: ...11 EN Right Rear View Nose Yaws Right Top View Aileron and Rudder Right Stick continued Right Stick to right...

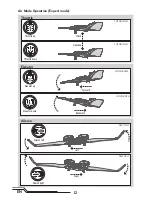
Page 12: ...up Elevator down Backward Left Side View Left Side View Aileron right Right Rear View Aileron Aileron left Left Rear View Throttle Throttle down Throttle up Left Side View Left Side View Descend Climb...

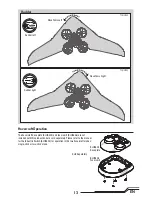
Page 13: ...H9806 Foam skirt BLH9805 Base plate Hovercraft Operation The hovercraft base plate BLH9805 and foam skirt BLH9806 are not included with this product and are sold separately Please refer to the manual...

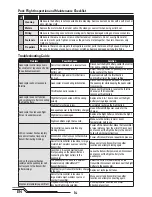
Page 14: ...ard Connect the ight battery noting proper polarity Quadcopter has reduced ight time or is underpowered Flight battery charge is low Completely recharge the ight battery Inadequate power to ight batte...

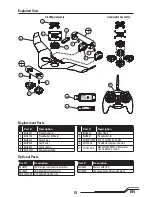
Page 15: ...rol Board 6 BLH08301 Replacement Wing Part Description 7 BLH9804 Main Frame 8 BLH9801 Propeller Set 4 9 EFLB1501S25 3 7V 150mAh 1S 25C LiPo 10 EFLC1008 1S USB LiPo charger 350mAh 11 EFLH1064 B Blade M...

Page 16: ...eed any assistance For questions or assistance please visit our website at www horizonhobby com submit a Product Support Inquiry or call the toll free telephone number referenced in the Warranty and S...

Page 17: ...rticular installation If this equipment does cause harmful interference to radio or television reception which can be determined by turning the equipment off and on the user is encouraged to try to co...

Page 18: ...n Union Instructions for disposal of WEEE by users in the European Union This product must not be disposed of with other waste Instead it is the user s responsibility to dispose of their waste equipme...

Page 19: ...go are trademarks or registered trademarks of Horizon Hobby LLC The Spektrum trademark is used with permission of Bachmann Industries Inc Futaba is a registered trademark of Futaba Denshi Kogyo Kabush...

Reviews: