EN
Blue Angels F-18 80mm EDF
10
After assembly and transmitter setup, confi rm that the control surfaces are
centered. The model must be powered up and bound to the transmitter in AS3X
mode, with the throttle left at zero. When enabled, SAFE mode is active at power
up. AS3X mode is activated when the throttle is raised above 25% for the fi rst time
after being powered on. It is normal for the control surfaces to respond to aircraft
movement if the aircraft is in AS3X or SAFE modes.
1. Verify the trims and subtrims on your transmitter are zero
2. Power up the model in AS3X mode and leave the throttle at zero
NOTICE:
Be aware of the pushrod bottoming out in the ball linkage. Do not
thread the pushrod too far into the ball link or the pushrod will damage the ball
link and protrude into the area needed for the control ball.
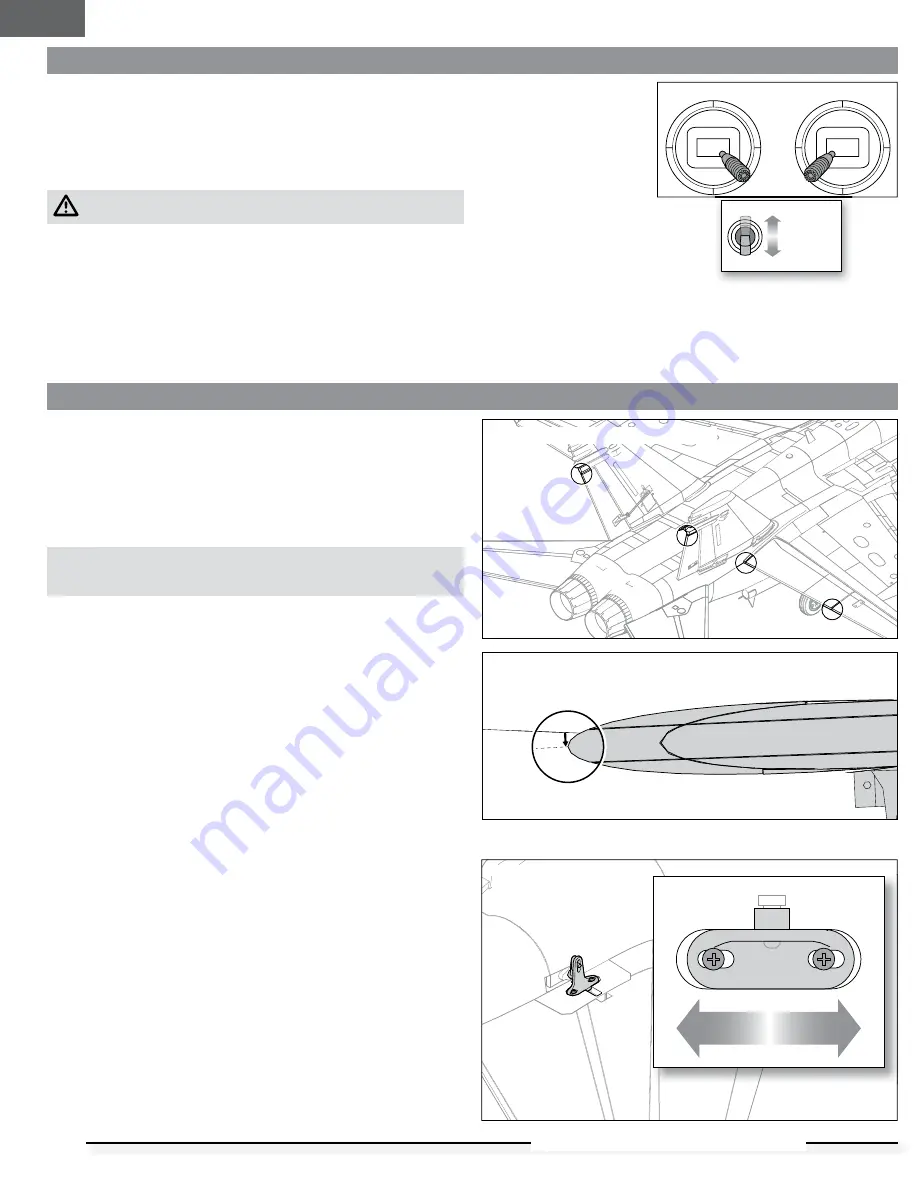
3. Center the rudders with the tops of the vertical stabilizers. If adjustment is
required, turn the ball link on the linkage to change the length between the
servo arm and the control horn until the rudders are straight.
4. With the fl ap switch in the up position, center the fl aps by aligning the inboard
end of the fl ap with the wing fi llet. Adjust the linkage length as in step 3 as
necessary.
5. Center the ailerons by aligning the inboard end of the aileron with the fl ap.
Adjust the linkage length as in step 3 as necessary.
6. The full fl ying stabilizers need to be aligned with each other and centered. At
neutral the leading edge of the full fl ying stabilizers should be 4mm below the
panel line in the fuselage as shown.
7. Adjustments to the full fl ying stabilizers may be made individually by loosening
the control horn mounting screws and sliding the control horn fore and
aft. Sliding the control horns is only meant for minor adjustment. See the
maintenance section of this manual to re-center the elevator servos if larger
changes are required.
SAFE
®
Select Switch Designation
SAFE
®
Select technology can be assigned to any open switch (2 or 3 position)
controlling a channel (5–9) on your transmitter. Once assigned to a switch, SAFE select
ON gives you the fl exibility to choose SAFE technology or AS3X mode while in fl ight. If
the aircraft is bound with SAFE select OFF, the aircraft will be in AS3X mode exclusively.
IMPORTANT:
Before assigning your desired switch, ensure that the travel for that
channel is set at 100% in both directions and the aileron, elevator, rudder and
throttle are all on high rate with the travel at 100%.
CAUTION:
Keep all body parts well clear of the rotor and keep the aircraft
securely restrained in case of accidental throttle activation.
TIP:
SAFE Select is assignable on any unused channels 5–9. See your
transmitter manual for more information about assigning a switch to a channel.
TIP:
Use your radio channel monitor to confi rm that the four primary channels
are showing 100% travel while assigning the switch.
TIP:
Use the channel monitor to make sure the switch you are assigning for SAFE
Select is active and driving a channel between 5-9 and that it is traveling 100% in
each direction.
TIP:
Make sure your four primary channels are not reversed if you are having
trouble assigning a SAFE Select switch.
Assigning a switch
1. Bind the aircraft to choose
SAFE Select ON. This will
allow the system to be
assigned to a switch.
2. Hold both transmitter
sticks to the inside bottom
corners and toggle the
desired switch 5 times
(1 toggle = full up and down)
to assign that switch. The
control surfaces of the
aircraft will move, indicating
the switch has been selected.
Repeat the process to assign a different switch or to deactivate the current switch
if desired.
Mode 1 and 2 transmitters
X 5
100%
100%
4mm
Elevator Control Horn
Elevator Center Position
Control Surface Centering
Rudder, Flap and Aileron Center Positions


