EN
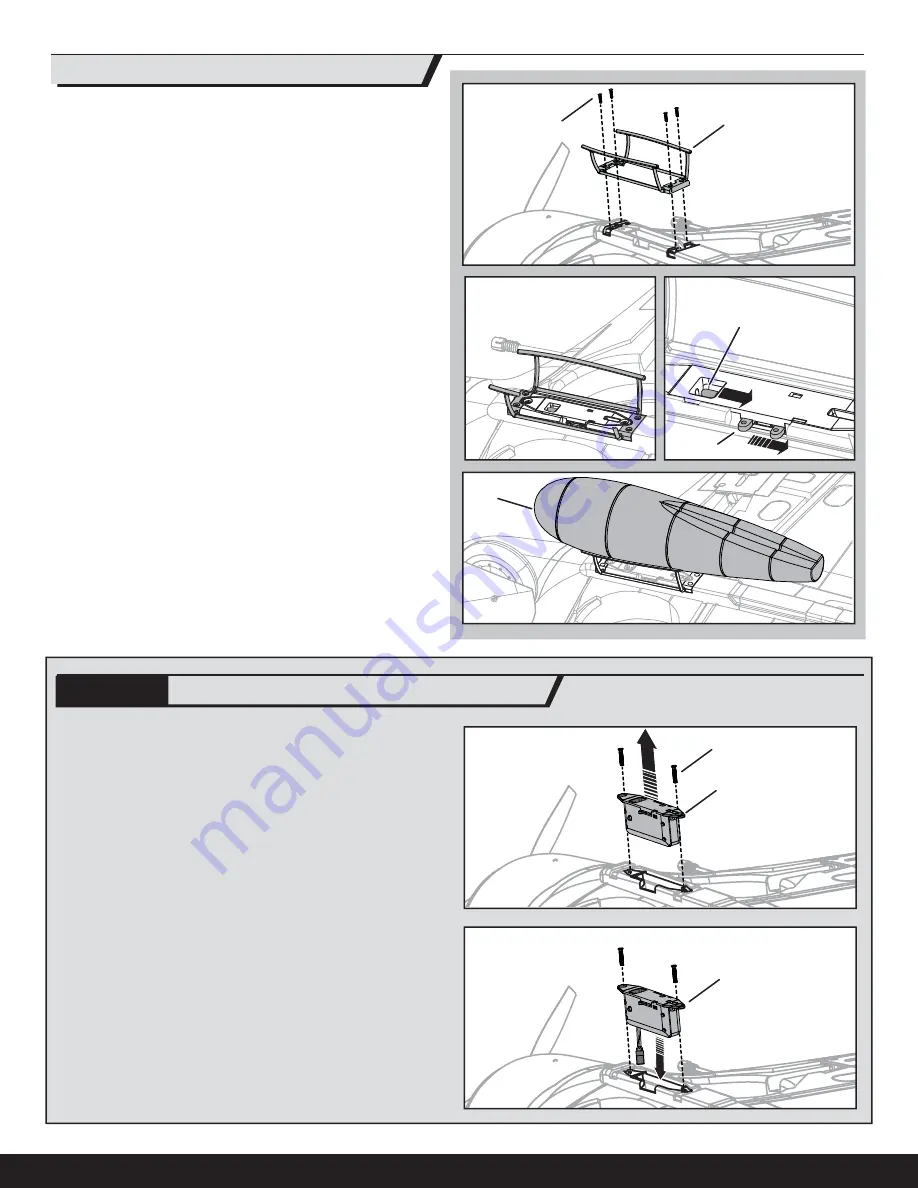
1. Remove the factory-installed payload mount (
A
) and 2 screws (
B
) from the
drop tank fairing located on the bottom of the wing.
2. Install the servoless payload release (
C
) by guiding the payload release wir-
ing and connector through the connecting holes of the fuselage and wing.
Secure the payload release with 2 screws from the payload mount.
3. Invert the aircraft so the battery hatch faces up. Remove the battery hatch
and connect the payload release connector to the AUX1 port of the receiver.
Replace the battery hatch on the fuselage.
4. Install the drop tank support frame and load the drop tank as described in
the “Installing the Drop Tank” section above.
IMPORTANT:
After installing an optional payload release, use the transmitter
to release a payload while the aircraft is still on the ground, observing the air-
craft’s reaction. In fl ight, be ready for the aircraft reaction whenever a payload
is released.
• Never drop any object that creates a hazard to persons or property.
• Never activate the payload release above crowded areas or cars.
• Always choose responsibly when selecting your payload.
• Always follow all aircraft instructions when using the device.
IMPORTANT:
The included scale drop tank will slow your aircraft much like the
auxiliary tank on a full-scale aircraft.
NOTICE:
NEVER attempt to belly land your aircraft with the drop tank or drop
tank support frame installed or damage to the aircraft may result.
1. Install the drop tank support frame (
A
) on the wing using 4 screws (
B
)
as shown.
2. Pull back the lever (
C
) on the side of the payload mount to retract
the pin (
D
).
3. Load the drop tank (
E
)
4. Release the lever when the drop tank is fully seated in the payload mount.
5. Ensure the drop tank is secure and the pin is fully engaged and does not
move. A loose payload can affect fl ight performance.
A
B
C
Drop Tank Installation
(EFLA405,
sold separately
)
A
B
E
D
C
Servoless Payload Release Installation
OPTIONAL
8


