background image

EN

Troubleshooting Guide AS3X

Motor Service

CAUTION:

 Always disconnect the fl ight battery before performing

motor service.

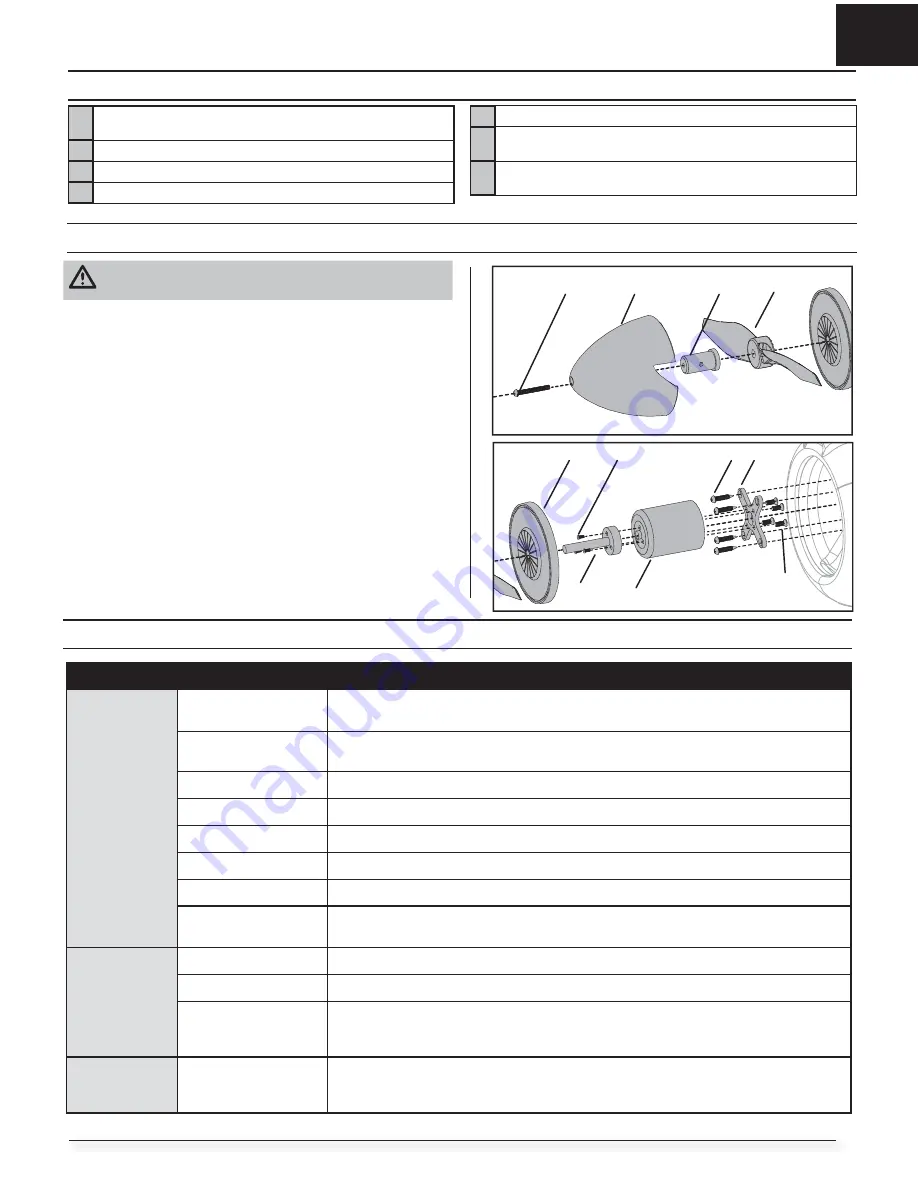
Disassembly 

1.   Remove the screw (

A

) and spinner (

B

) from the prop nut (

C

). 

2.  Remove the propeller (

D

), backplate (

E

) from the prop adapter and motor. 

You will need a tool to turn the spinner nut.

3  Remove the 3 screws (

G

) from the prop adapter (

H

) and remove it from the 

motor.

4.   Remove the 4 screws (

I

) from the motor mount (

J

) and the fuselage.

5.   Disconnect the motor wires from the ESC wires.
6.   Remove the 4 screws (

K

) and motor (

L

) from the motor mount. 

Assembly

Assemble in reverse order. 
•  Correctly align and connect the motor wire colors with the ESC wires.
•  The propeller size numbers (8 x 8) must face to the front of the airplane for 

correct propeller operation.

•  A tool is required to tighten the lock nut on the collet.

A

B

H

C

D

N

Problem

Possible Cause

Solution

Oscillation

Damaged propeller or 
spinner

Replace propeller or spinner

Imbalanced propeller 

Balance the propeller. For more information, view John Redman’s propeller balancing video at www.
horizonhobby.com

Motor vibration

Replace parts or correctly align all parts and tighten fasteners as needed

Loose receiver

Align and secure receiver in fuselage

Loose aircraft controls

Tighten or otherwise secure parts (servo, arm, linkage, horn and control surface)

Worn parts

Replace worn parts (especially propeller, spinner or servo)

Irregular servo movement

Replace servo

Too high of gain value in 
AR636

Reference AR636 manual to reduce gain value.

Inconsistent fl ight 
performance

Trim is not at neutral

If you adjust trim more than 8 clicks, adjust the clevis to remove trim

Sub-Trim is not at neutral

No Sub-Trim is allowed. Adjust the servo linkage

Aircraft was not kept im-
mobile for 5 seconds after 
battery connection.

With the throttle stick in lowest position. Disconnect battery, then reconnect battery and keep the aircraft 
still for 5 seconds

Incorrect response 
to the AS3X Control 
Direction Test

Incorrect direction settings 
in the receiver, which can 
cause a crash

DO NOT fl y. Correct the direction settings (refer to the receiver manual), then fl y

Post Flight

1

Disconnect the fl ight battery from the ESC (Required for Safety
and battery life).

2

Power OFF the transmitter.

3

Remove the fl ight battery from the aircraft.

4

Recharge the fl ight battery.

5

Repair or replace all damaged parts.

6

Store the fl ight battery apart from the aircraft and monitor the
battery charge.

7

Make note of the fl ight conditions and fl ight plan results, planning for
future fl ights.

E

G

I

J

K

L

H

11

Summary of Contents for Rare Bear

Page 1: ...Rare Bear Instruction Manual Bedienungsanleitung Manuel d utilisation Manuale di Istruzioni ...

Page 2: ...ntial harm when operating this product NOTICE Procedures which if not properly followed create a possibility of physical property damage AND little or no possibility of injury CAUTION Procedures which if not properly followed create the probability of physical property damage AND a possibility of serious injury WARNING Procedures which if not properly followed create the probability of property da...

Page 3: ...o EFLB33004S50 Required to Complete Required to Complete Recommended Battery Charger 4 cell Li Po battery balancing charger Required to Complete Required to Complete Recommended Transmitter Full Range 2 4GHz with Spektrum DSM2 DSMX technology DX6i and above Required to Complete Required to Complete T 287 sq in 18 5 sq dm Preflight 4 Model Assembly 4 Model Assembly Continued 5 Clevis Installation an...

Page 4: ...everse order A B 3mm X 10mm Preflight 1 Remove and inspect contents 2 Read this instruction manual thoroughly 3 Charge flight battery 4 Fully assemble airplane 5 Install the flight battery in the aircraft once it has been fully charged 6 Check the Center of Gravity CG 7 Bind aircraft to your transmitter 8 Make sure linkages move freely 9 Perform the Control Direction Test with the transmitter 10 Perf...

Page 5: ...e 4 Secure the left and right wings to the fuselage using the included 4 screws E Tip If needed use hemostats or pliers to pull the servo connectors into the fuselage 5 Connect the aileron servos F from the wings to the Y harness connectors in the fuselage The left and right aileron servos can be connected to either side of the Y harness 6 Reinstall the canopy hatch on the fuselage Disassemble in ...

Page 6: ...hows the factory settings for the control horns and servo arms Fly the aircraft at factory settings before making changes NOTICE If control throws are changed from the factory settings the AR636 gain values may need to be adjusted Refer to the Spektrum AR636 manual for adjustment of gain values After flying you may choose to adjust the linkage positions for the desired control response See the tabl...

Page 7: ...e transmitter while holding the transmitter bind button or switch Refer to your transmitter s manual for binding 6 When the receiver binds to the transmitter the orange bind light on the receiver will turn solid and the ESC will produce a series of three ascending tones The tones indicate the ESC is armed provided the throttle stick and throttle trim are low enough to trigger arming 7 Remove the b...

Page 8: ...y lift the back of the canopy hatch B to remove 4 Install the fully charged battery C in the battery compartment as shown See the Adjusting the Center of Gravity instructions for more information 5 Make sure the flight battery is secured using the hook and loop strap D 6 Connect the battery to the ESC the ESC is now armed 7 Keep the aircraft immobile and away from wind or the system will not initia...

Page 9: ...and bind your transmitter to the receiver before performing this test 1 Raise the throttle just above 25 and then lower the throttle to activate AS3X 2 Move the entire aircraft as shown and ensure the control surfaces move in the direction indicated in the graphic If the control surfaces do not respond as shown do not fly the aircraft Refer to the receiver manual for more information Once the AS3X ...

Page 10: ...Low Voltage Cutoff LVC section for more details on maximizing battery health and run time Land the aircraft into the wind in a soft area such as tall grass using the rec ommended landing rate Use a small amount of throttle for the initial approach Once the aircraft is on a proper approach angle and the aircraft will land in the proper area remove all throttle but maintain the descent During approa...

Page 11: ...Loose receiver Align and secure receiver in fuselage Loose aircraft controls Tighten or otherwise secure parts servo arm linkage horn and control surface Worn parts Replace worn parts especially propeller spinner or servo Irregular servo movement Replace servo Too high of gain value in AR636 Reference AR636 manual to reduce gain value Inconsistent flight performance Trim is not at neutral If you ad...

Page 12: ... batteries Bind switch or button not held long enough during bind process Power off transmitter and repeat bind process Hold transmitter bind button or switch until receiver is bound Aircraft will not con nect after binding to transmitter Transmitter too near aircraft during connecting process Move powered transmitter a few feet from aircraft disconnect and reconnect flight battery to aircraft Airc...

Page 13: ...or model demonstrations unless a The aircraft control system and pilot skills have successfully demonstrated all maneuvers intended or anticipated prior to the specific event b An inexperienced pilot is assisted by an experienced pilot 4 When and where required by rule helmets must be properly worn and fastened They must be OSHA DOT ANSI SNELL or NOCSAE approved or comply with comparable standards ...

Page 14: ... need any assistance For questions or assistance please visit our website at www horizonhobby com submit a Product Support Inquiry or call the toll free telephone number referenced in the Warranty and Service Contact Information section to speak with a Product Support representative Inspection or Services If this Product needs to be inspected or serviced and is compliant in the country you live an...

Page 15: ...bH 49 0 4121 2655 100 France Service Parts Sales Horizon Hobby SAS infofrance horizonhobby com 11 Rue Georges Charpak 77127 Lieusaint France 33 0 1 60 18 34 90 China Service Parts Sales Horizon Hobby China info horizonhobby com cn Room 506 No 97 Changshou Rd Shanghai China 200060 86 021 5180 9868 FCC Information Operation is subject to the following two conditions 1 This device may not cause harmf...

Page 16: ...imento attrezzi 5 pc EFLAEC302 EC3 Battery Connector Female 2 EC3 Akkukabel Buchse 2 Prise EC3 femelle 2pc EC3 Connettore femmina x batteria 2 EFLAEC303 EC3 Device Battery Connector Male Female EC3 Kabelsatz Stecker Buchse Prise EC3 male femelle EC3 Connettore batteria maschio femmina EFLB33004S50 3300mAh 4S 14 8V 50C Li Po 12AWG EC3 E fl ite 3300mAh 4S 14 8V 50C Li Po 12AWG EC3 3300mAh 4S 14 8V 50...

Page 17: ...ed with permission of Bachmann Industries Inc Futaba is a registered trademark of Futaba Denshi Kogyo Kabushiki Kaisha Corporation of Japan Rare Bear and the Rare Bear trimscheme are trademarks of Lewis Racing LLC and are used with permission by Horizon Hobby LLC All other trademarks service marks and logos are property of their respective owners Patents pending http www e fliterc com Created 04 15...

Reviews: