DCC Ready
If your locomotive is not pre-fitted with
a decoder, please see Fig.9 for location
of DCC socket.
Both the power and dummy cars are fitted
with decoders. They are both programmed
to address 3 at the factory. If you wish to
change the address from 3 and to ensure
correct function of the lighting system, please
ensure that both cars are programmed to the
same new address.
Fig.9
4
Body Removal
4
Fig.5
Fig.4
Fig.7
Fig.8
Fig.1
Lubrication
3
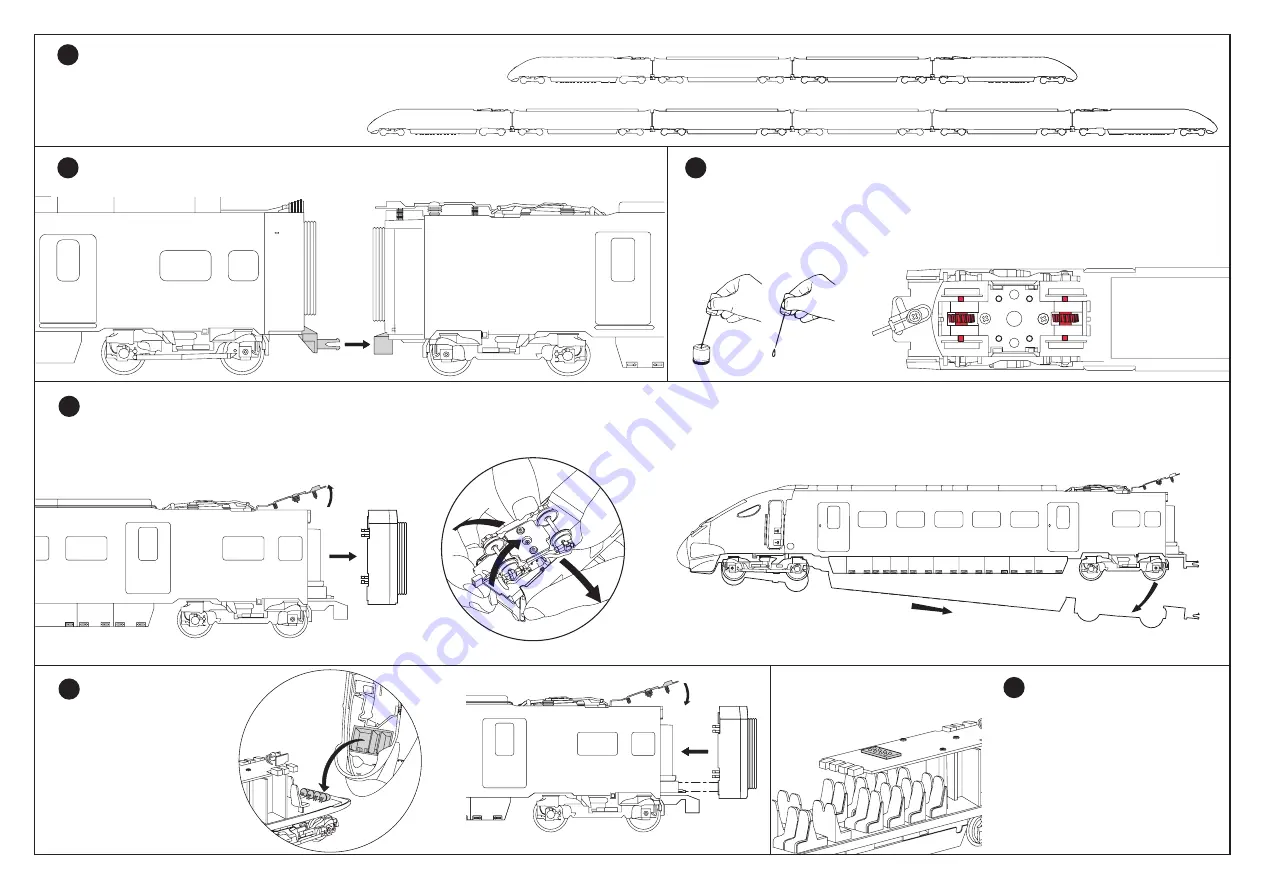
Coupling Sequence
1
Fig.2
IMPORTANT – Only apply small single drops of light machine oil to the places indicated in red in Fig.3. This
is best achieved by making a simple oil ‘dropper’ as illustrated in Fig.2. Insert a straightened paper clip into a
cork and use a bottle cap as a container for the oil. A small drop of oil can then be picked up by the dropper
and applied in exactly the right place. Immediately wipe off any excess oil, especially from the locomotive
body. Only lubricate moving parts.
Carefully unplug the detail located in the top of the body end. Ease body end off, by gently pulling away from the body, as shown in Fig.4. Gently pull the body sides at the rear end outwards and ease the chassis out as illustrated in Fig.5.
Ease the chassis down and backward to disengage it from the front of the loco (Fig.6), making sure the chassis does not catch on any small parts of the body.
Body Re-assembly
5
To re-assemble make sure that the
L.E.D.s on the chassis align with
the light box located under the cab
as illustrated in Fig.7.
Gently push the body end onto the
main body and carefully plug in the
detail located in the top of the
body end (Fig.8).
Coupling
2
Additional coaches, MS3 and MS4, are available separately to
complete the 6-car train and should be coupled in the correct
sequence as illustrated. Contact your Hornby Service Dealer
or visit the Hornby website for information.
Fig.3
1
2
DPT1
MS1
MS2
DPT2
DPT1
MS4
MS3
MS1
MS2
DPT2
Fig.6
1
2
4-Car Train
6-Car Train
For coupling coaches see Fig.1.


