background image

4  

B a y  

M U L T I  

H D D  

B O X  

U s e r  

G u i d e


1.

 Getting Started & Notice 


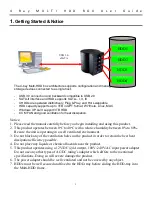
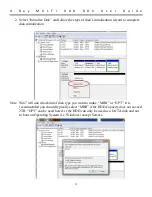
The 4-bay Multi-HDD box architecture supports configuration and management of multiple 
storage devices connected to a single host.


-

  USB 3.0 connection and backward compatible to USB 2.0 

-

  SATA-II interface and HDD supports SATA 

– I, II, III  

-

  4 HDDs are operated distinctively, Plug & Play, and Hot swappable 

-

  HDD capacity supports up to 3TB in GPT format, W7/Vista, Linux, MAC 

-


Windows XP can’t support 3TB HDD 

-

  8 CM FAN and good ventilation for heat dissipation. 


Notice: 
1.


Please read the manual carefully before you begin installing and using this product. 

2.


This product operates between 0

o

C to 40

o

C with a relative humidity between 0% to 80%. 

Be sure the unit is operating in a well ventilated environment. 

3.


Do not block any of the ventilation holes on the product in order to retain the best heat 
dissipation efficiency possible. 

4.


Do not place any liquids or chemical hazards near the product. 

5.


This product operates using a 12V/DC @4A output, 100V~240V/AC input power adapter. 
Do not use any other types of AC/DC rating’s adapter which differs to the mentioned 
specifications. Doing so will severe damage the product. 

6.


The power adapter should be well ventilated and not be covered by any object. 
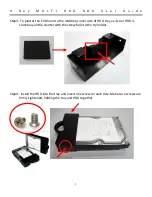
7.


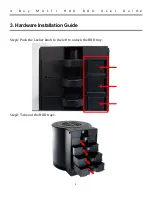
HDDs must be well secured and fixed to the HDD-tray before sliding the HDD-tray into 
the Multi-HDD frame. 
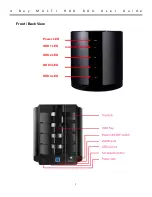
USB 3.0


eSATA


HDD4


HDD1


HDD2


HDD3


Summary of Contents for Enterprise

Page 1: ...Enterprise 3 5 SATA 4 Bay MULTI HDD BOX User Guide Include Getting Started Notice Installing MULTI HDD BOX Hardware Installation Guide Partitioning Configured Volumes ...

Page 2: ...sing this product 2 This product operates between 0o C to 40o C with a relative humidity between 0 to 80 Be sure the unit is operating in a well ventilated environment 3 Do not block any of the ventilation holes on the product in order to retain the best heat dissipation efficiency possible 4 Do not place any liquids or chemical hazards near the product 5 This product operates using a 12V DC 4A ou...

Page 3: ... 0 to the PC at the same time the PC will recognize eSATA FAN Speed Control Rotatory Knob Tuning the FAN speed to ease the noise of ventilation LED Indication Power LED Green ON Power input OFF Power Removed HDD 1 LED Blue ON HDD inserted Flashing Accessing Read Write OFF HDD not installed Removed HDD 2 LED Blue ON HDD inserted Flashing Accessing Read Write OFF HDD not installed Removed HDD 3 LED ...

Page 4: ...4 B a y M U L T I H D D B O X U s e r G u i d e 3 Front Back View Power LED HDD1 LED HDD2 LED HDD3 LED HDD4 LED ...

Page 5: ...4 B a y M U L T I H D D B O X U s e r G u i d e 4 3 Hardware Installation Guide Step1 Push the Locker knob to the left to unlock the HDD tray Step2 Take out the HDD trays ...

Page 6: ... EVA foam to the middle at inner side of HDD tray as if your HDD is somehow a little shorter with the screw hole to the try holder Step4 Install the HDD into the tray and insert one screw on each side Make sure screws are firmly tightened holding the tray and HDD together ...

Page 7: ...4 B a y M U L T I H D D B O X U s e r G u i d e 6 Step5 Slide HDD trays into the case Step5 Push the Locker knob to the right to lock the HDD tray ...

Page 8: ...llowing sections describe the procedures required to partition a volume 1 Right click the My Computer icon and select Manage from the pop up window From the Computer Management window select Disk Management under Storage to open Windows Disk Manager Note Follow the step by step instructions below to complete the HDD partitioning and formatting Each HDD has to be partitioned and formatted distincti...

Page 9: ...k on the configured disk s unallocated space and select New Partition If a New Partition option is not available select the disk and Initialize it first To initialize a disk please check the guidance on Initialize a Disk 3 Click Next to start the Partition Wizard ...

Page 10: ...4 B a y M U L T I H D D B O X U s e r G u i d e 9 4 Select the Primary or Extended option and click Next 5 Specify the partition size By default the partition occupies the entire volume Click Next ...

Page 11: ...4 B a y M U L T I H D D B O X U s e r G u i d e 10 6 Assign a drive letter or mount path and click Next 7 Name format the partition and click Next ...

Page 12: ...stem settings and click Finish to create the logical partition 9 Note the properties selected for the logical partition in the Disk Manager is surrounded by a green box 10 Repeat steps 1 through 9 to partition and format any of the remaining HDD installed in Multi HDD BOX ...

Page 13: ...icking on the Unallocated box View the box to the left of the Unallocated box You most likely would see the Not Initialized message displayed The Hard Disk Drive must be set to Online before partitioning and formatting the Hard Disk Drive 1 Right click the Not Initialized area a disk s initialization menu will appear as below ...

Page 14: ...izard to complete disk initialization Note Win 7 will ask what kind of disk type you want to make MBR or GPT It is recommended you should typically select MBR if the HDD Capacity does not exceed 2TB GPT can be used however the HDD can only be used as a DATA disk and not to boot an Operating System i e Windows except Servers ...

Page 15: ...4 B a y M U L T I H D D B O X U s e r G u i d e 14 3 Online message will replace Not Initialization message when disk is initialized and ready for disk partitioning and formatting ...

Page 16: ...rt information 2010 2011 Hornettek LLC All Rights Reserved Hornettek the Hornettek logo the original product images taken by Hornettek and all Hornettek based trademarks are registered in the United States and other countries Unauthorized use of Hornettek s Name Images Logos Trademarks or unauthorized copy of product without permission from Hornettek is in violation of U S and International copyri...

Reviews: