7
GB
Instruction
To turn on the power
Slide the switch
ELECTRICAL SAFETY
When using electric machines always observe the safety regulations applicable in your country to
reduce the risk of fi re, electric shock and personal injury. Read the following safety instructions and also
the enclosed safety instructions.
Always check that the power supply corresponds to the voltage on the rating plate.
Class II machine – Double insulation – You don’t need any earthed plug
Replacing cables or plugs
If the power cord is damaged, it must be replaced by the manufacturer or its service agent or a similarly
qualifi ed person, in order to avoid a hazard. Immediately throw away old cables or plugs when they
have been replaced by new ones. It is dangerous to insert the plug of a loose cable in the wall outlet.
Using extension cables
Only use an approved extension cable suitable for the power input of the machine. The minimum
conductor size is 1.5 mm
2
. When using a cable reel always unwind the reel completely. Inadequate
extension cords can be dangerous. If an extension cord is used, it shall be suitable for outdoor use, and
the connection has to be kept dry and off the ground. It is recommended that this is accomplished by
means of a cord reel which keeps the socket at least 60 mm above the ground.
OPERATION
Always use with caution! Do NOT cover the ventilation openings during use as it
causes a risk of burns! Do not touch the hot nozzle!
Temperature settings
With the temperature switch you can select from two temperature settings. Depending on the applica-
tion, you can use the following settings:
Setting I:
50°C (cooling)
Setting II:
600°C
The volume of air in each setting: 500 litres/minute
To turn on the power
Slide the switch
to position II, the unit is switched on.
To cool the device
After working with the device at high temperature setting (Setting II), the device is getting very hot. So
it is suggested to slide the switch
to setting I, to quickly cool down the device before turning it off
and storing it.
ENGLISH
7
BSI0616bsThKi_19489.indd 7
16/09/16 10:33
to position II, the unit is switched on.
To cool the device
After working with the device at high temperature setting (Setting II), the device is getting very hot. So
it is suggested to slide the switch
ELECTRICAL SAFETY
When using electric machines always observe the safety regulations applicable in your country to
reduce the risk of fi re, electric shock and personal injury. Read the following safety instructions and also
the enclosed safety instructions.
Always check that the power supply corresponds to the voltage on the rating plate.
Class II machine – Double insulation – You don’t need any earthed plug
Replacing cables or plugs
If the power cord is damaged, it must be replaced by the manufacturer or its service agent or a similarly
qualifi ed person, in order to avoid a hazard. Immediately throw away old cables or plugs when they
have been replaced by new ones. It is dangerous to insert the plug of a loose cable in the wall outlet.
Using extension cables
Only use an approved extension cable suitable for the power input of the machine. The minimum
conductor size is 1.5 mm
2
. When using a cable reel always unwind the reel completely. Inadequate
extension cords can be dangerous. If an extension cord is used, it shall be suitable for outdoor use, and
the connection has to be kept dry and off the ground. It is recommended that this is accomplished by
means of a cord reel which keeps the socket at least 60 mm above the ground.
OPERATION
Always use with caution! Do NOT cover the ventilation openings during use as it
causes a risk of burns! Do not touch the hot nozzle!
Temperature settings
With the temperature switch you can select from two temperature settings. Depending on the applica-
tion, you can use the following settings:
Setting I:
50°C (cooling)
Setting II:
600°C
The volume of air in each setting: 500 litres/minute
To turn on the power
Slide the switch
to position II, the unit is switched on.
To cool the device
After working with the device at high temperature setting (Setting II), the device is getting very hot. So
it is suggested to slide the switch
to setting I, to quickly cool down the device before turning it off
and storing it.
ENGLISH
7
BSI0616bsThKi_19489.indd 7
16/09/16 10:33
to setting I, to quickly cool down the device before turning it off.
and storing it.
To turn off the appliance
Slide the switch
ELECTRICAL SAFETY
When using electric machines always observe the safety regulations applicable in your country to
reduce the risk of fi re, electric shock and personal injury. Read the following safety instructions and also
the enclosed safety instructions.
Always check that the power supply corresponds to the voltage on the rating plate.
Class II machine – Double insulation – You don’t need any earthed plug
Replacing cables or plugs
If the power cord is damaged, it must be replaced by the manufacturer or its service agent or a similarly
qualifi ed person, in order to avoid a hazard. Immediately throw away old cables or plugs when they
have been replaced by new ones. It is dangerous to insert the plug of a loose cable in the wall outlet.
Using extension cables
Only use an approved extension cable suitable for the power input of the machine. The minimum
conductor size is 1.5 mm
2
. When using a cable reel always unwind the reel completely. Inadequate
extension cords can be dangerous. If an extension cord is used, it shall be suitable for outdoor use, and
the connection has to be kept dry and off the ground. It is recommended that this is accomplished by
means of a cord reel which keeps the socket at least 60 mm above the ground.
OPERATION
Always use with caution! Do NOT cover the ventilation openings during use as it
causes a risk of burns! Do not touch the hot nozzle!
Temperature settings
With the temperature switch you can select from two temperature settings. Depending on the applica-
tion, you can use the following settings:
Setting I:
50°C (cooling)
Setting II:
600°C
The volume of air in each setting: 500 litres/minute
To turn on the power
Slide the switch
to position II, the unit is switched on.
To cool the device
After working with the device at high temperature setting (Setting II), the device is getting very hot. So
it is suggested to slide the switch
to setting I, to quickly cool down the device before turning it off
and storing it.
ENGLISH
7
BSI0616bsThKi_19489.indd 7
16/09/16 10:33
to position 0, the unit is switched off.
To install the nozzle
The nozzles can easily be pushed over the hot air nozzle. Never touch the
nozzles during or immediately after use of the device. The nozzles are very hot.
MAIN FUNCTION: WEED BURNER
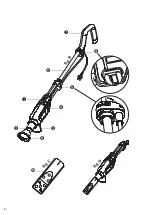
Assemble the extension handle
Attach the extension handle to the device. Make sure that the extension handle firmly clicks into position.
If using the device as a weed burner, you must use the extension handle. Hold the weed burner
firrmly by holding the end of the extension handle.
Use
Ensure the extension handle is firmly fixed onto the device and that it is turned off.
•
Install the weeding nozzle
•
To turn off the appliance
Slide the switch
to position 0, the unit is switched off .
To install the nozzle
The nozzles can easily be pushed over the hot air nozzle. Never touch the
nozzles during or immediately after use of the device. The nozzles are very hot.
MAIN FUNCTION: WEED BURNER
Assemble the extension handle
Attach the extension handle to the device. Make sure that the extension handle fi rmly clicks into po-
sition. If using the device as a weed burner, you must use the extension handle. Hold the weed burner
fi rmly by holding the end of the extension handle.
Use
³
Ensure the extension handle is fi rmly fi xed onto the device and that it is turned off
³
Install the weeding nozzle
to the device
³
Connecting to power supply and insert the plug into the power socket
This product is designed with a cord retainer that prevents the power cord from being pulled loose
while using. If using the device as a weed burner you must make sure the power cord is retained by
the cord retainer before plugging it into the power socket.
³
Check to ensure the nozzle is not blocked before turning the device on
³
Set the temperature to setting II
³
Allow the device about 45 seconds to heat up
³
To kill weeds, hold the weeding nozzle over the weeds for about 5 seconds. During these 5 seconds
the cell structure of the weed is destroyed. As a result, the weed dies within a few days
³
It is not necessary to completely burn the weeds, 5 seconds is more than suffi cient
³
For an effi cient treatment, the weeding nozzle should be held around 0 to 5 cm above the weeds
³
The eff ects are not visible immediately but it will take a while before they can be seen. It is more of
a long-term eff ect.
Keep all parts of the body away from the metal heating head. Do not touch it before
it is cooled down. Carry the appliance by the handle, even when the metal heating
head is cooled down. Hold the appliance by insulated gripping surfaces only. Keep
the cable away from the metal heating head. As personal protection equipment, one
can wear safety boots while operating the weed burner.
8
BSI0616bsThKi_19489.indd 8
16/09/16 10:33
to the device.
Connecting to power supply and insert the plug into the power socket.
•
This product is designed with a cord retainer that prevents the power cord from being pulled loose
while using. If using the device as a weed burner you must make sure the power cord is retained by
the cord retainer before plugging it into the power socket.
Check to ensure the nozzle is not blocked before turning the device on.
•
Set the temperature to setting II.
•
Allow the device about 45 seconds to heat up.
•
To kill weeds, hold the weeding nozzle over the weeds for about 5 seconds. During these 5 seconds
•
the cell structure of the weed is destroyed. As a result, the weed dies within a few days.
It is not necessary to completely burn the weeds, 5 seconds is more than sufficient.
•
For an efficient treatment, the weeding nozzle should be held around 0 to 5 cm above the weeds.
•
The effects are not visible immediately but it will take a while before they can be seen. It is more of
•
a long-term effect.
Keep all parts of the body away from the metal heating head. Do not touch it before
it is cooled down. Carry the appliance by the handle, even when the metal heating
head is cooled down. Hold the appliance by insulated gripping surfaces only. Keep
the cable away from the metal heating head. As personal protection equipment, one
can wear safety boots while operating the weed burner.
ELECTRICAL SAFETY
When using electric machines always observe the safety regulations applicable in your country to
reduce the risk of fi re, electric shock and personal injury. Read the following safety instructions and also
the enclosed safety instructions.
Always check that the power supply corresponds to the voltage on the rating plate.
Class II machine – Double insulation – You don’t need any earthed plug
Replacing cables or plugs
If the power cord is damaged, it must be replaced by the manufacturer or its service agent or a similarly
qualifi ed person, in order to avoid a hazard. Immediately throw away old cables or plugs when they
have been replaced by new ones. It is dangerous to insert the plug of a loose cable in the wall outlet.
Using extension cables
Only use an approved extension cable suitable for the power input of the machine. The minimum
conductor size is 1.5 mm
2
. When using a cable reel always unwind the reel completely. Inadequate
extension cords can be dangerous. If an extension cord is used, it shall be suitable for outdoor use, and
the connection has to be kept dry and off the ground. It is recommended that this is accomplished by
means of a cord reel which keeps the socket at least 60 mm above the ground.
OPERATION
Always use with caution! Do NOT cover the ventilation openings during use as it
causes a risk of burns! Do not touch the hot nozzle!
Temperature settings
With the temperature switch you can select from two temperature settings. Depending on the applica-
tion, you can use the following settings:
Setting I:
50°C (cooling)
Setting II:
600°C
The volume of air in each setting: 500 litres/minute
To turn on the power
Slide the switch
to position II, the unit is switched on.
To cool the device
After working with the device at high temperature setting (Setting II), the device is getting very hot. So
it is suggested to slide the switch
to setting I, to quickly cool down the device before turning it off
and storing it.
ENGLISH
7
BSI0616bsThKi_19489.indd 7
16/09/16 10:33
Summary of Contents for 211-320
Page 2: ...2 F i g B F i g C F i g D 2...
Page 9: ...9 F i g B F i g C F i g D 2...
Page 16: ...F i g B F i g C F i g D 2 16...
Page 23: ...F i g B F i g C F i g D 2 23...
Page 30: ...30...
Page 31: ...31...
Page 32: ...32...


