


Takuu
Tuotetakuu alkaa ostopäivästä. Säilytä aina alkuperäinen kuitti, jossa näkyy tuotteen nimi, ostopäivä
ja – paikka. Takuuasioissa ota aina yhteys myymälään.
Tuoteviat pyritään korjaamaan varaosin
Mikäli koko tuote joudutaan vaihtamaan, saattaa korvaavassa tuotteessa olla pieniä sävyyn tai malliin
liittyviä eroja.
Tuotteessa ilmenevät viat, jotka ovat aiheutuneet laitteen ohjeiden vastaisesta käytöstä, eivät kuulu
takuun piiriin.
Takuu ei myöskään kata vikoja, jotka ovat aiheutuneet käyttäjän itse tekemistä muutoksista tai
asennuksista laitteeseen. Takuu ei kata myöskään Force Majeure -tilanteita, kuten tulipalo, salama, tulva
tai kuljetusvahinko. Takuu ei myöskään enää ole voimassa, jos laitteen korjausta on yrittänyt joku muu kuin
valtuutettu korjaaja.
11
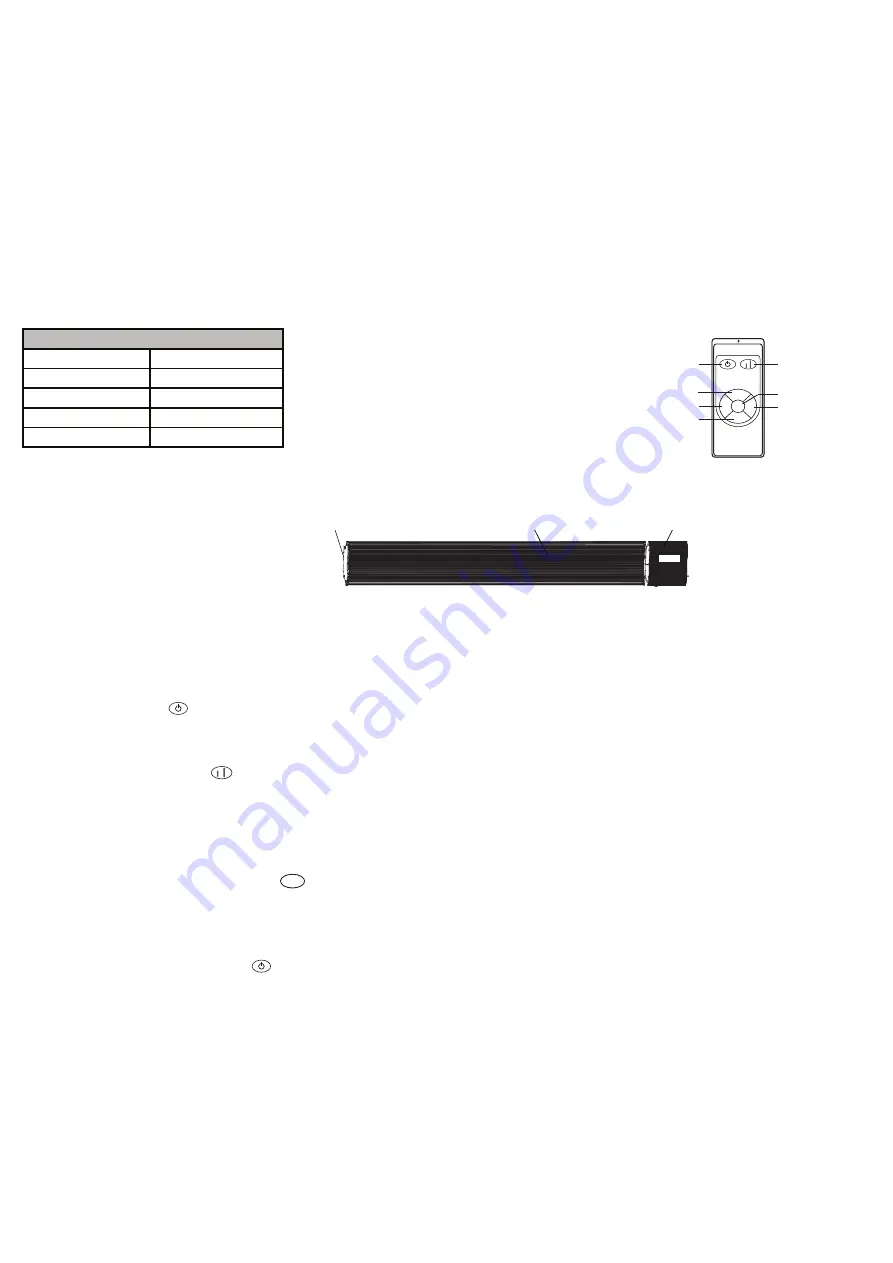
Kaukosäädin
Käynnistys: päälle / pois (ON/OFF)
Tehovalinta: puoliteho/täysteho (LOW/HIGH)
1 tunnin ajastin
2 tunnin ajastin
3 tunnin ajastin
4 tunnin ajastin
5 tunnin ajastin
THE-18DS(A)
THE-12DS(A)
THE-24DS(A)
THE-30DS(A)
L1
L2
1h
2h
3h
4h
5h
1
2
4
5
7
6
3
1
、
Display
screen ON/OFF button 2
、
HIGH/LOW function
button
3
、
1h timing button
4
、
5h timing button
5
、
2h timing button
6
、
4h timing button
7
、
3h timing button
Press
" "
the power light is lighting , the product is
ready to working.
2.3
HIGH\LOW function
button
Press
" "
,you can set the product power is high or low,the function light
is lighting..
Timing
set
button
Press
"
"
timing button , you can set 1(max
=
5hours)
hour working ,the time light is linghting
,
after
the
time
set
,
the
system
will
automatically
save
and
product is
working untill the seting time,the time light is out.
2. 4
1h
High
function light
Power light
Low function light
Timing set light
935
1235
1535
1835
Näyttö- ja säädinyksikkö
Lämpöelementti
Ulkokuori
KÄYTTÖOHJEET
Käynnistys
Laitteen näyttöön syttyy valmiustilan valo, kun laite on kytketty verkkovirtaan ja laitteen sivussa oleva
•
virtakytkin on asennossa “ON”.
Paina nappia “ ” (nappi 1) kaukosäätimessä käynnistääksesi lämmittimen.
•
Lämmitystehon valinta
Painamalla nappia (nappi 2) kaukosäätimessä, voit valita joko puolitehon (LOW, 900W) tai täyste-
•
hon (HIGH, 1800W). Kun painat nappia kerran, syttyy yksi vihreä valo ja lämmitin on 900W puoliteholla.
Kun painat nappia toisen kerran, syttyy kaksi vihreää valoa ja lämmitin on 1800W täydellä teholla.
Ajastintoiminto
Kaukosäätimen napeilla 3-7 voit asettaa laitteen sammumaan ajastetusti 1,2,3,4 tai 5 tunnin kulut-
•
tua.
Sammuttaminen
Paina uudelleen nappia “ ” (nappi 1) kaukosäätimessä sammuttaaksesi lämmittimen valmiustilaan.
•
Mallinumero
THE-18DS (A)
Tuotenumero
211-331
Virtalähde
230V AC ~ 50 Hz
Virrankulutus
1800W
IP luokitus
IP44
Tuotetiedot
THE-18DS(A)
THE-12DS(A)
THE-24DS(A)
THE-30DS(A)
L1
L2
1h
2h
3h
4h
5h
1
2
4
5
7
6
3
1、Display screen ON/OFF button 2、 HIGH/LOW function button
3、1h timing button
4、5h timing button
5、2h timing button
6、4h timing button
7、3h timing button
Press
" "
the power light is lighting , the product is
ready to working.
2.3
HIGH\LOW function
button
Press
" "
,you can set the product power is high or low,the function light
is lighting..
Timing
set
button
Press
"
"
timing button , you can set 1(max=5hours)
hour working ,the time light is linghting,after the time
set ,the system will automatically save and product is
working untill the seting time,the time light is out.
2. 4
1h
High
function light
Power light
Low function light
Timing set light
935
1235
1535
1835
TIME
2
.
5
temperature
setting
Press
" "
or
" "
you
can
set
the
temperature
,
press
the
" "
or
" "
to
increase
or
decrease
1
℃.
The
maximum
is
36
℃,
the
lowest
is
5
℃.
Finally
,
set
the
temperature
to
the
effective
temperature
,
the
system
will
automatically
save
the
set
temperature
,
and
automatically
to
operational
status
,
and
displays
the
room
return
temperature
.
2
.
6
Timing
switch
OFF
setting
When
press
the
" " ,
the
"
88
"
will
flashes
,
then
press
the
" "
or
" "
you
can
set
the
time
,
the
minimum
set
-
up
time
is
one
hour
,
the
maximum
set
time
is
9
hours
.
Each
time
you
press
the
" "
or
" "
the
time
will
increase
or
decrease
by
1
hour
.
After
the
time
set
,
the
system
will
automatically
save
and
return
to
operational
status
,
temperature
and
time
again
exchanged
display
.
3 Switch
OFF
.
Press
" "
to
turn
off
the
device
at
any
time
,
except
for
the
power
light
no
display
outside
any
state
.
4 WARNING
.
This
heater
heats
up
when
in
use
.
To
avoid
burns
,
do
not
touch
the
surface
.
hot
5 SERVICE
.
When
you
require
service
,
contact
the
local
dealer
or
qualified
service
center
.
The function of switch on the screen.
Press
" ",
the screen will power off but indication light will be lighting,
Press
" "
again the screen will be lighting again.
ECO
ECO
2
.
4
Display
screen
ON
/
OFF
function
OPERATION
GUIDE
1
.
Before
first
use
,
please
read
this
manual
1
.
1
Take
out
the
heater
from
the
carton
carefully
.
please
save
the
carton
for
off-season
storage
,
1
.
2
Firmly
fixed
heaters
according
to
the
installation
instructions,
1
.
3
Do
not
use
the
same
socket
with
other
high-power
appliance
to
avoid
overloading
.
2 Switch
ON
.
2
.
1
The
power
light
flashes
when
heater
is
connected
with
power
.
2
.
3
lock
function
Press
the
fir
firstly
when
operation
then
press
the
and
"
LOCK
"
" "
" "
indicator
lights
light
up
.
all
keys
are
invalid
when
Lock
function
is
activated
.
LOCK
Press
turn on the heater, screen show temperature of the room, if it
lower than preset temperature , the heater will be worked. Indicator light
will blink.
" "
2
.
2
CIRCUIT
DIAGRAM
4
PRODUCT
SIZE
Model
Power
Length
(
mm
)
Wide
(
mm
)
High
(
mm
)
THC
-
12D
1200W
900
150
65
THC
-
18D
1800W
1200
150
65
THC
-
20D
2000W
1350
150
65
THC
-
24D
2400W
1500
150
65
PRODUCT
INSTRUCTION
Heating Plate
Out Covering
THC
-
30D
3000W
1800
150
65
Control Box
5
220V-240V 50Hz
L
N
N1
NTC
Heating plate
1
2
3
4
5
6
ION
Set
TIME
ECO
PRODUCT
CONTROL
PANEL
1. Power
Switch
button
2. Display
screen
ON
/
OFF
button
3. Up
button
4. Lock
button
LOCK
L1
5. timing
switch
6. Down
button
Switch
6 REPLACEMENT
OF
POWER
CORD
.
The
power
cord
damaged
must
be
replaced
by
a
service
agent
or
equivalent
persons
in
order
to
prevent
a
hazard
.
7 CHILD
SUPERVISION
.
This
appliance
is
not
intended
to
be
use
by
children
or
infirm
persons
without
supervision
.
TIME
2
.
5
temperature
setting
Press
" "
or
" "
you
can
set
the
temperature
,
press
the
" "
or
" "
to
increase
or
decrease
1
℃.
The
maximum
is
36
℃,
the
lowest
is
5
℃.
Finally
,
set
the
temperature
to
the
effective
temperature
,
the
system
will
automatically
save
the
set
temperature
,
and
automatically
to
operational
status
,
and
displays
the
room
return
temperature
.
2
.
6
Timing
switch
OFF
setting
When
press
the
" " ,
the
"
88
"
will
flashes
,
then
press
the
" "
or
" "
you
can
set
the
time
,
the
minimum
set
-
up
time
is
one
hour
,
the
maximum
set
time
is
9
hours
.
Each
time
you
press
the
" "
or
" "
the
time
will
increase
or
decrease
by
1
hour
.
After
the
time
set
,
the
system
will
automatically
save
and
return
to
operational
status
,
temperature
and
time
again
exchanged
display
.
3 Switch
OFF
.
Press
" "
to
turn
off
the
device
at
any
time
,
except
for
the
power
light
no
display
outside
any
state
.
4 WARNING
.
This
heater
heats
up
when
in
use
.
To
avoid
burns
,
do
not
touch
the
surface
.
hot
5 SERVICE
.
When
you
require
service
,
contact
the
local
dealer
or
qualified
service
center
.
The function of switch on the screen.
Press
" ",
the screen will power off but indication light will be lighting,
Press
" "
again the screen will be lighting again.
ECO
ECO
2
.
4
Display
screen
ON
/
OFF
function
OPERATION
GUIDE
1
.
Before
first
use
,
please
read
this
manual
1
.
1
Take
out
the
heater
from
the
carton
carefully
.
please
save
the
carton
for
off-season
storage
,
1
.
2
Firmly
fixed
heaters
according
to
the
installation
instructions,
1
.
3
Do
not
use
the
same
socket
with
other
high-power
appliance
to
avoid
overloading
.
2 Switch
ON
.
2
.
1
The
power
light
flashes
when
heater
is
connected
with
power
.
2
.
3
lock
function
Press
the
fir
firstly
when
operation
then
press
the
and
"
LOCK
"
" "
" "
indicator
lights
light
up
.
all
keys
are
invalid
when
Lock
function
is
activated
.
LOCK
Press
turn on the heater, screen show temperature of the room, if it
lower than preset temperature , the heater will be worked. Indicator light
will blink.
" "
2
.
2
CIRCUIT
DIAGRAM
4
PRODUCT
SIZE
Model
Power
Length
(
mm
)
Wide
(
mm
)
High
(
mm
)
THC
-
12D
1200W
900
150
65
THC
-
18D
1800W
1200
150
65
THC
-
20D
2000W
1350
150
65
THC
-
24D
2400W
1500
150
65
PRODUCT
INSTRUCTION
Heating Plate
Out Covering
THC
-
30D
3000W
1800
150
65
Control Box
5
220V-240V 50Hz
L
N
N1
NTC
Heating plate
1
2
3
4
5
6
ION
Set
TIME
ECO
PRODUCT
CONTROL
PANEL
1. Power
Switch
button
2. Display
screen
ON
/
OFF
button
3. Up
button
4. Lock
button
LOCK
L1
5. timing
switch
6. Down
button
Switch
6 REPLACEMENT
OF
POWER
CORD
.
The
power
cord
damaged
must
be
replaced
by
a
service
agent
or
equivalent
persons
in
order
to
prevent
a
hazard
.
7 CHILD
SUPERVISION
.
This
appliance
is
not
intended
to
be
use
by
children
or
infirm
persons
without
supervision
.
THE-18DS(A)
THE-12DS(A)
THE-24DS(A)
THE-30DS(A)
L1
L2
1h
2h
3h
4h
5h
1
2
4
5
7
6
3
1、Display screen ON/OFF button 2、 HIGH/LOW function button
3、1h timing button
4、5h timing button
5、2h timing button
6、4h timing button
7、3h timing button
Press
" "
the power light is lighting , the product is
ready to working.
2.3
HIGH\LOW function
button
Press
" "
,you can set the product power is high or low,the function light
is lighting..
Timing
set
button
Press
"
"
timing button , you can set 1(max=5hours)
hour working ,the time light is linghting,after the time
set ,the system will automatically save and product is
working untill the seting time,the time light is out.
2. 4
1h
High
function light
Power light
Low function light
Timing set light
935
1235
1535
1835


