background image

Warranty

The product warranty is pursuant to the Danish Sale of Goods Act.The warranty period starts on the day 

the product was purchased.

Warranty handling

A defective product must be returned to the place of purchase along with a valid receipt. If the product be-

comes defective during the warranty period, the product must be returned to the place of purchase. 

Warranty disclaimer

Damage or defects resulting from neglect or improper use of the product is not covered by the warranty. 

The warranty does not cover force majeure such as lightning, flood, fire or damage occurred during trans

-

port. Warranty cover will be void, if the product’s serial number has been changed, if any modifications 

have been made or if a repair has been attempted by any unauthorized service centre.

5

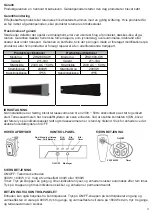
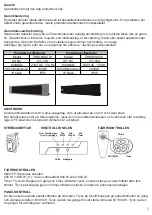
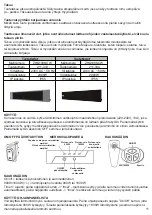
Model no. 

ZHQ1898-CW

Model no. 

ZHQ1898-CW

Art. No.

211-333

Art. No.

211-334

Power source

230V AC ~ 50 Hz

Power source

230V AC ~ 50 Hz

Consumption

2000W

Consumption

2000W

Protection class

IP55

Protection class

IP55

Product specifications

Product specifications

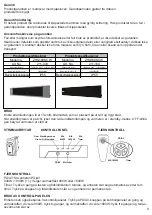
OPERATING INSTRUCTIONS

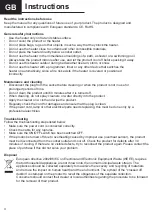
When the installation is complete, connect the heater to a 230V ~ 50Hz outlet in a dry and safe place. The 

heater has the main switch on the unit itself. By pushing the switch to ON, the first light on the indicator 

panel turns red and the heater is in standby mode. Turn off the unit by pushing the main switch to OFF.

MAIN SWITCH 


CONTROL PANEL   


REMOTE CONTROL

REMOTE CONTROL

ON/OFF: SwitchS the device ON/OFF.

900W / 1800W (+/-): Selecting heat output 900W or 1800W.

Timer: Press the button once and the timer indicator lights up and the device automatically turns off after 

five hours. Press the button again and the timer indicator turns off and the device is permanently on.

OPERATING THE UNIT FROM THE CONTROL PANEL 

You can also press the panel control of the heater, press the ON/OFF button on the control panel one time, 

the heater will be on 900W power, press it two times, the heater will be on 1800W power, press it three 

times, the heater will be off.

Red: Stand-by mode

Green: Power-mode

Blue:

900W

Blue: 

1800W

Blue: 

Timer

ON/OFF

Receiver

ON/OFF

Timer

900/1800W

Summary of Contents for ZHQ1898-CW

Page 1: ...Instruktioner Instruksjoner Ohjeet Imported by Importeret af NSH NORDIC A S Virkefeltet 4 DK 8740 Braedstrup Made in PRC Wall ceiling model with remote control Art no 211 333 211 334 PATIO HEATER No G...

Page 2: ...roduktet P f r reng ringsmiddel p en klud og aft r produktet Kontroller regelm ssigt at ledningen ikke er beskadiget og at stikket er rent Hvis str mledningen skal udskiftes m det kun g res af en auto...

Page 3: ...t eller hvis produktet er fors gt repareret af en udenforst ende tredjepart 3 IBRUGTAGNING N r installationen er f rdig tilslut terrassevarmeren til en 230V 50Hz stikkontakt p et t rt og sikkert sted...

Page 4: ...or water directly into the product Apply the cleaner on a cloth and wipe the product Regularly check the cord for damages and ensure that the plug is clean If the power cord lamp or other electrical p...

Page 5: ...n class IP55 Protection class IP55 Product specifications Product specifications OPERATING INSTRUCTIONS When the installation is complete connect the heater to a 230V 50Hz outlet in a dry and safe pla...

Page 6: ...raya inte reng ringsmedel eller vatten direkt i produkten Applicera reng ringsmedel p en trasa och torka av produkten Kontrollera regelbundet sladden f r skador och se till att kontakten r ren Om str...

Page 7: ...g 2000W IP klass IP55 IP klass IP55 Produktspecifikationer Produktspecifikationer FJ RRKONTROLLEN ON OFF Sl r p av enheten 900 W 1800 W Val av v rmeeffekt 900 W eller 1800 W Timer Tryck p knappen en g...

Page 8: ...les da dette forlenger produktets levetid og utseende I kystn re omr der b r produktet rengj res hyppigere grunnet luftens saltinnhold Kontroller regelmessig at ledningen ikke er skadet og at kontakte...

Page 9: ...000W Str mforbruk 2000W Beskyttelsesklasse IP55 Beskyttelsesklasse IP55 Produktspeesifikasjoner Produktspeesifikasjoner FJERNKONTROLL P AV Sl enheten P AV 900W 1800W Velger varmeeffekt 900W eller 1800...

Page 10: ...la irti pistorasiasta tunnin ajan ennen kuin puhdistat sen Puhdistettaessa laitetta l suihkuta vett tai puhdistusainetta suoraan laitteeseen Lis puhdistusaine ensin siivousliinaan ja pyyhi tuote S nn...

Page 11: ...s on valmis kytke l mmittimen verkkojohto maadoitettuun pistorasiaan 220 240V 13A joka sijaitsee kuivassa ja turvallisessa paikassa L mmittimess on laitteen p virtakytkin Painamalla kytkin asentoon ON...

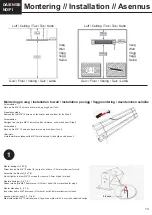
Page 12: ...present and that there are no components left in the box and that the heater head is free from any packing material Using the detailed drawing follow the steps to assemble your heater Do not connect t...

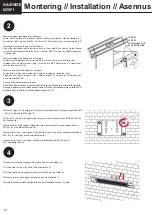
Page 13: ...n och anv nd dem i Steg 2 Forberedelse Fjern de fire M6 10 skruene fra varmeren og bruk dem i trinn 2 Valmistelu Irrota l mmittimen takaa nelj M6 10 mutteria osa 3 ja k yt ne vaiheessa 2 2 3 mm Monter...

Page 14: ...ruene 3 Trekk dem med en unbrakon kkel 10 Asenna kiinnike l mmittimen taakse Siirr l mmittimen takana kiskossa liikkuvat nelj vastakappaletta keskelle l mmitint Asenna aikaisemmassa vaiheessa kokoamas...

Page 15: ...change the position of the M4 8 screws 7 and the M6 10 screws 3 for the best Angle of heating We have 6 positions for your choice near 0 16 32 and far 0 16 and 32 Du kan byta position p M4 8 skruvarna...

Page 16: ...mm och 788 mm Montera fast beslaget 6 med fyra M6 18 skruvar Sp nn dem med en insexnyckel 10 Juster de fire skyvekontrollene som ligger inne i sporet Avstanden mellom skyvekontrollene skal v re mellom...

Reviews: