67
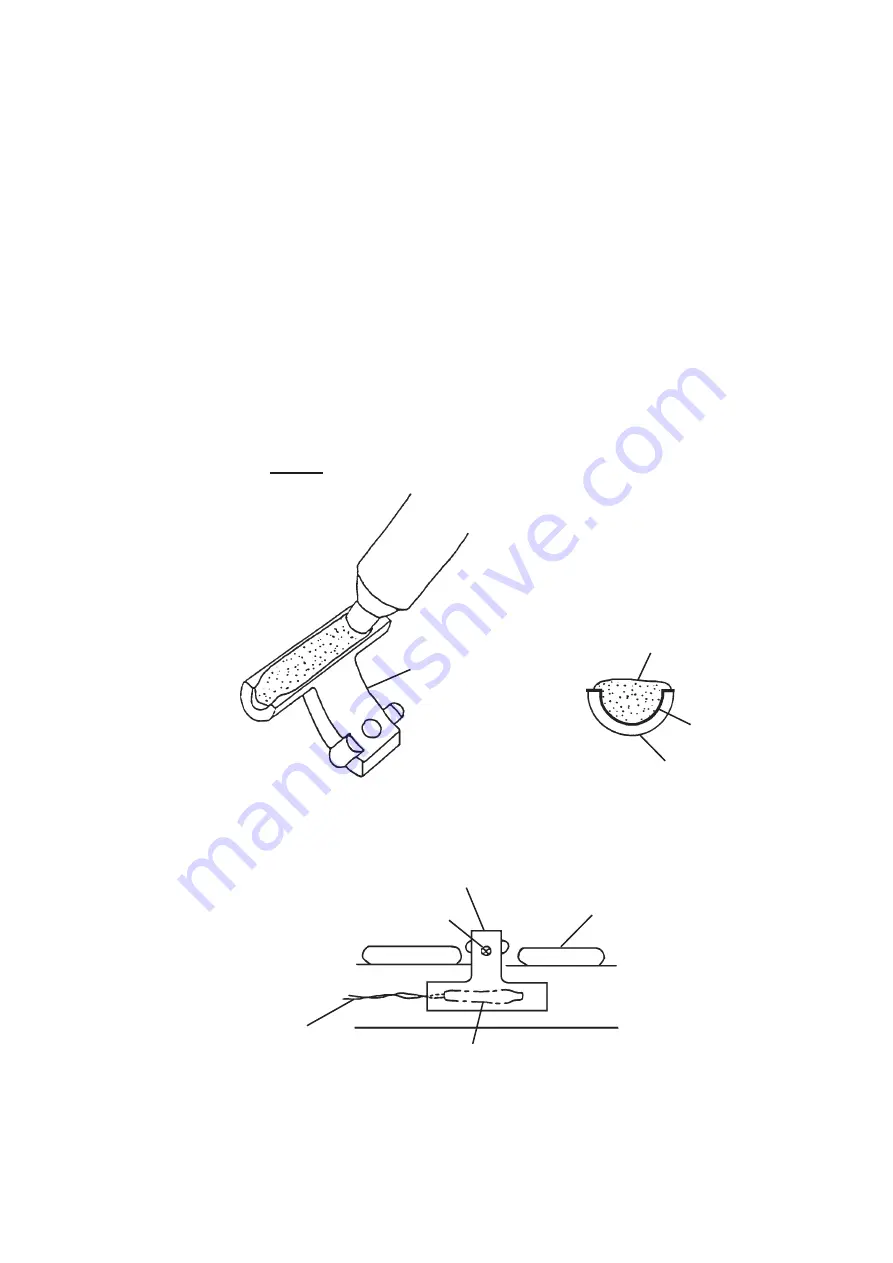
Fig. 17
Sealant
Sealant
Holder
Holder
Holder
Evaporator
Screw
** Leads
** Thermistor
** Thermistor and leads are FRAGILE.
HANDLE WITH CARE.
* Insert aluminum tape or foil
between holder and sealant.
* Aluminum Tape
14. THERMISTOR FOR CUBE CONTROL
1) Unplug the icemaker or disconnect the power source.
2) Remove the top and front panels.
3) Remove the connector CN13 on the controller board, referring to “13.
CONTROLLER BOARD”.
4) Unscrew and remove the thermistor holder and thermistor, located on the evaporator
(front side).
5) Install the new thermistor in the reverse order of the removal procedure, by using a
sealant (high-thermal conduct type). See Fig. 17.
Note: Recommended sealant is KE4560RTV, manufactured by Shin-Etsu Silicones.
When other type of sealant used, the cube size and performance will be
changed. Do not use silicone sealant as this will insulate the thermistor.
Summary of Contents for IM-240ANE
Page 4: ...1 I SPECIFICATIONS 1 DIMENSIONS SPECIFICATIONS a IM 240DNE Air cooled ...
Page 5: ...2 b IM 240DNE C Air cooled ...
Page 6: ...3 c IM 240DWNE Water cooled ...
Page 7: ...4 d IM 240DWNE C Water cooled ...
Page 8: ...5 e IM 240DWNE R452 Water cooled ...
Page 9: ...6 f IM 240ANE Air cooled ...
Page 10: ...7 g IM 240AWNE Water cooled ...
Page 11: ...8 h IM 240DSNE Remote Air cooled ...
Page 12: ...9 j URC 240C E 4 Condenser Unit ...
Page 20: ...17 a CONTROLLER BOARD LAYOUT Main Board Sub Board Combination ...
Page 37: ...34 2 WIRING DIAGRAM a IM 240DNE C XNE C IM 240DWNE C R452 XWNE C R452 IM 240ANE AWNE ...
Page 38: ...35 b IM 240DSNE XSNE URC 240C E 4 ...
Page 69: ...66 Fig 16 Controller Board Board Support Control Box Cover Screw ...


